酷豆软件及云平台介绍汇总
1-0 多弦办公国内版使用文档
2-0 多弦办公海外版使用文档
3-0 多弦办公APP使用文档(中文版)
4-0 多弦 PaaS 系统接口清单
8-0 云证核验系统介绍(1.2.2)
6-0 共享空间系统介绍
7-0 我的门钥匙小程序使用手册(历史版)
1-1 多弦办公国内版功能清单
3-1 多弦办公APP使用文档(英文版)
5-0 粮仓安全管理系统功能清单
5-1 粮仓安全管理系统需求书
5-2 粮仓安全管理系统标准版方案
5-3 粮仓安全管理系统用户手册
7-1 我的门钥匙小程序流程汇总(历史版)
9-0 凡汐 APP 功能清单
文档
-
+
首页
3-1 多弦办公APP使用文档(英文版)
#### 本地链接 [【附件】多弦办公APP使用文档(英文版).docx](/media/attachment/2024/12/%25E5%25A4%259A%25E5%25BC%25A6%25E5%258A%259E%25E5%2585%25ACAPP%25E4%25BD%25BF%25E7%2594%25A8%25E6%2596%2587%25E6%25A1%25A3%25E8%258B%25B1%25E6%2596%2587%25E7%2589%2588.docx) #### 使用文档 # Register and login Register and log in to the system The main content of this chapter: * 1. Register account 2. Login ## 1\.1 Register account Click on【Register a new account】', enter the email, verification code, and password, and click on【REGSISTER】to successfully register. 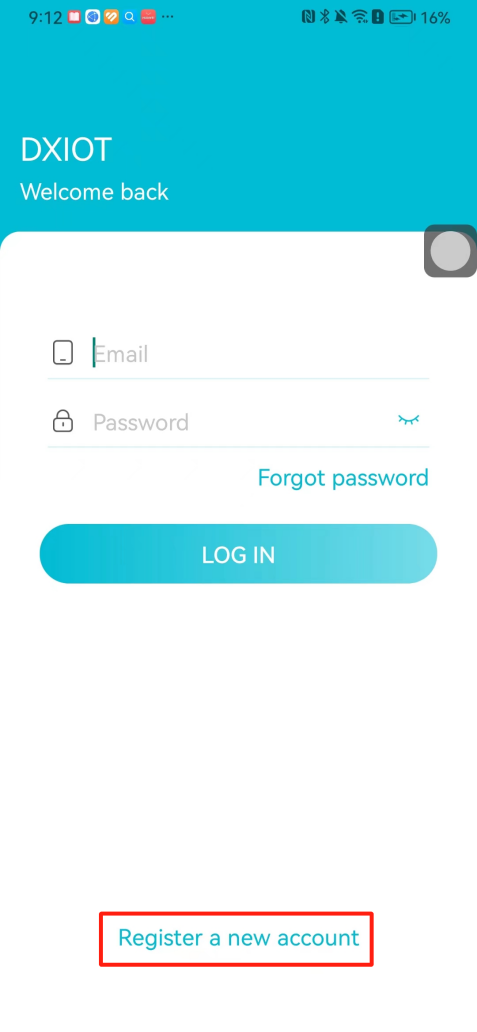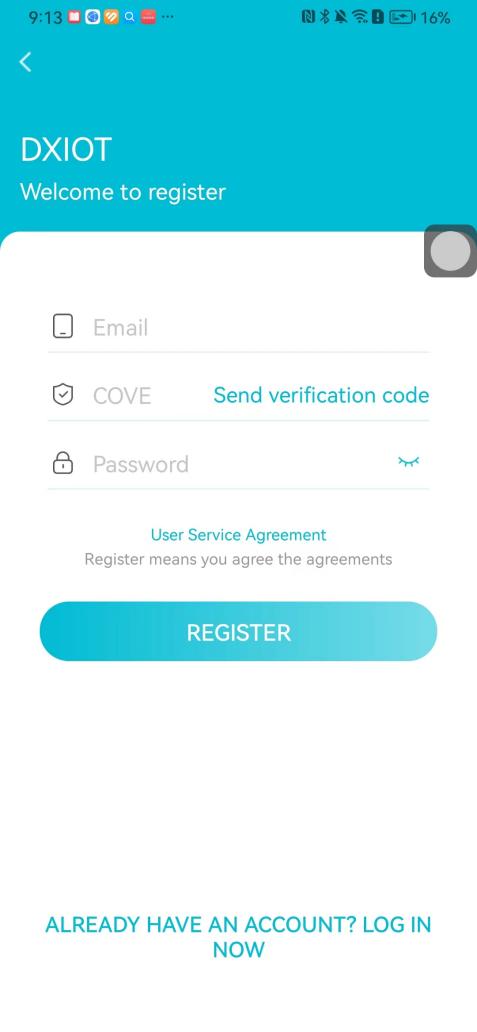 ## 1\.2 Login Enter your email and password and click on”LOG IN“,when logging in to the system for the first time, you will enter the "Organization page". 1. If you are a team manager, click on”CREATE ORGANIZATION”and enter the organization name. 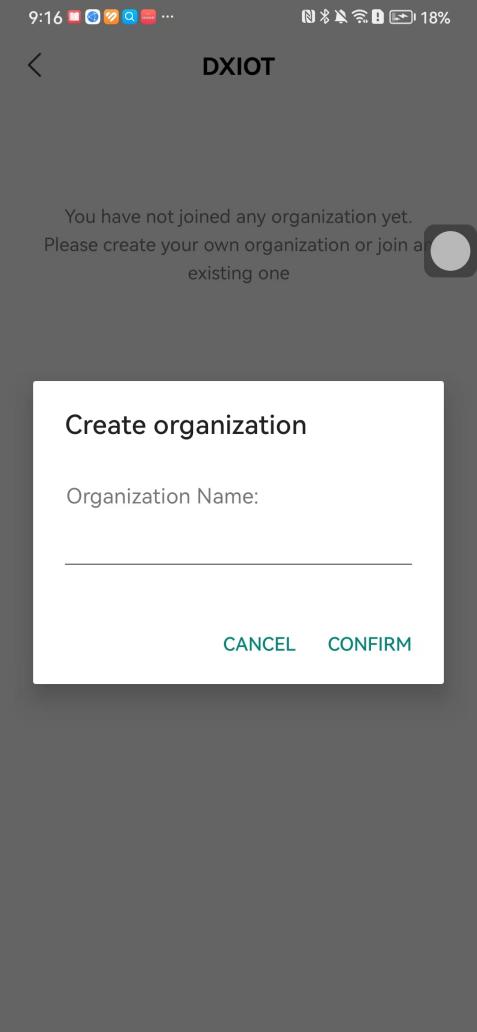 1. If you are a member of the organization, click on【JOIN ORGANIZATION】and ask the administrator to scan the QR code on the page through the internal scanning function of the APP and invite you to join the organization. **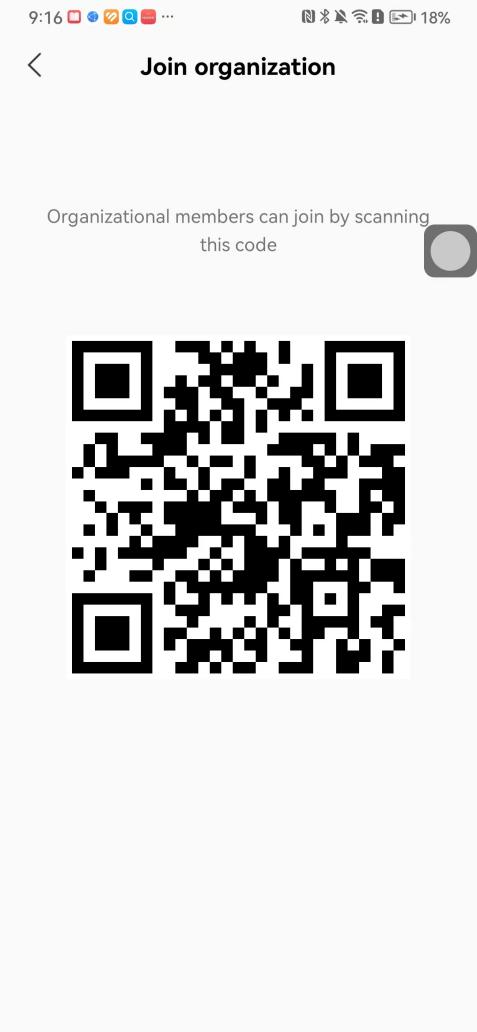** # 2\. Device Administrators have the authority to manage devices, including adding, deleting, and generating configuration codes. The main content of this chapter: 2\.1 Adding and generating configuration code for device 2\.2 Delete device 2\.3 Edit device 2\.4 Configure device 2\.5 Remote one click door opening ## 2\.1 Adding and generating configuration code for device **Entrance for adding device**:Clicking on \[\+] on the homepage will bring up \[Add Device] and \[Scan]. Choose one of the methods to add the device. You can also add device by entering the \[Device Management] module. 【Manual add】:Manually enter the device SN code and device name. 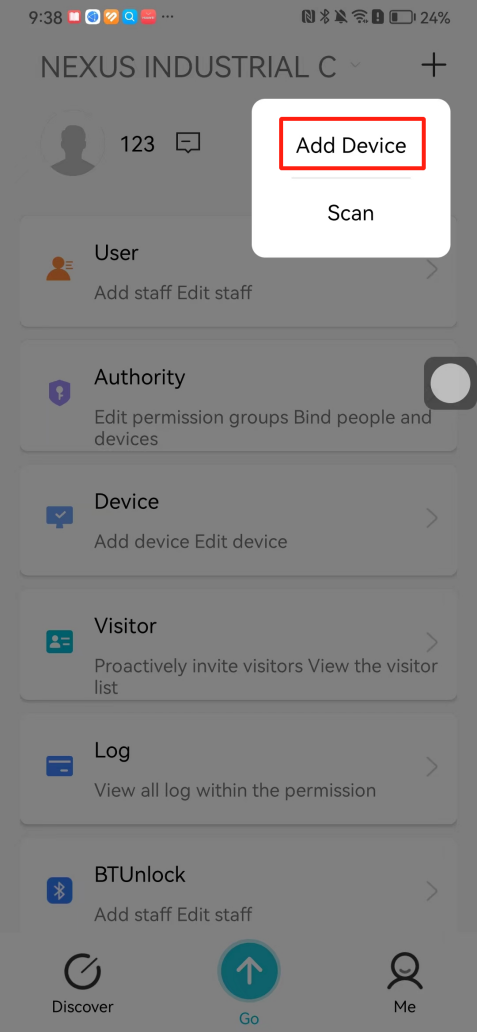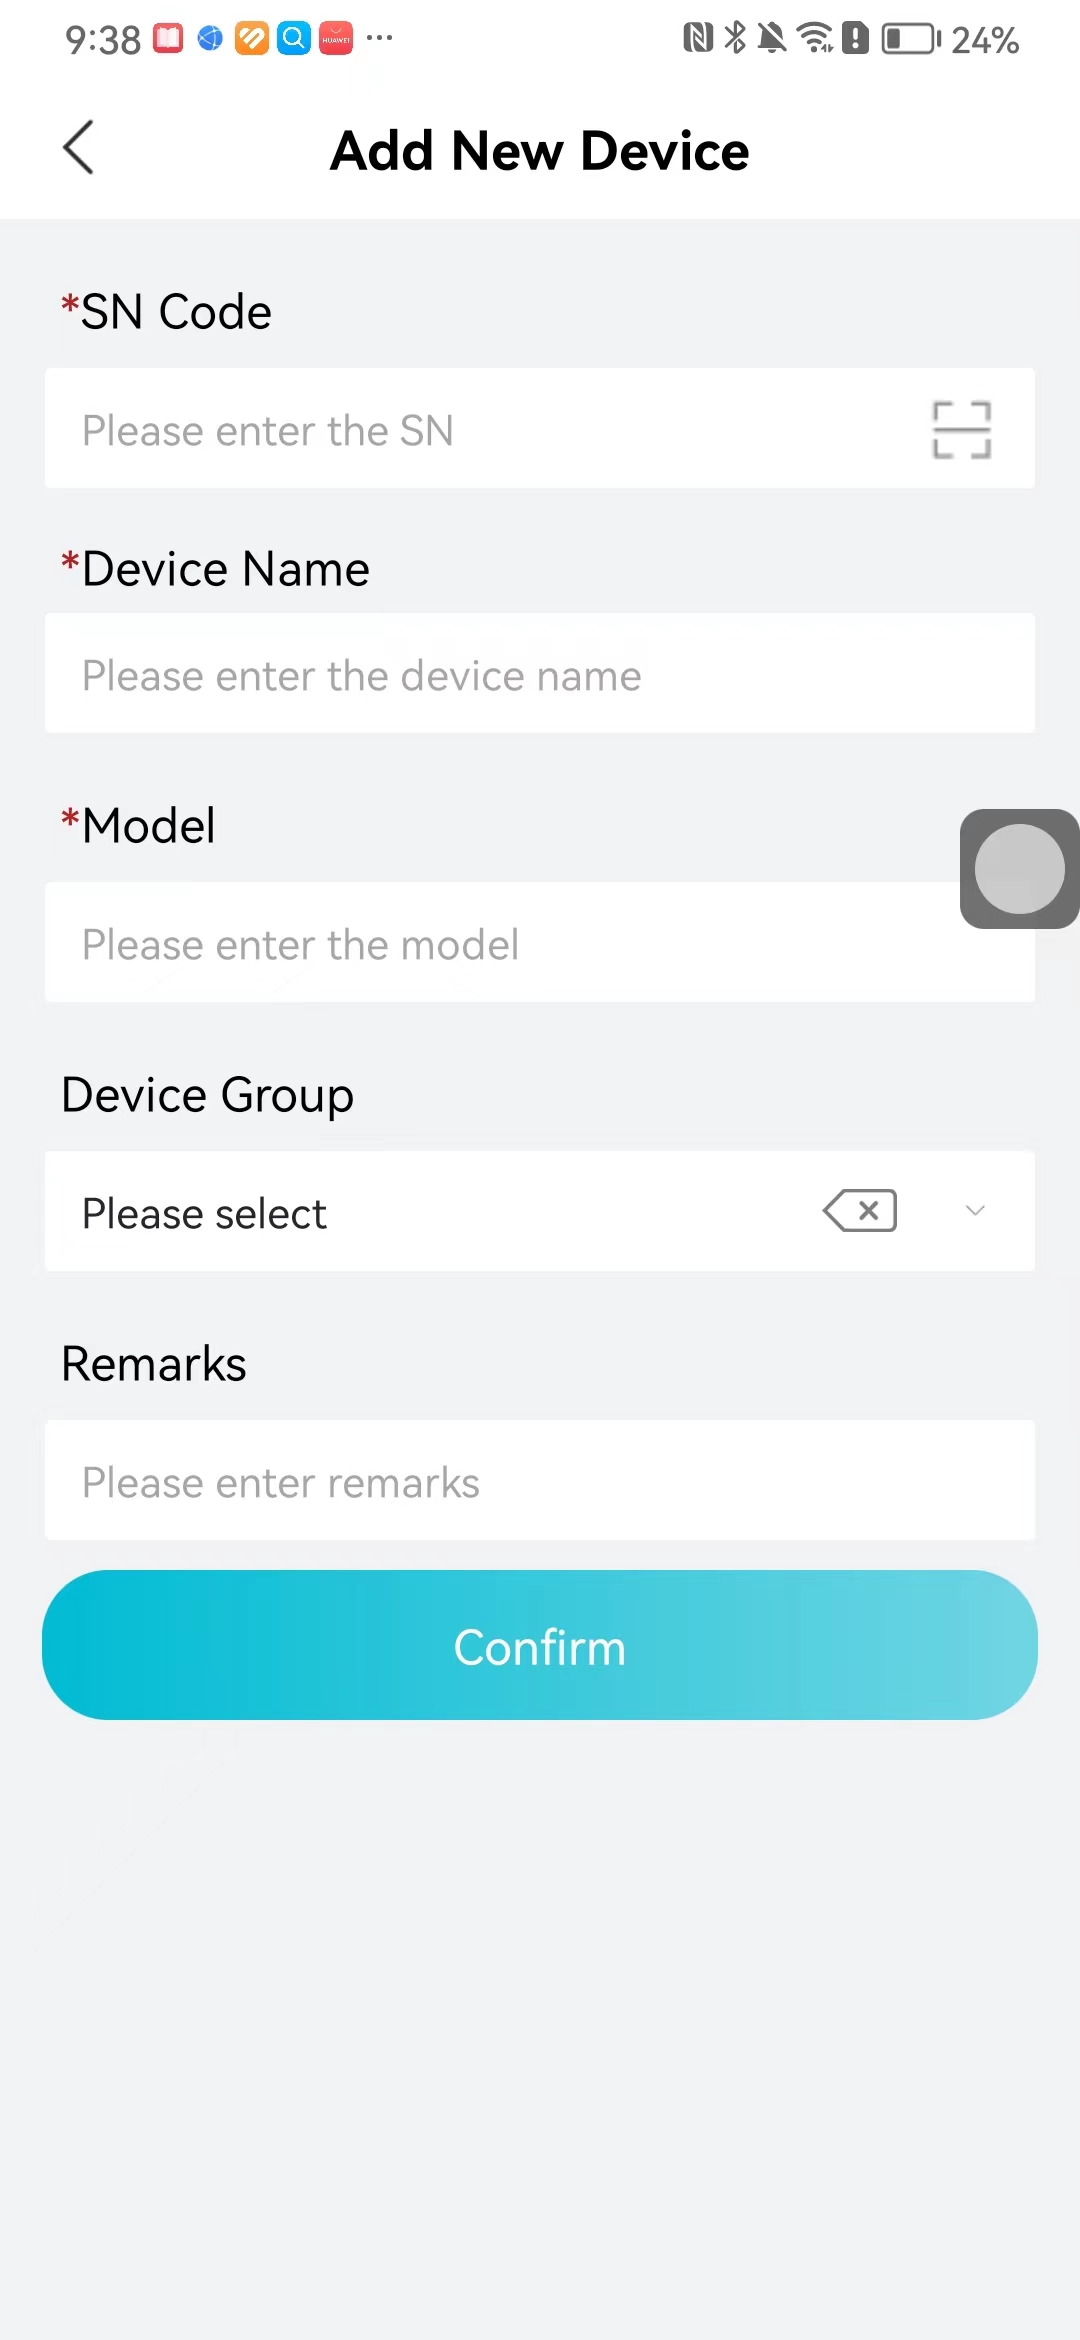 【Scan QR code to add】:Scan the QR code on the back of the device, the app will automatically fill in the SN code, and then enter the device name. 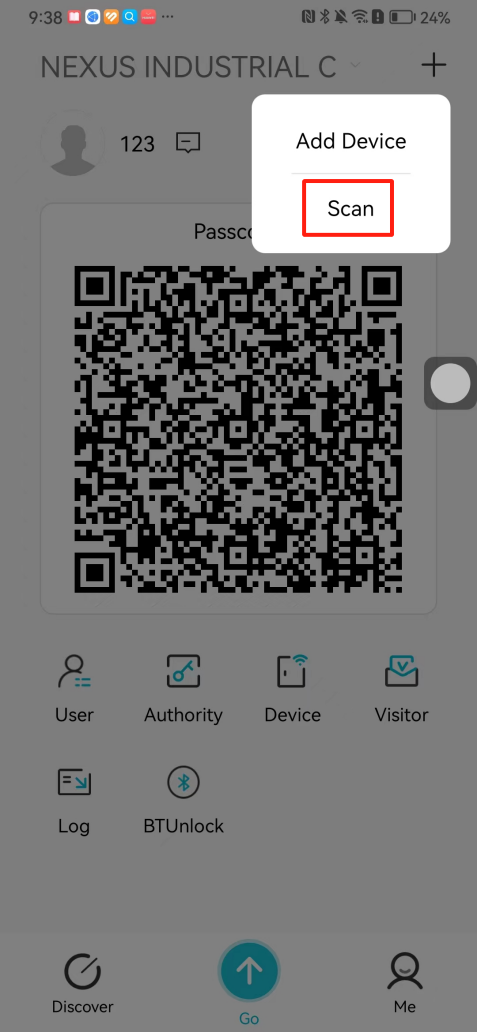 **Generate configuration code:**After completing the required fields, network configuration is also required. You can select static IP (manually fill in IP, subnet mask, gateway, DNS) or dynamic IP (automatically allocate IP, subnet mask, and other configurations) to generate configuration code for device to scan based on Ethernet or WiFi. 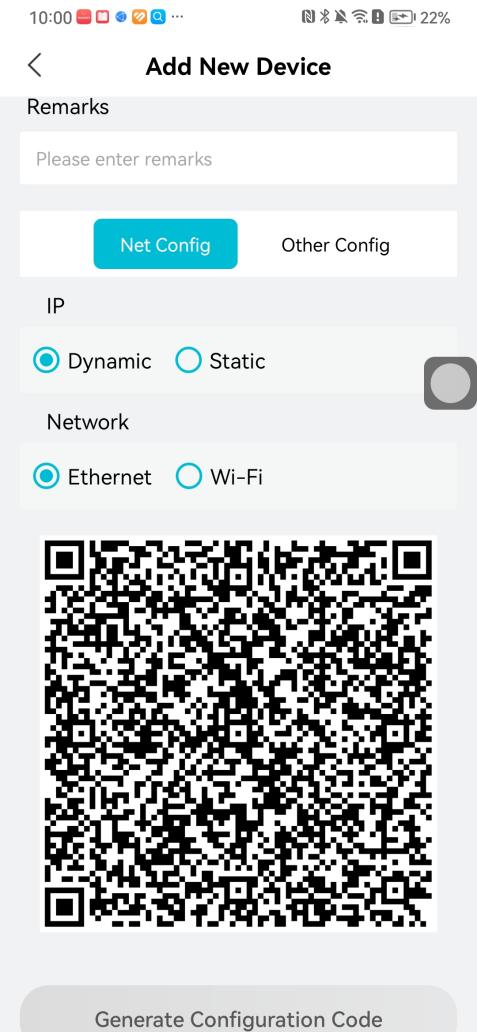 ## 2\.2 Delete device Enter the device management module: 1. The page displays the added device groups; 2. Enter the device group, find the device you want to delete, long press the card to display the 'Delete' button; 3. After the device is deleted, if the device is online, all access permissions within the device will be automatically removed. If the device is not online, the access permissions will not be removed. The removal of permissions will only be performed after the device is online again. 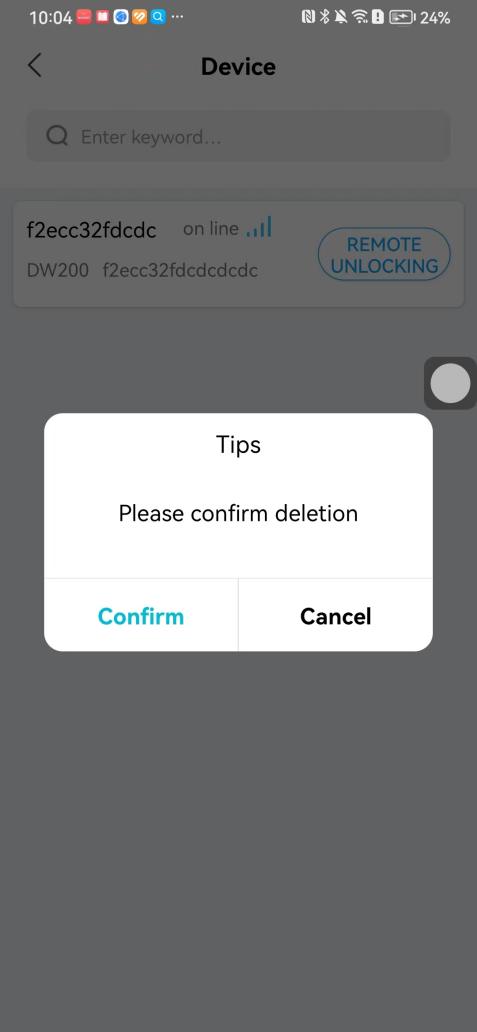 ## 2\.3 Edit device 1\. Click on the device card and click "Edit" to enter the editing page; 2\. Support modifying device name, group and comment. 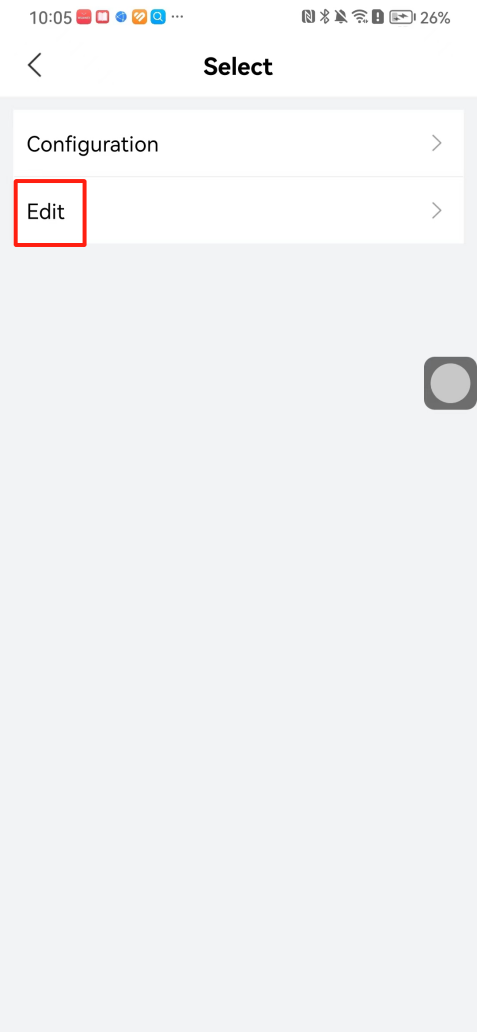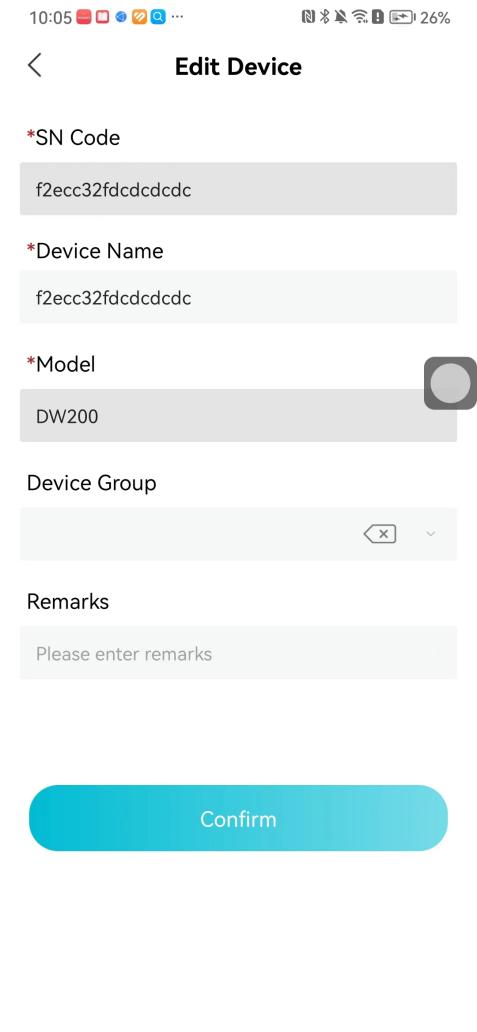 ## 2\.4 Configure device 1\. Click on the device card and click "Configuration" to enter the configuration page; 2\. Different devices have different configuration contents. **Generate configuration code:**Can select static IP (manually fill in IP, subnet mask, gateway, DNS) or dynamic IP (automatically allocate IP, subnet mask, and other configurations) to generate configuration code for device to scan based on Ethernet or WiFi. 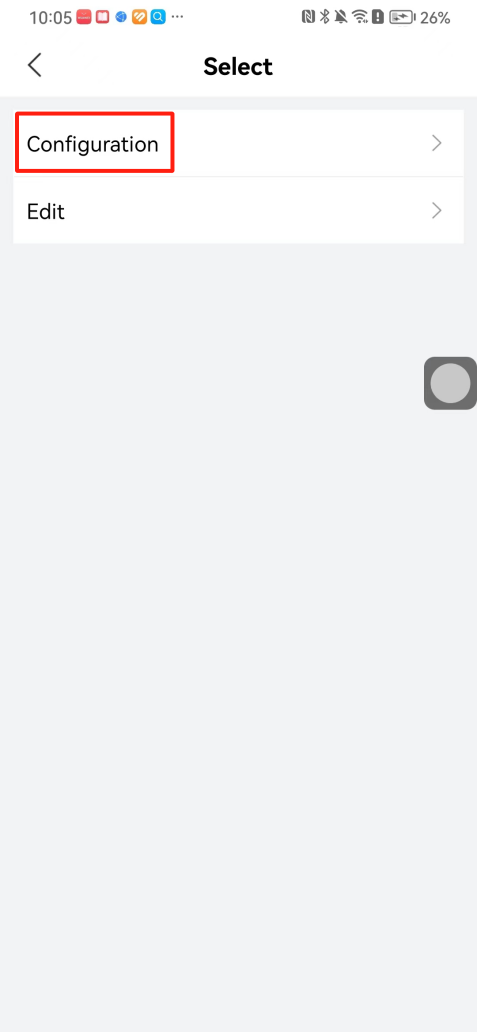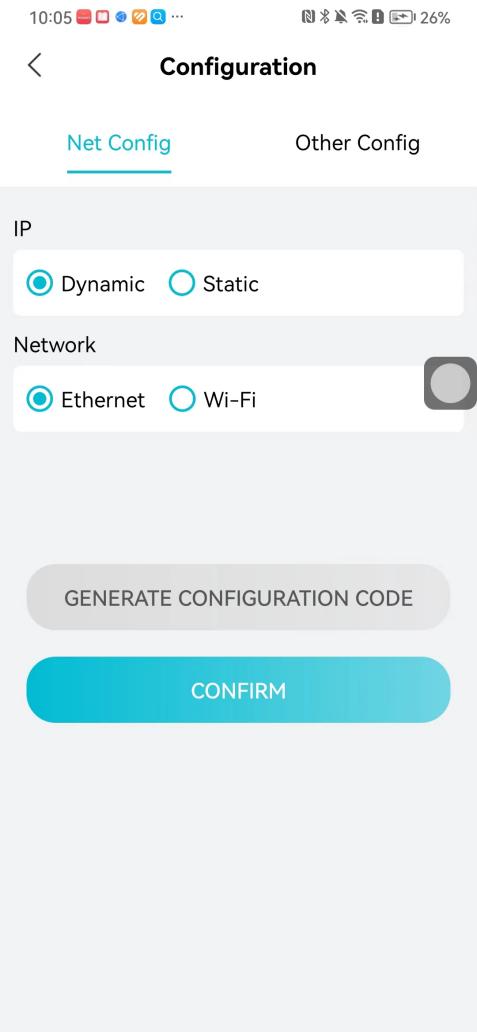 ## 2\.5 Remote one click door opening Enter the 【Device Management】module, find the device and click on“REMOTE UNLOCKING”. 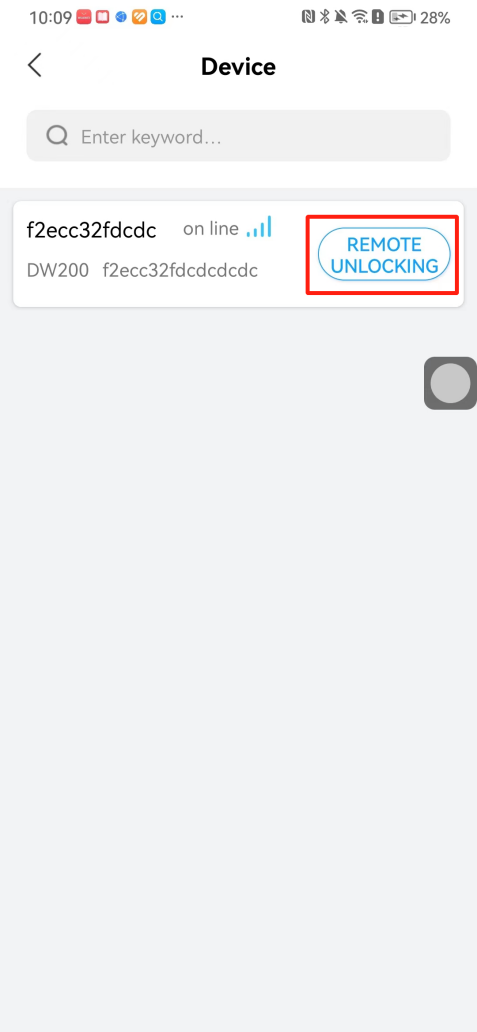 # 3\.User Administrators have the authority to manage users, mainly including adding and deleting users, managing user credentials (face, card, password), and setting up sub administrators. The main content of this chapter: 3\.1 Add user and delete user 3\.2 Add personnel credential and delete personnel credential ## 3\.1 Add user and delete user Administrators can manually add users or delete users here. 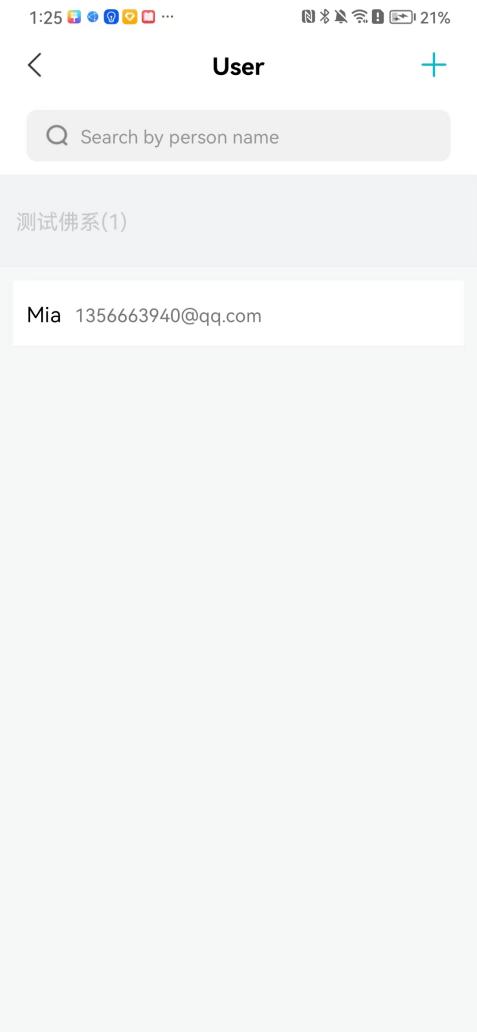 ### 3\.1\.1 Add user Click on "Add User", enter the name and email, or select a user group (which needs to be added in the background), set up an administrator, and click "Confirm" to successfully add. 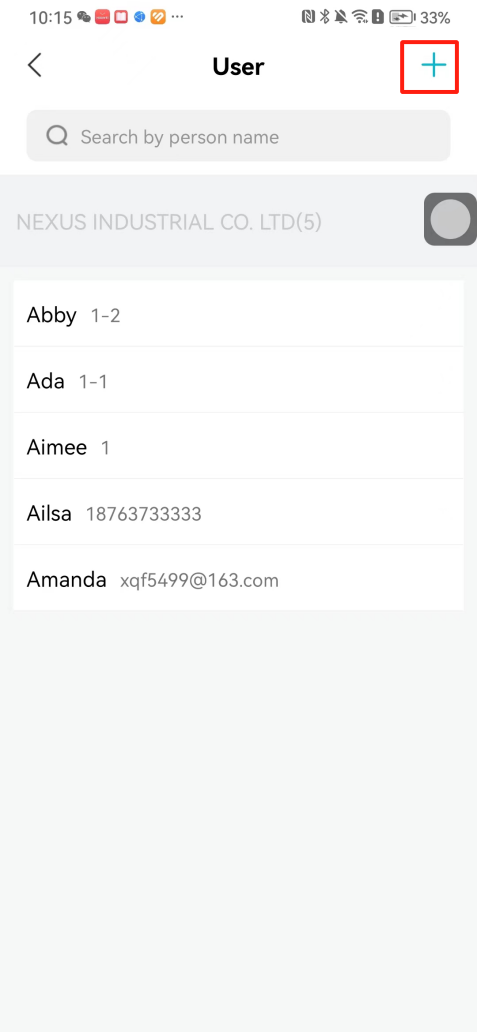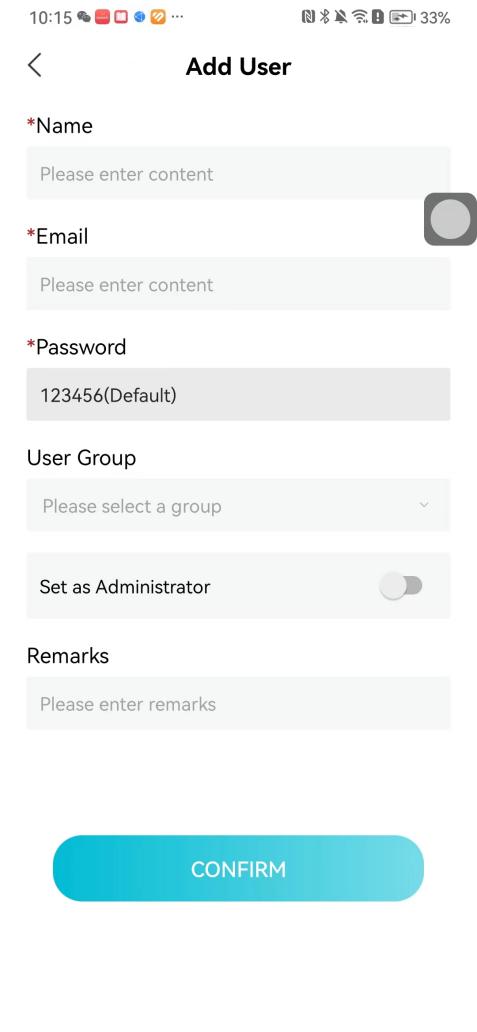 ### 3\.1\.2 Delete user Go to "User Management" and find the person and long press the person card to click "Confirm". (After deleting a person, this user cannot log in to the system and their access privileges will be automatically removed). 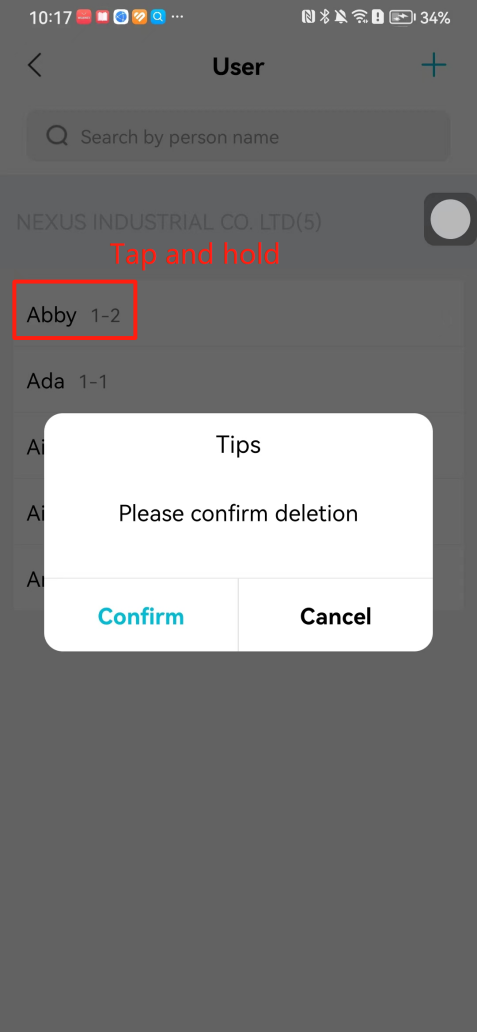 ## 3\.2 Add personnel credential and delete personnel credential Administrators can view the list of organizational users, and click on a single person to view and edit user information. 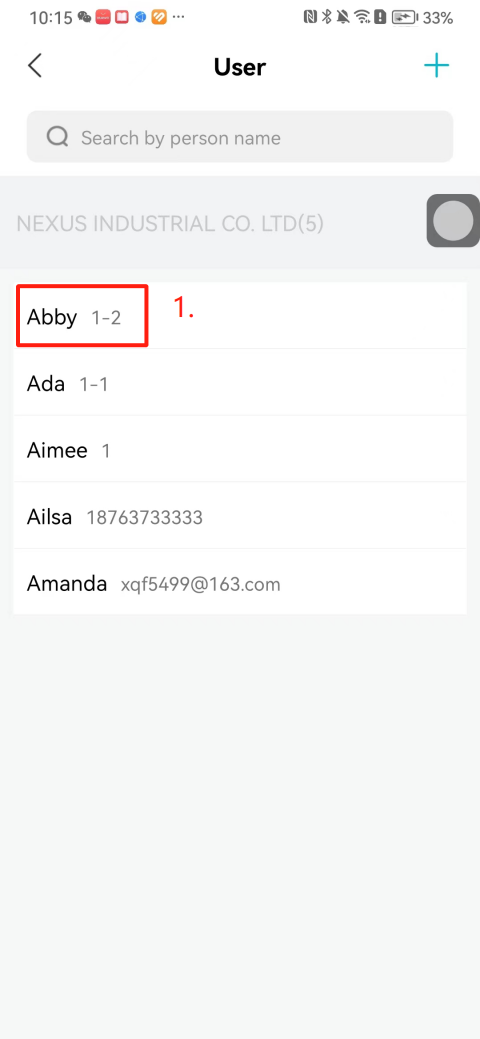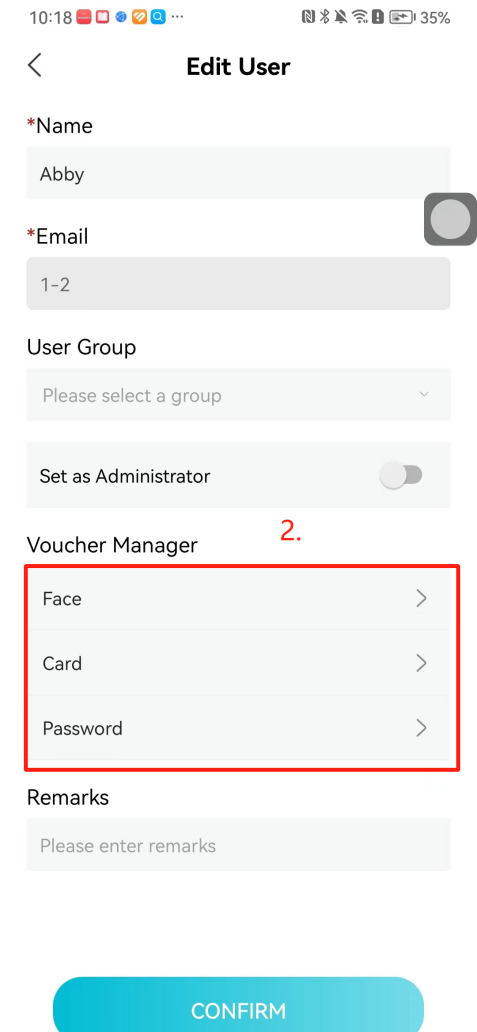 ### 3\.2\.1 Face management 1\.View photos: Administrators can view whether users have added faces in User Management \- Edit Users \- Face. 2\.Face entry/modification: If the administrator needs to modify the user's face photo, they can add/modify the photo in the face voucher. (If the user already has QR code access permission, when adding a face, the face permission will also be automatically issued). 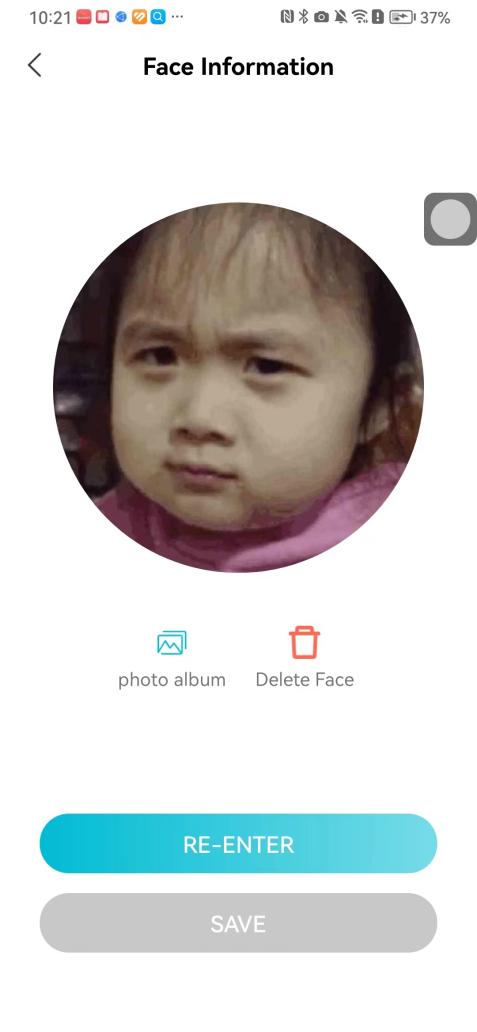 ### 3\.2\.2 Card management Manually input the card number to add a card, or add a card to the user through device card reading. 1. Manually add card: Click "Enter Card Number", enter the card number, and click "Confirm" to successfully add. 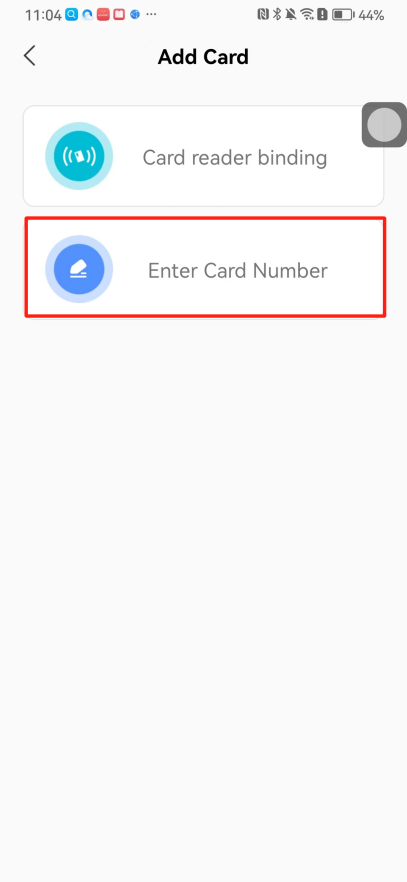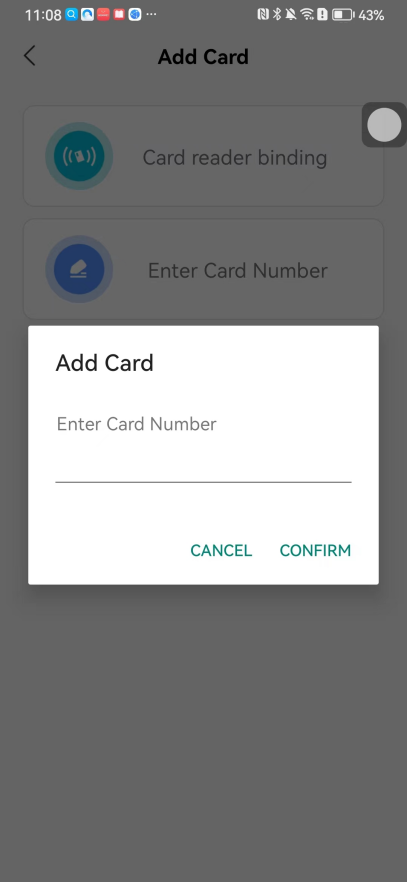 1. Card reading binding: You need to first add a device and click on "Card reading binding \- select the device to read (the device must be online)". Place the card close to the device and wait for 3\-5 seconds, and the card number will be displayed. 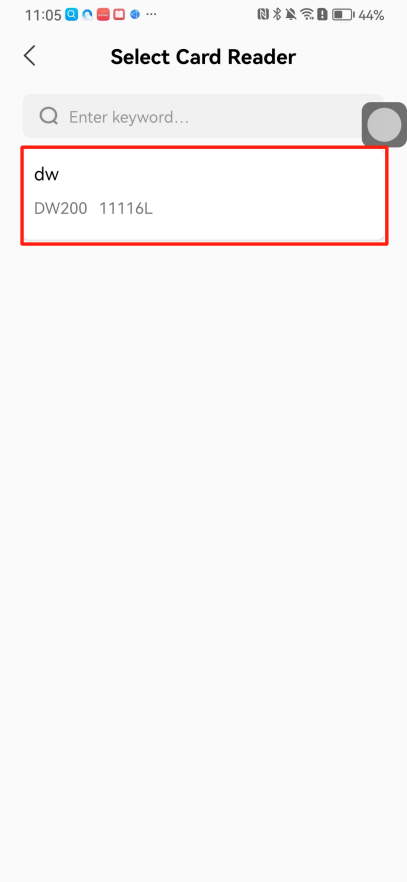 3\.2\.3 Password management Generate passwords manually or randomly, currently only 6\-8 digit numerical passwords are supported. 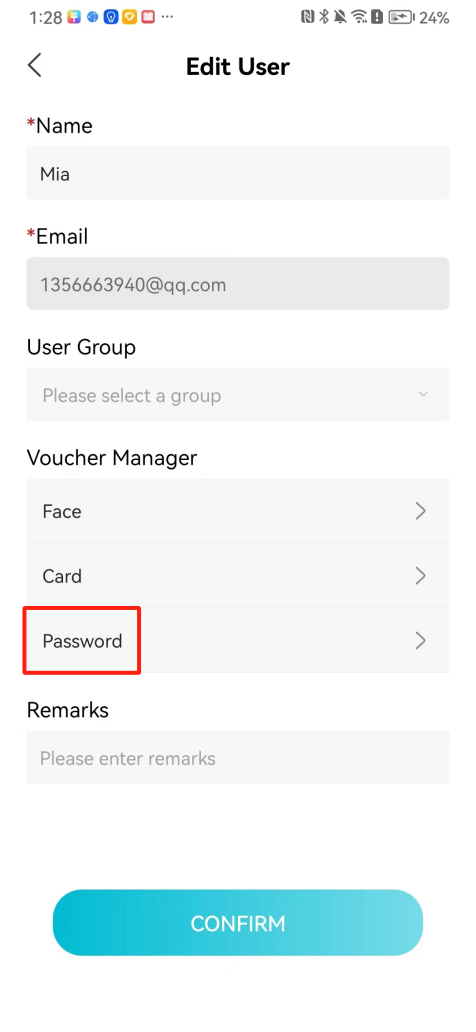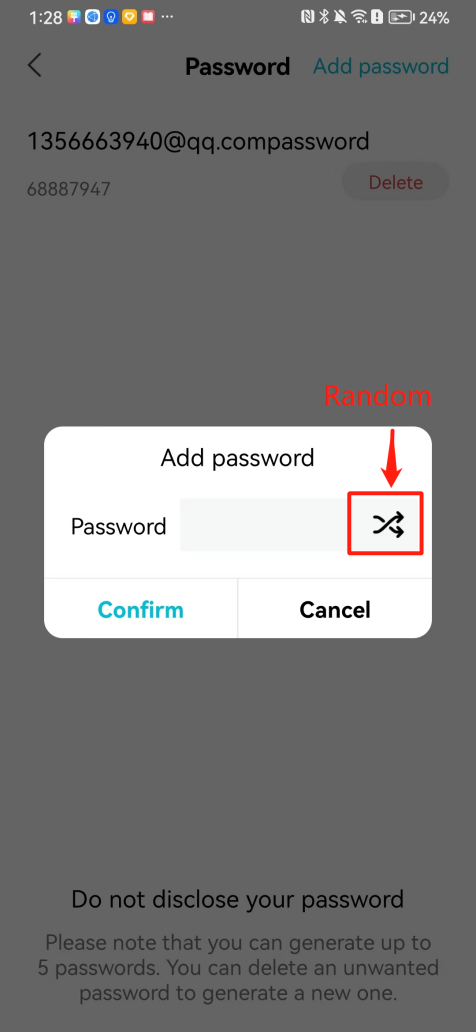 # 4\.Authority Administrators can add permission groups in this module, configure the validity period of permissions based on different permission groups, and support \[Permanent Effective] and \[Period Effective]. ## 4\.1 Add personnel permission group Administrators can set different personnel and devices based on permission groups. Enter the "Permission Management" module and click "\+" to enter the name. 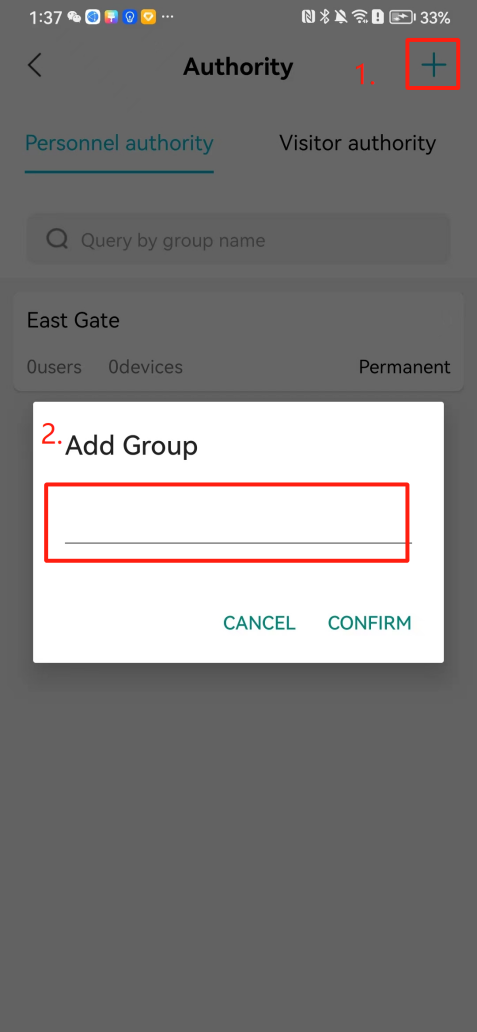 ### 4\.1\.1 Adding personnel and device to permission group (permission configuration) 1\.Click to enter the 【Permission Management】 module to view the list of added permission groups. 2\.Click on 【Permission Group】 to enter the configuration page and select the personnel and devices that need to set permissions. Click on 【Confirm】 to add the personnel permissions selected on the page to the device. Note: After successful authorization, authorization records can be viewed through the backend. 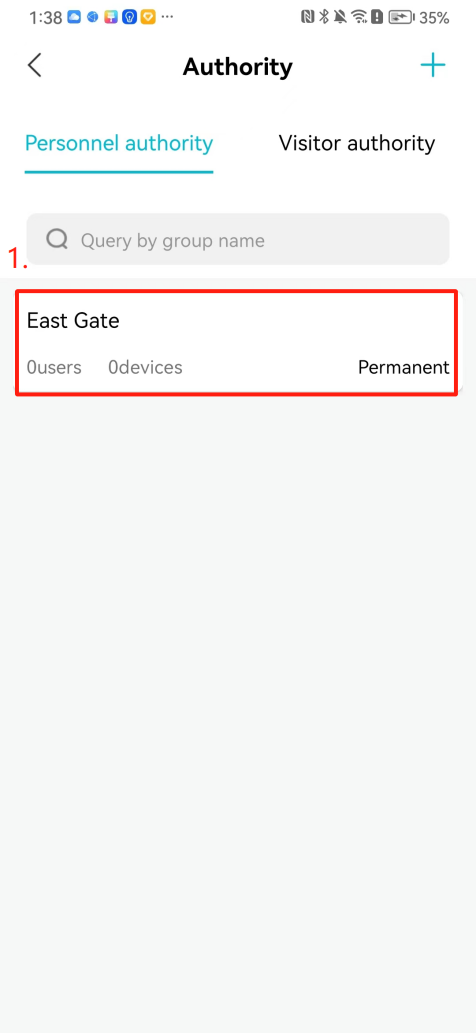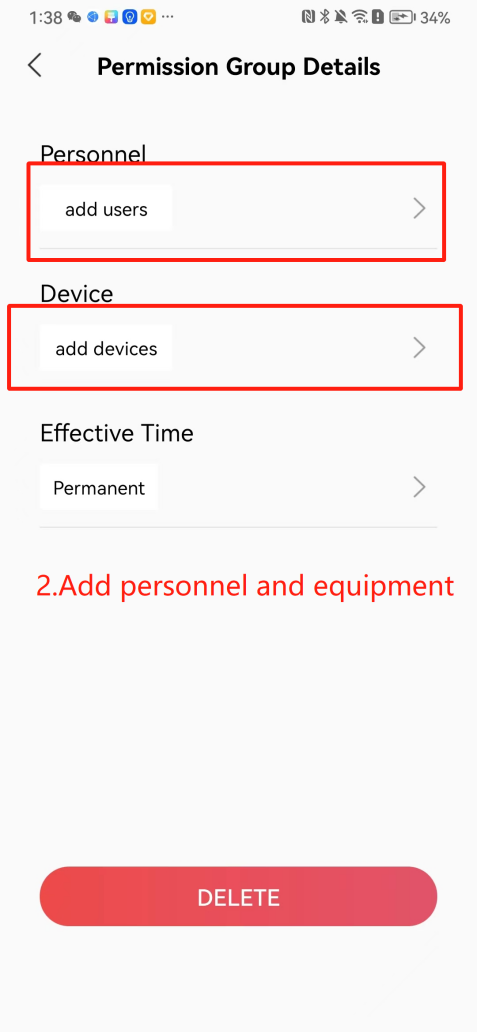 ### 4\.1\.2 Configure permissions based on time periods Click on "Permanently Effective" and select "Period Effective" to fill in the start and end times to complete the setting. Personnel within the end time group will be unable to pass. 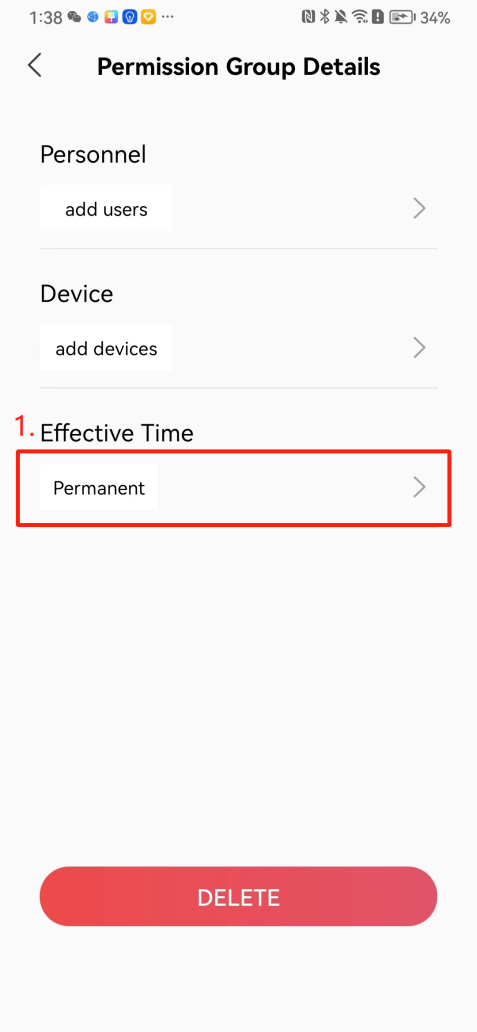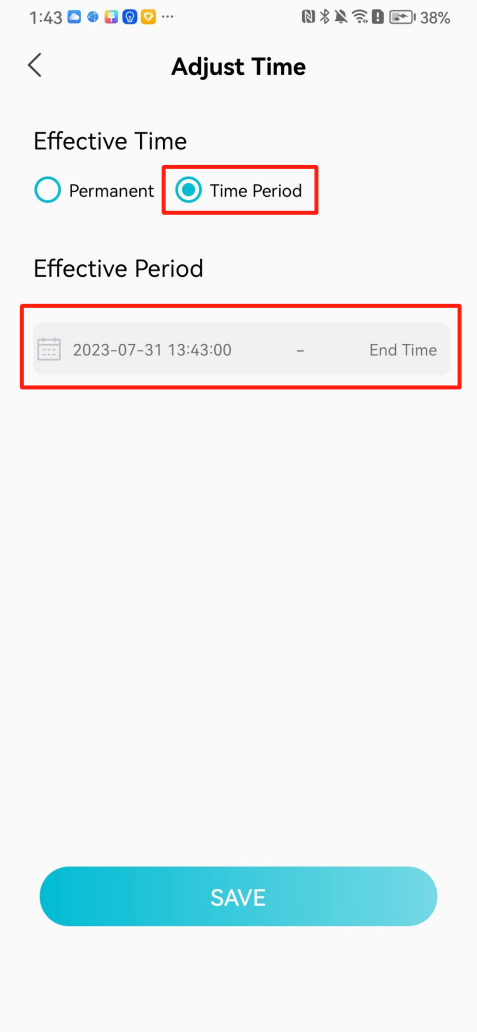 ## 4\.2 Add visitor permission group Administrators need to set up visitor permission groups here for adding or reviewing visitors. 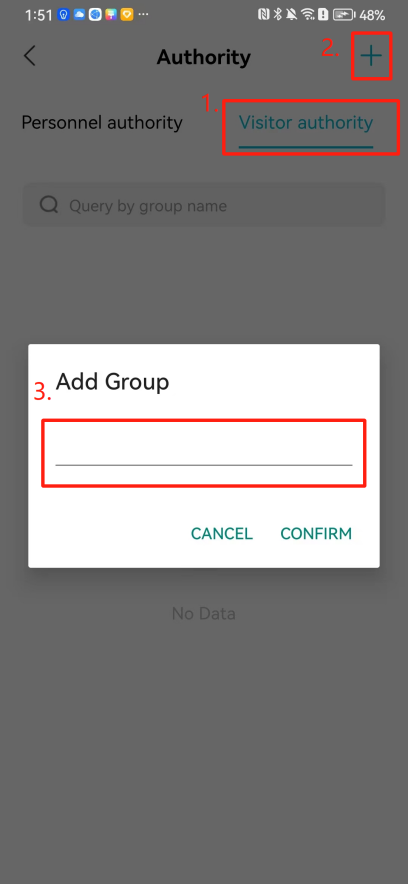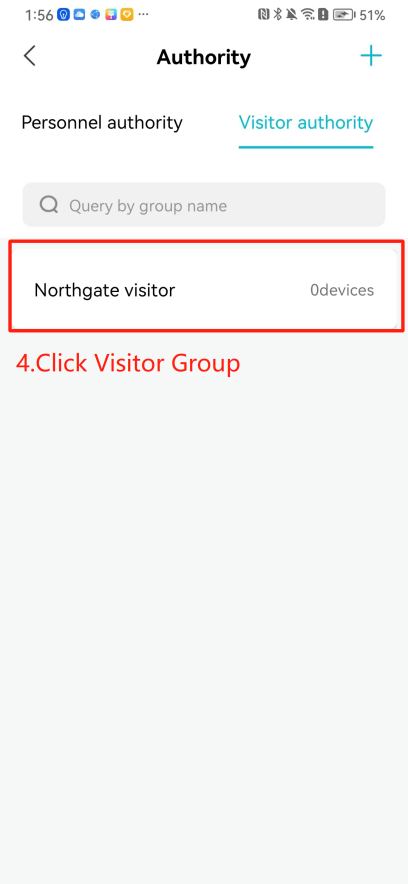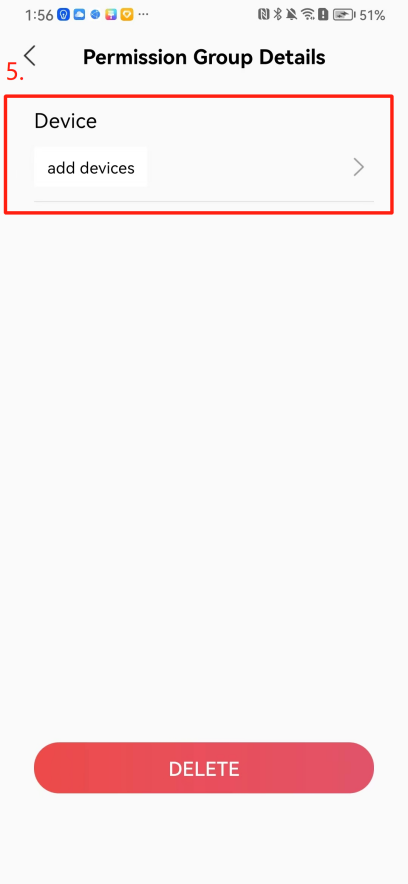 ## 4\.3 Delete permission group Click on the "Permission Group Card" to enter the configuration page, delete the device and personnel in the group, and click "Delete" to complete. 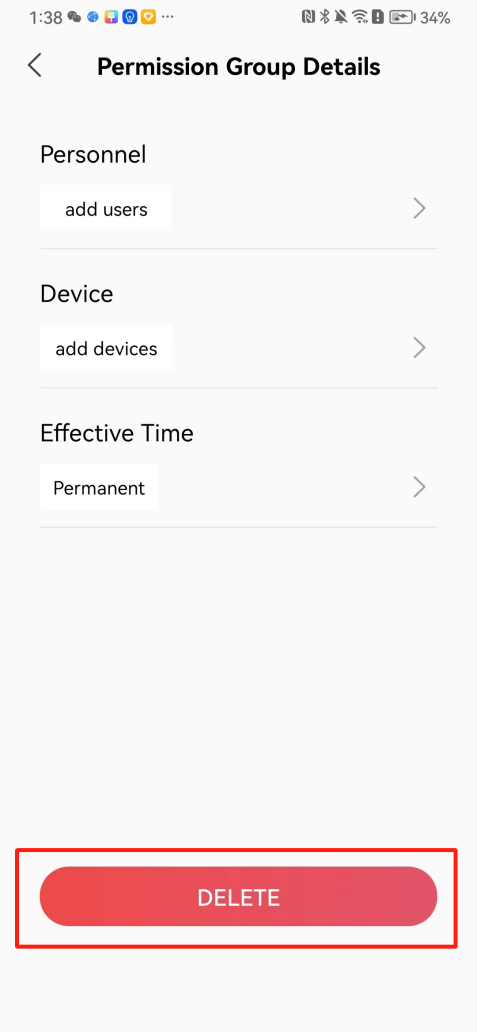 # 5\.Visitor Administrators/ordinary users can directly invite visitors in this module, or generate a "visitor application code" for visitors to actively apply. Visitor List: Administrators can see all users' invited/pending visitors, while ordinary users can only see their own invited/pending visitors. The main content of this chapter: 5\.1 Direct visitor invitation 5\.2 Visitor application code 5\.3 Visitor message ## 5\.1 Direct visitor invitation 1\.Click on \[\+], click on \[Invite visitors], fill in the visitor name, visit time, email address (if facial access is required, you can upload a face on this interface), select the visitor permission group, and click on \[CONFIRM]. 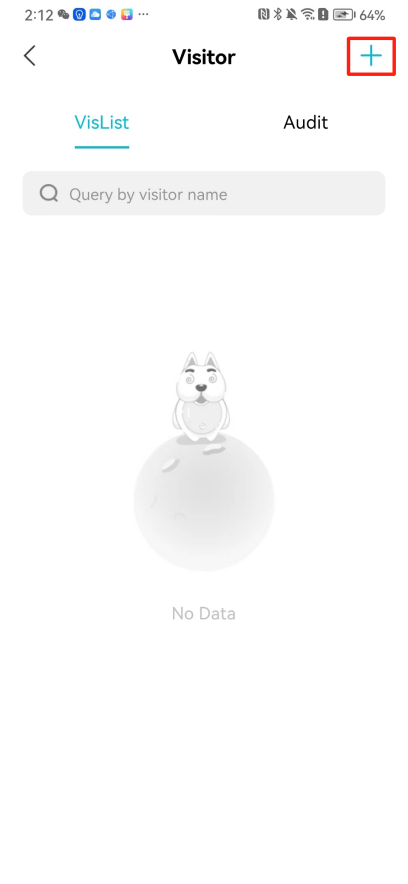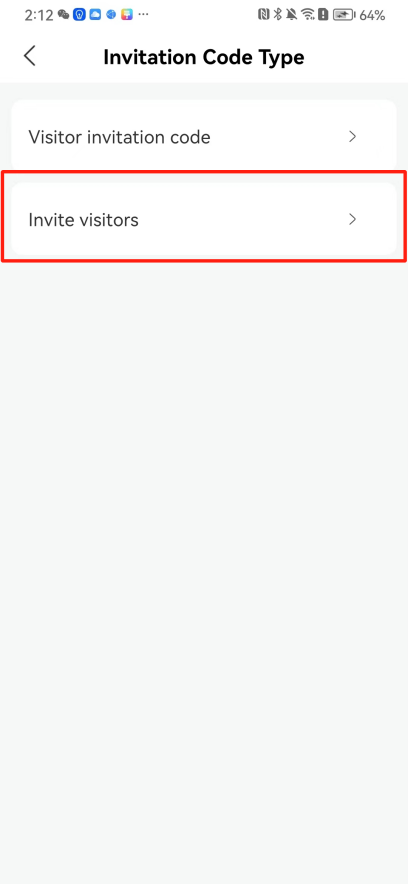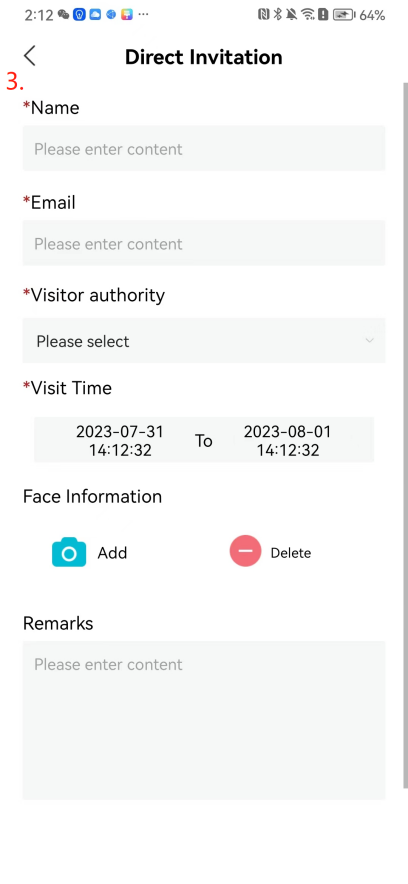 2\. After generating a visitor, a QR code link will pop up, and the link needs to be shared with the visitor, who will use the QR code to access. 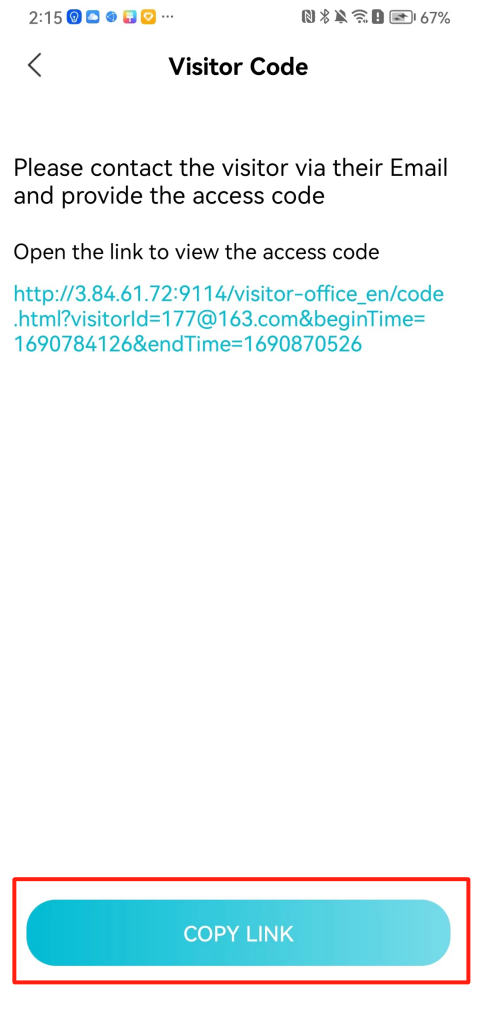 ## 5\.2 Visitor application code Generate a "Visitor invitation code" in the app. Visitors can scan the code and fill in their name, email, and visit time, then click on \[Submit]. 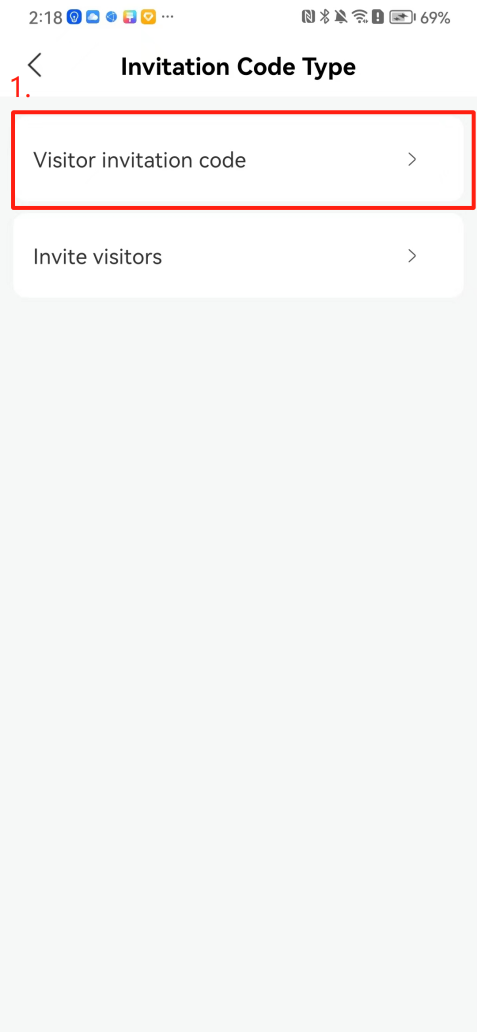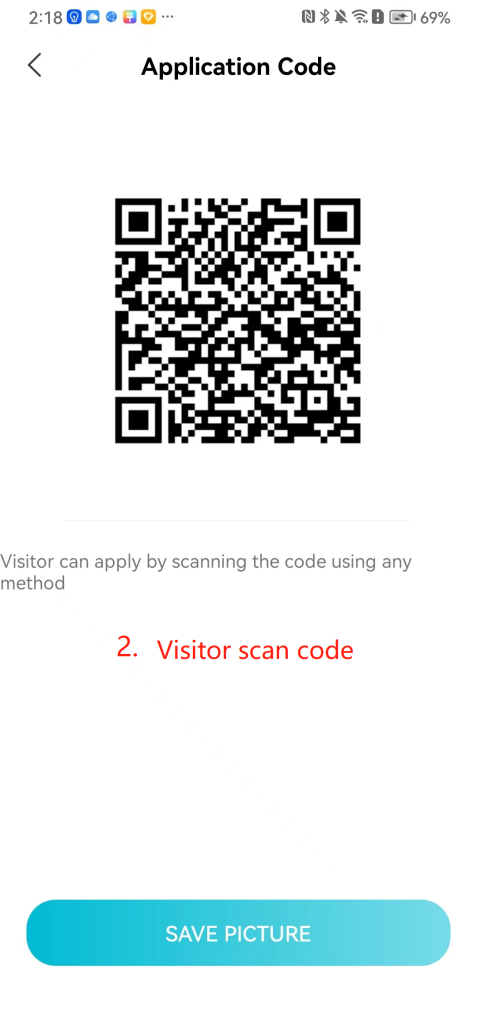 ## 5\.3 Visitor messages Visitors can view their 'application' or' visit 'through the' notification message 'function. Note: Administrators can see all messages. Ordinary users can only see messages related to themselves. 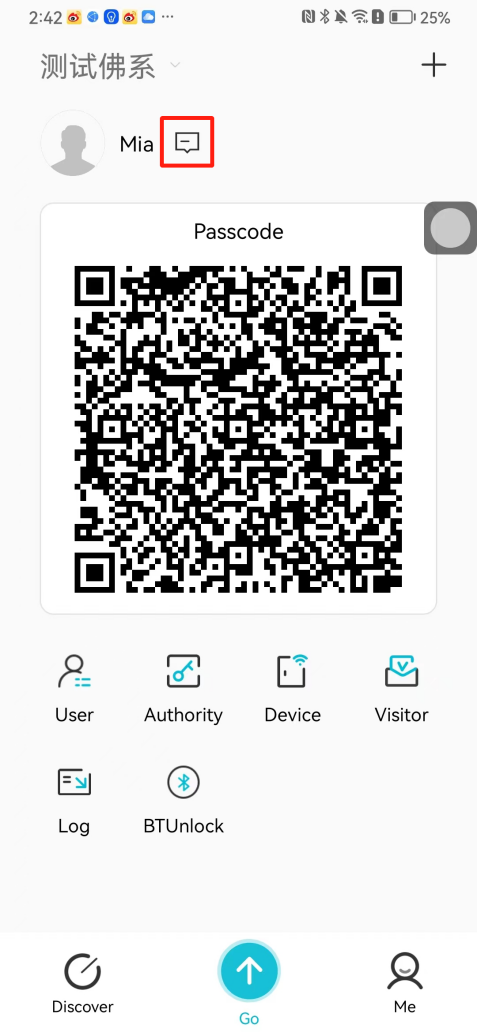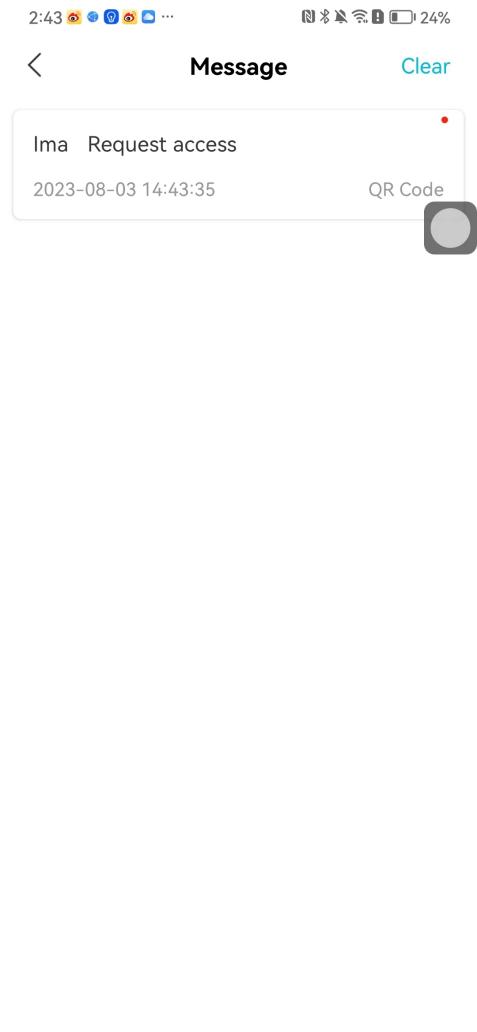 # 6\.Log Administrators can see the access records of all users/visitors, while ordinary users can only see the access records of visitors related to themselves (invited or approved by themselves). The main content of this chapter: 6\.1 View access records ## 6\.1 View access records All access records will be recorded here, including card swiping, face, QR code, Bluetooth, password, remote door opening, visitor QR code, visitor face. 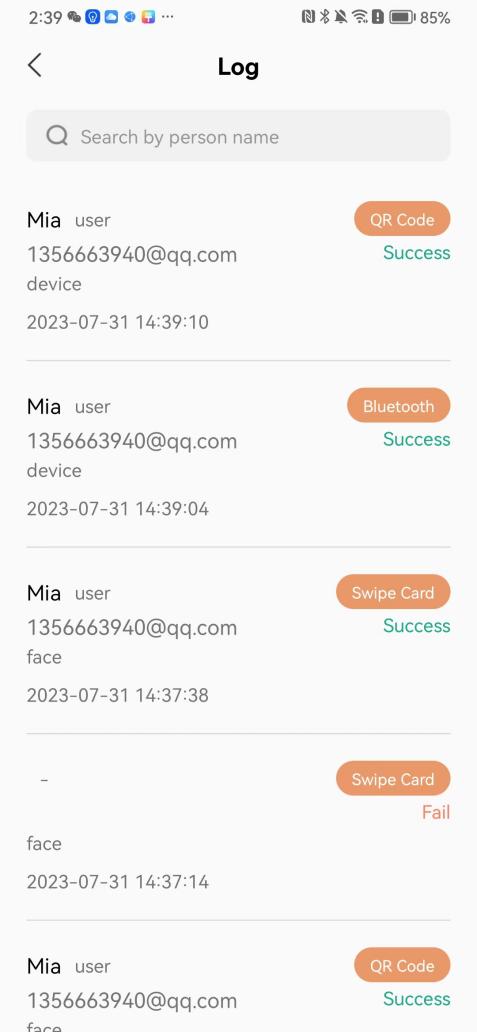 # 7\.BTUnlock 1. The login personnel need to be in the same permission group as the Bluetooth device (see section 4\.2\), and the Bluetooth on the mobile phone is turned on. Click on "REMOTE UNLOCKING" to successfully open the door. 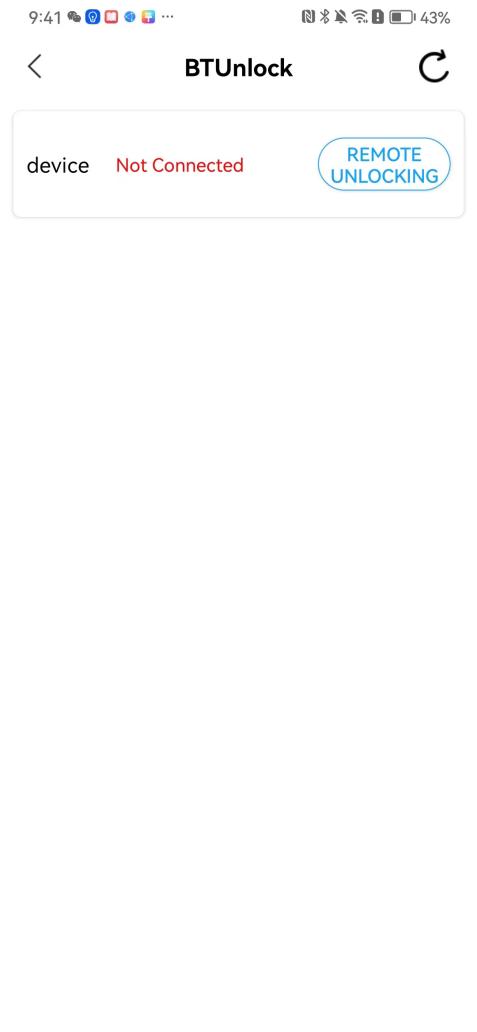 1. If Bluetooth permission is not configured, a prompt will pop up when entering "REMOTE UNLOCKING" and Bluetooth cannot be used to open the door. 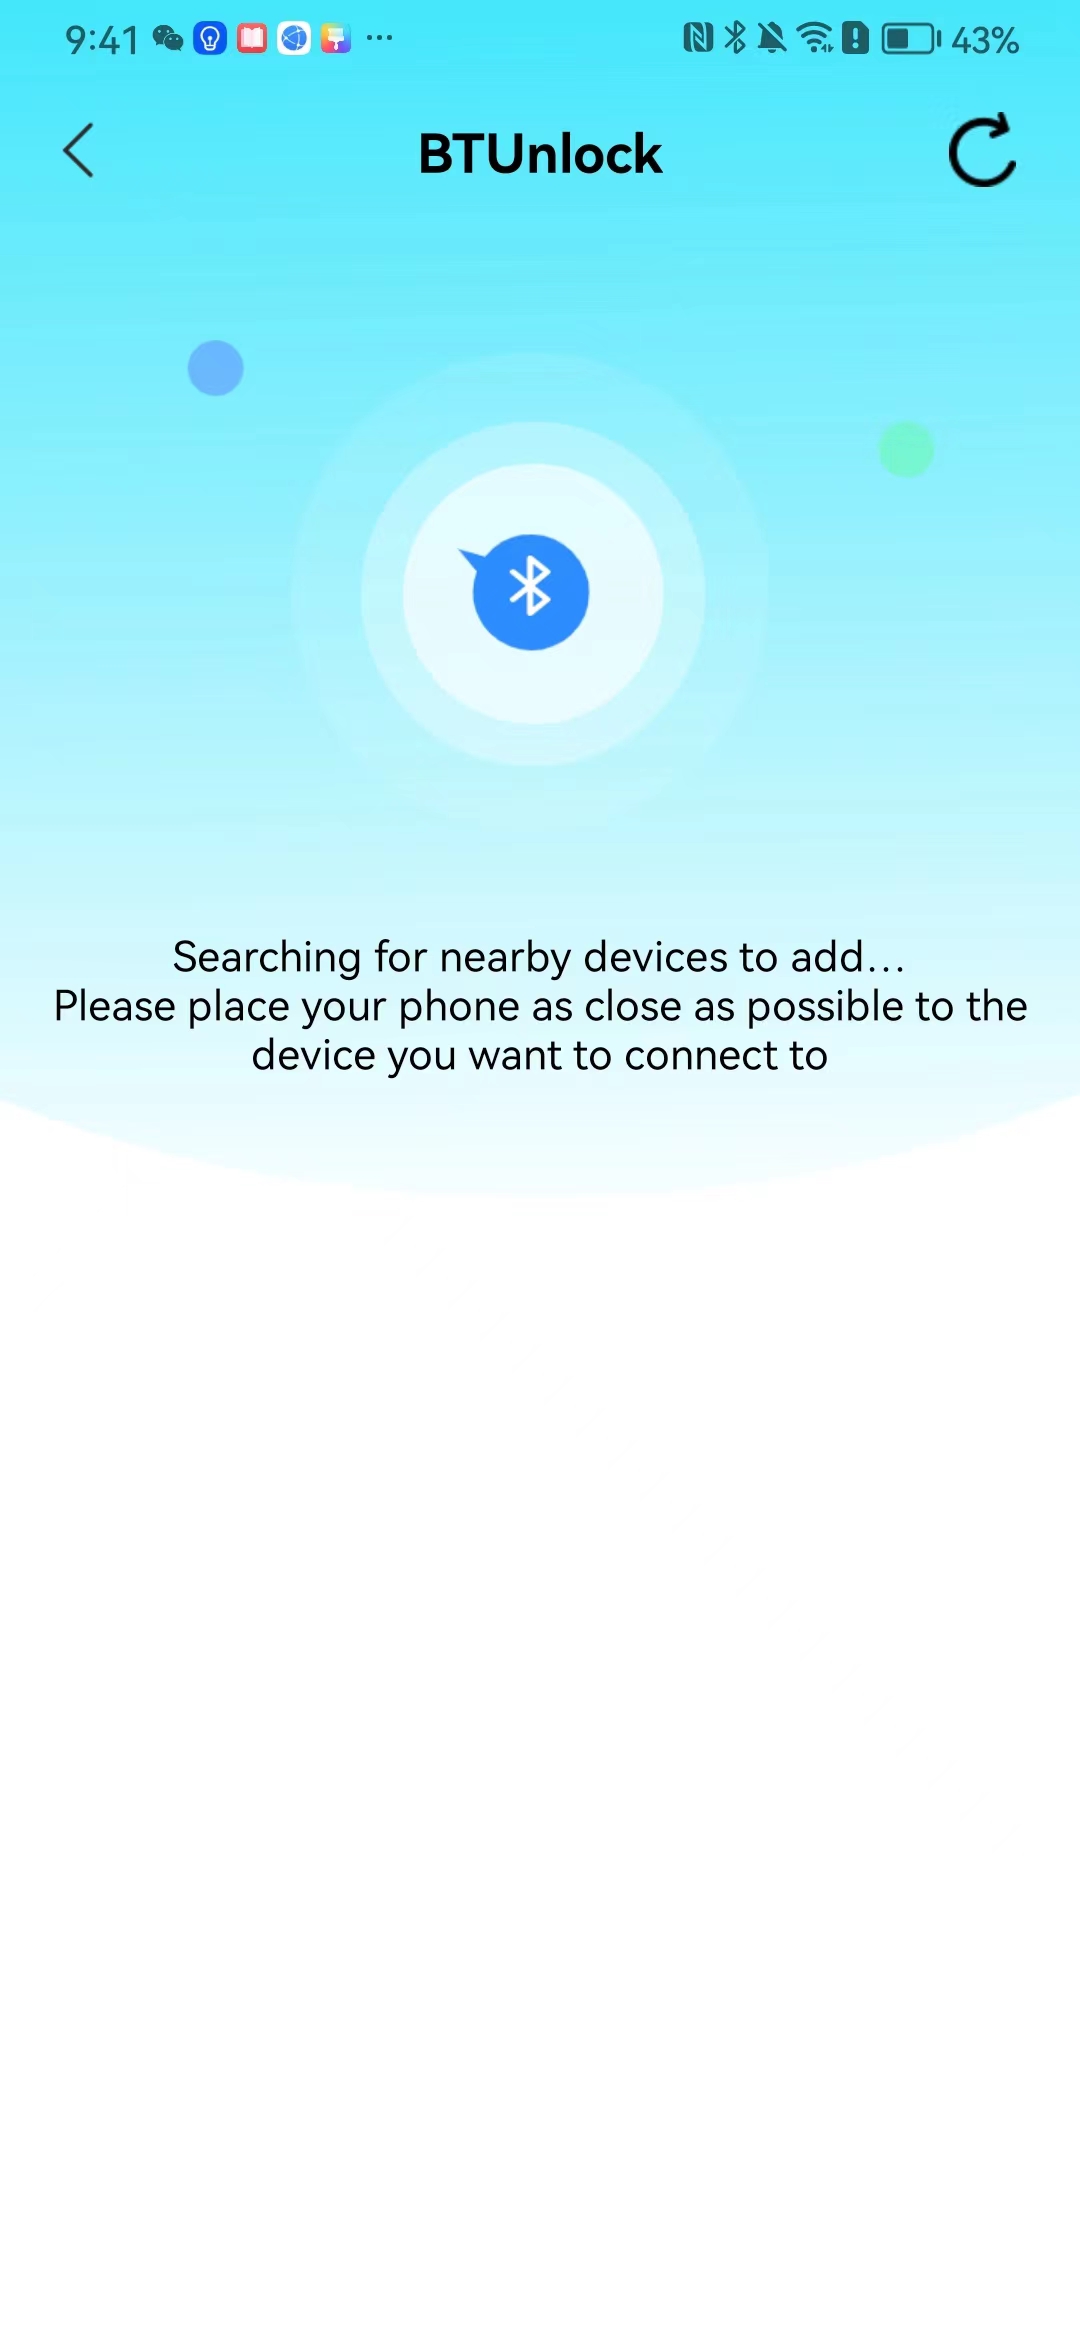 # 8\.Me The personal center supports viewing or modifying one's basic information. The main content of this chapter: ## 8\.1 View/modify personal information Click on the top”\>“to modify the name, phone number, add face, card, and password credentials. 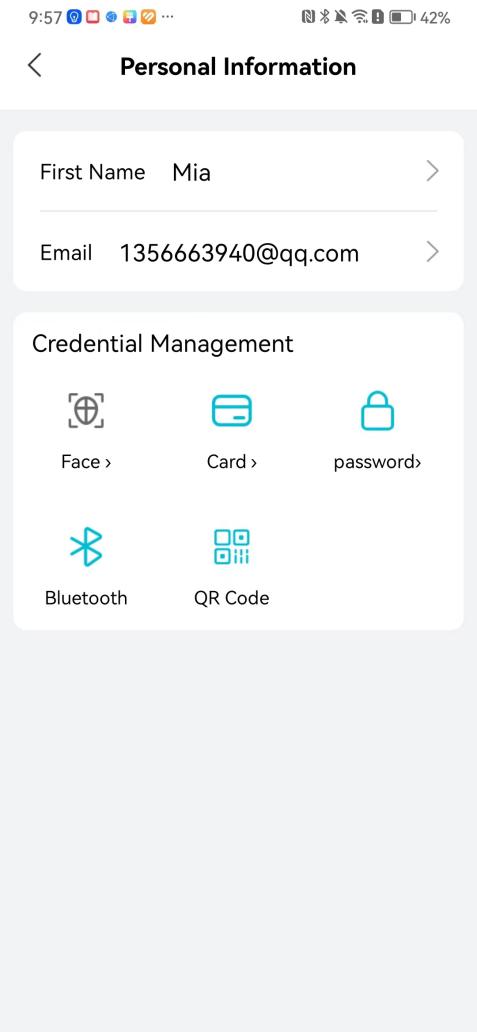 ### 8\.1\.1 Add face credential Click on "Face" to enter the face interface, where you can enter and modify the face. 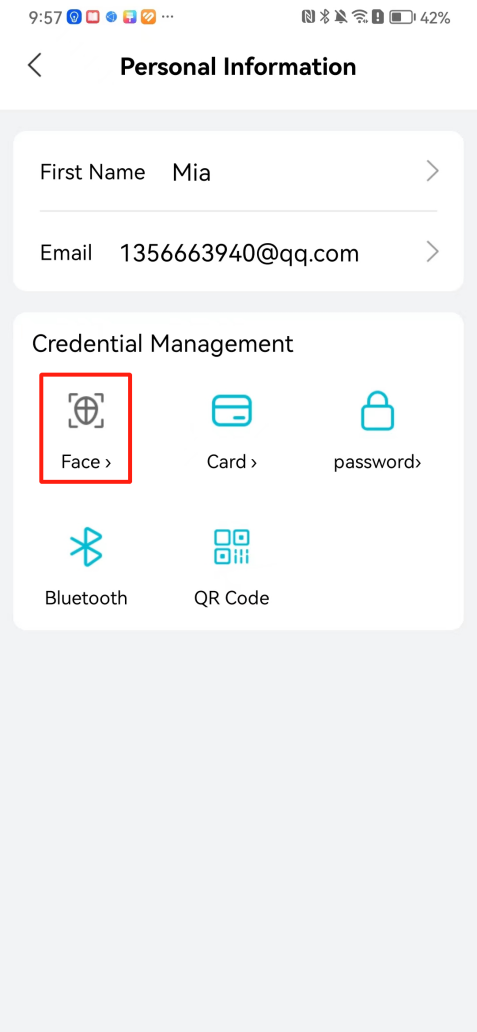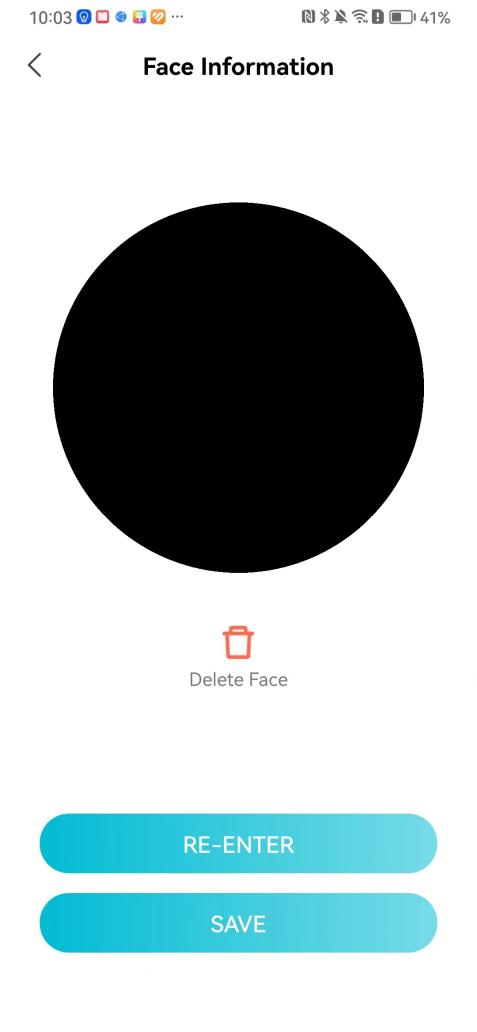 ### 8\.1\.2 Add card credential Click on "Card" to add a card through "card binding" or "manual" on this interface. (For how to add a card, please refer to 3\.2\.2 Card Management). 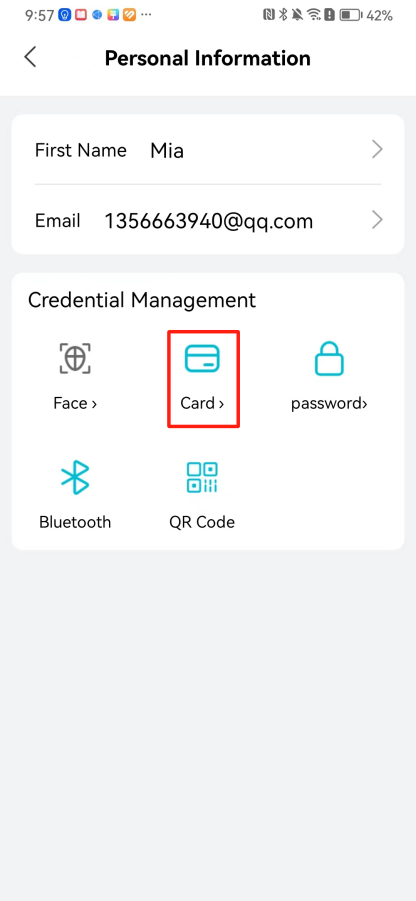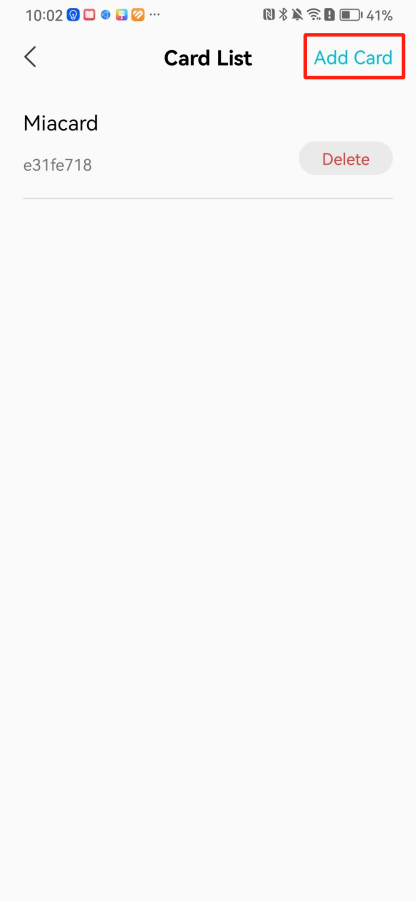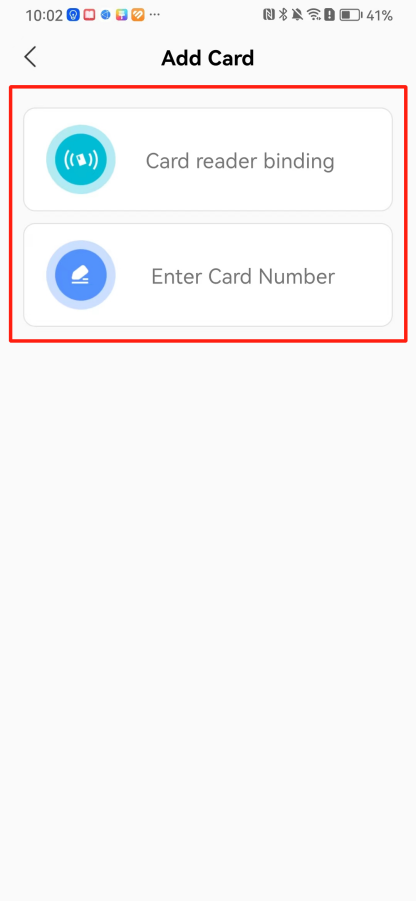 ### 8\.1\.3 Add password credential Click "password" to randomly generate an 8\-digit password. A user can have up to 5 password credentials. 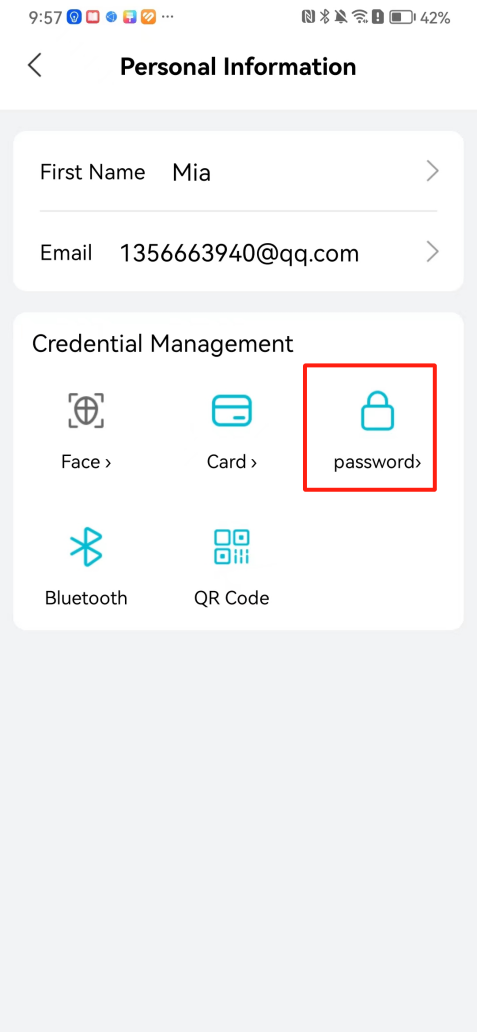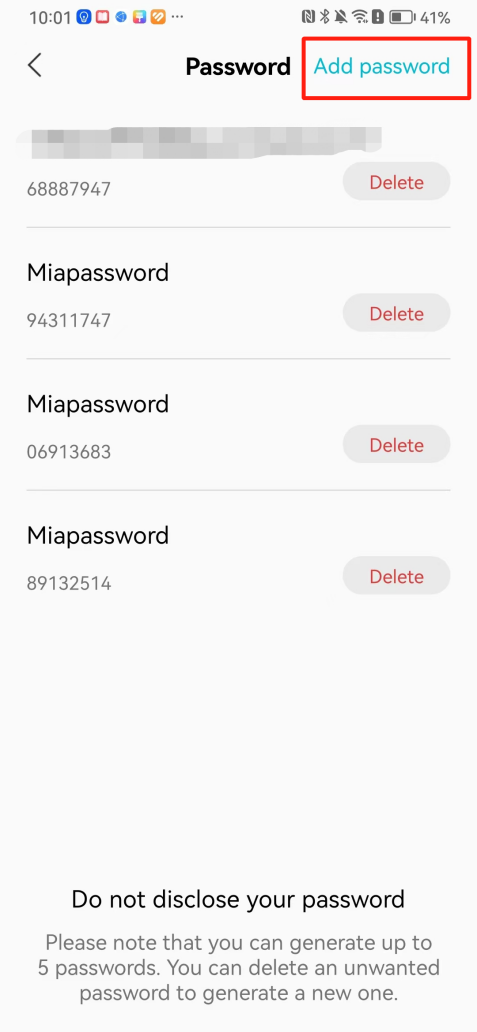 ### 8\.1\.4 Change email address Enter the email and verification code to successfully modify it, but cannot be modified to a mobile phone number that exists within the organization or system. 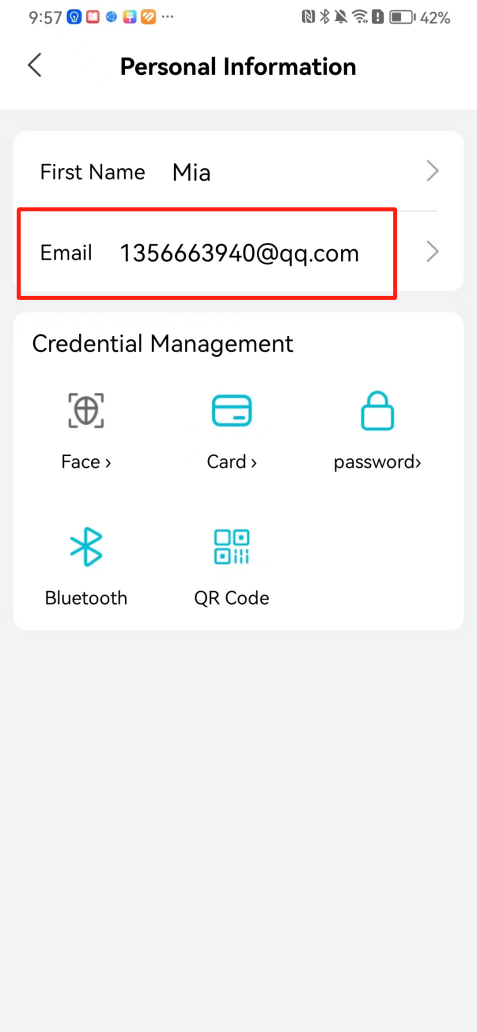 ## 8\.2 Dissolve organization/Exit organization The administrator displays a Dissolve organization. After dissolution, personnel and permissions are automatically deleted, and all personnel within the organization are no longer able to log in to the system. 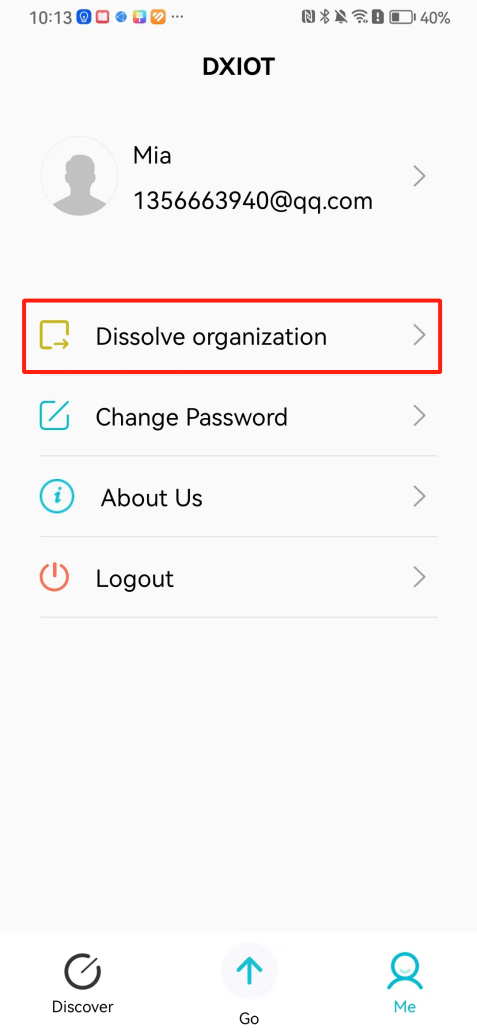 The sub administrator/regular user displays Exit organization. After exiting, the user cannot log in to this organization again, and the original permissions within the organization will also be deleted. 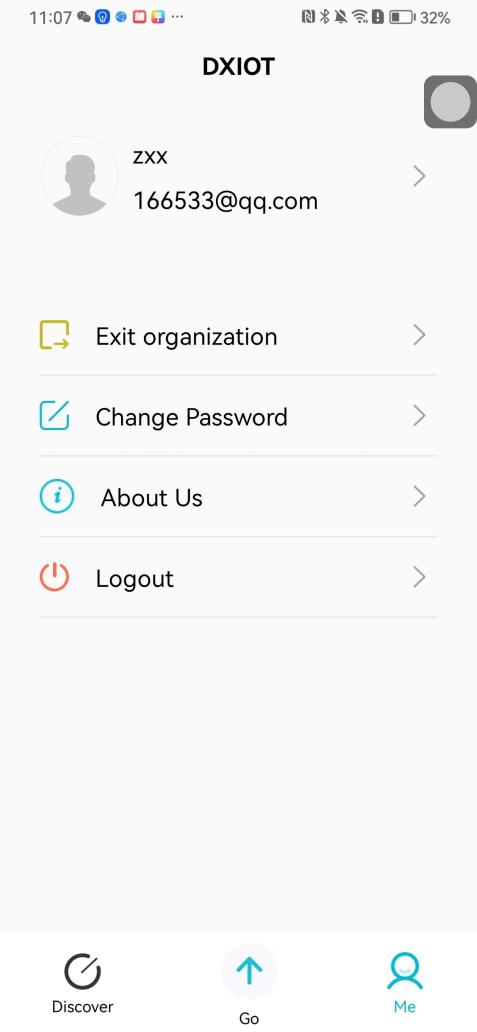 ## 8\.3 Change password Enter the original and new passwords and click 'Confirm' to proceed. 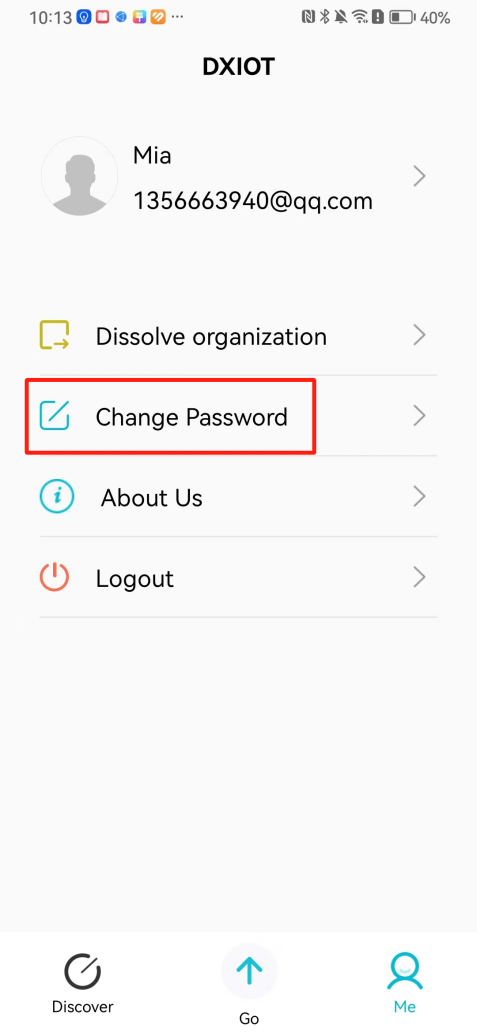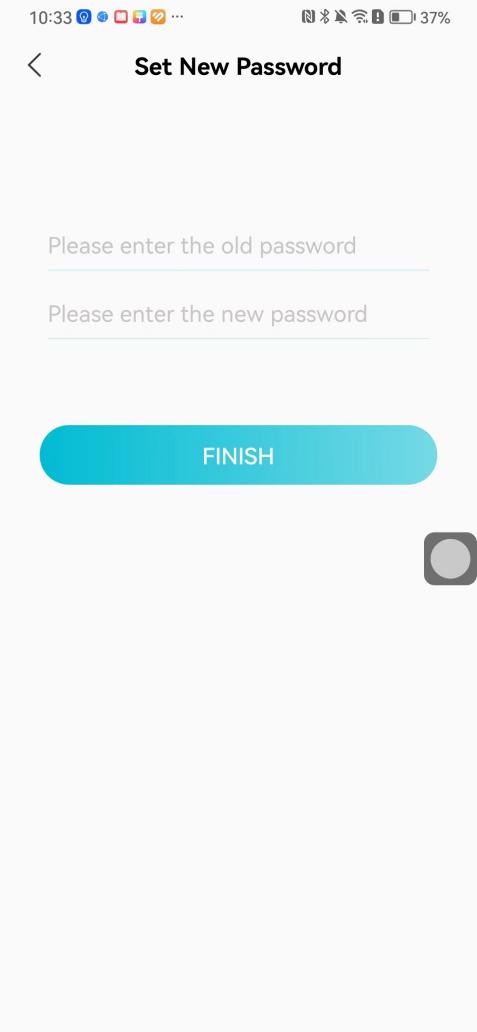 ## 8\.4 Log out After exiting, return to the login page and can switch accounts to log in. 
王雅伦
2024年12月6日 16:31
14
转发文档
收藏文档
上一篇
下一篇
手机扫码
复制链接
手机扫一扫转发分享
复制链接
Markdown文件
Word文件
PDF文档
PDF文档(打印)
分享
链接
类型
密码
更新密码
有效期