酷豆软件及云平台介绍汇总
1-0 多弦办公国内版使用文档
2-0 多弦办公海外版使用文档
3-0 多弦办公APP使用文档(中文版)
4-0 多弦 PaaS 系统接口清单
8-0 云证核验系统介绍(1.2.2)
6-0 共享空间系统介绍
7-0 我的门钥匙小程序使用手册(历史版)
1-1 多弦办公国内版功能清单
3-1 多弦办公APP使用文档(英文版)
5-0 粮仓安全管理系统功能清单
5-1 粮仓安全管理系统需求书
5-2 粮仓安全管理系统标准版方案
5-3 粮仓安全管理系统用户手册
7-1 我的门钥匙小程序流程汇总(历史版)
9-0 凡汐 APP 功能清单
文档
-
+
首页
2-0 多弦办公海外版使用文档
#### 多弦办公海外版本地文档 [【附件】多弦办公使用文档_国际化(英文版).docx](/media/attachment/2024/12/%25E5%25A4%259A%25E5%25BC%25A6%25E5%258A%259E%25E5%2585%25AC%25E4%25BD%25BF%25E7%2594%25A8%25E6%2596%2587%25E6%25A1%25A3_%25E5%259B%25BD%25E9%2599%2585%25E5%258C%2596%25E8%258B%25B1%25E6%2596%2587%25E7%2589%2588.docx) #### 平台访问地址 http://101.200.139.97:8091/ #### 国际化使用文档 [1\. Register/Login 3](#_Toc16044) [1\.1 Register and login through the registration button 3](#_Toc12346) [1\.2 Administrator set permissions for login 5](#_Toc22034) [1\.3 Forget password 6](#_Toc28018) [2\. Homepage 6](#_Toc25424) [3\. Personnel management 7](#_Toc2475) [3\.1 Add/Edit personnel 7](#_Toc2793) [3\.2 Import information 8](#_Toc17838) [3\.3 Adjust group 9](#_Toc18321) [3\.4 Delete personnel 10](#_Toc8772) [3\.5 Reset password 10](#_Toc19525) [3\.6 Credential management 11](#_Toc20071) [4\. Device management 1](#_Toc31808)4 [4\.1 Add/Edit device 14](#_Toc30694) [4\.2 Import device 1](#_Toc20371)6 [4\.3 Adjust group 16](#_Toc6690) [4\.4 Delete device 17](#_Toc29023) [4\.5 Remote door opening and device disabling and enabling 17](#_Toc986) [4\.6 Configuration 17](#_Toc3334) [5\. Permission management 18](#_Toc21527) [5\.1 Add permission group 18](#_Toc10709) [5\.2 Adjust personnel and device 18](#_Toc28600) [5\.3 Adjust the time 2](#_Toc12521)0 [5\.4 Delete permission group 2](#_Toc15413)2 [5\.5 Add visitor permission group 22](#_Toc22373) [6\. Visitor management 22](#_Toc4488) [6\.1 Visitor authorization 2](#_Toc14132)3 [6\.2 Invite visitor 23](#_Toc9318) [6\.3 Visitor application 24](#_Toc29409) [6\.4 Deletion 25](#_Toc29480) [6\.5 Visitor review 2](#_Toc25949)6 [7\. Attendance management 26](#_Toc21268) [7\.1 Attendance details 26](#_Toc9371) [7\.2 Attendance statistics 2](#_Toc26862)7 [8\. Log 2](#_Toc5744)7 [8\.1 Access records 27](#_Toc28396) [8\.2 Authorization records 2](#_Toc4381)8 [8\.3 Operation log 2](#_Toc31629)8 [8\.4 Warning records 2](#_Toc3426)9 [9\. System settings 2](#_Toc22498)9 [9\.1 System settings 2](#_Toc24090)9 [9\.2 Form configuration 3](#_Toc10557)0 DX Office, as an access control and security management application, provides users with functions such as **personnel management, device management, permission management, visitor management, and access records.** ## Register/Login Can register and log in through the login button on the login page, or can log in through the administrator's permission settings. The main content of this chapter: * 1. Use the registration button to register and log in. 2. Administrator set personnel permissions to log in. 3. Forget password. ### 1\.1 Register and login through the registration button Step 1:Click the login page \[Register] to enter the registration page; Step 2:Choose phone number or email address; Step 3:Enter the correct email address, click \[Get], and accurately fill in the obtained verification code; Step 4:Enter the password and confirm the password, check the agreement and policy, and click \[Confirm]; Step 5:Enter the organization page, enter the name of the organization, click \[Confirm], and go to the office homepage to indicate successful registration and login.  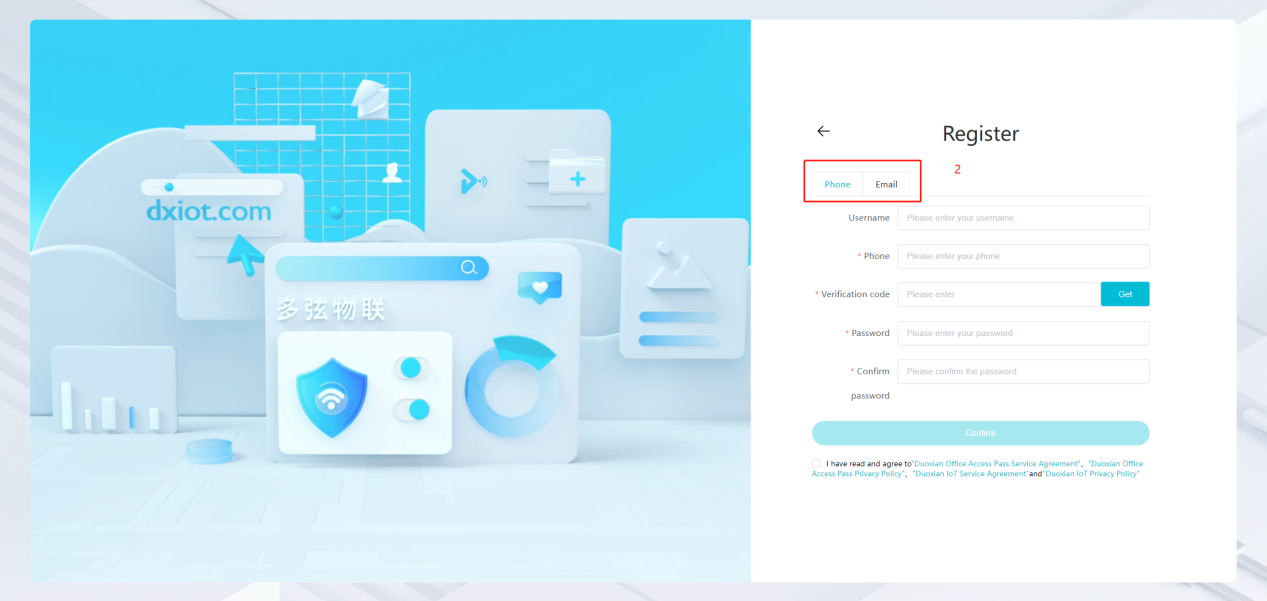 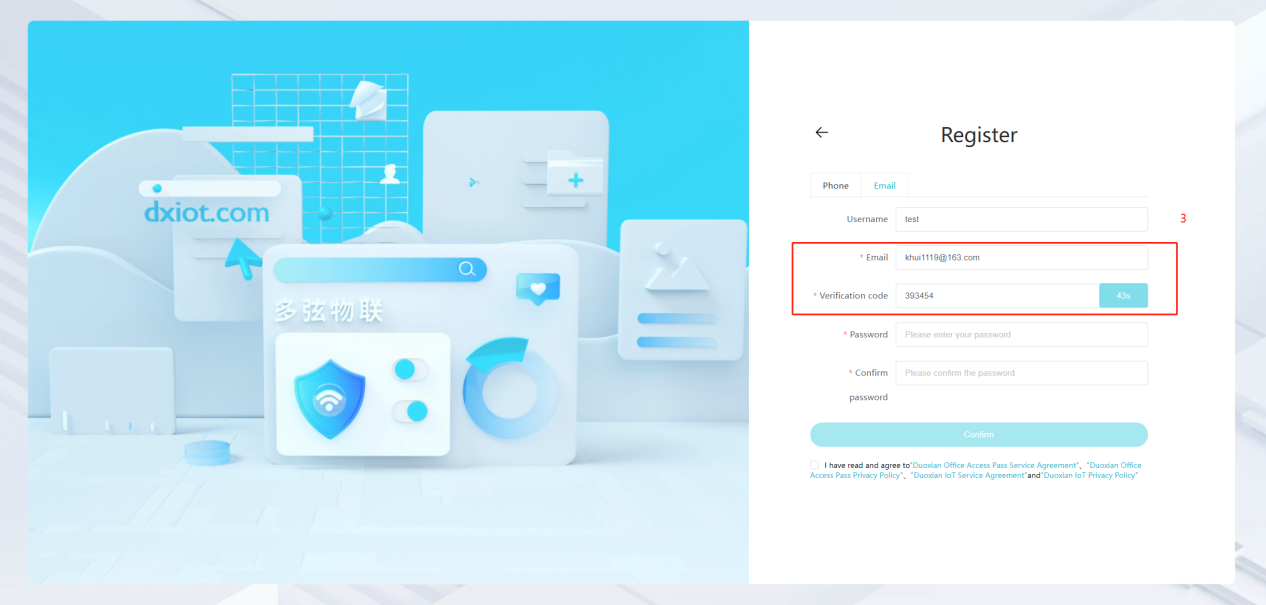 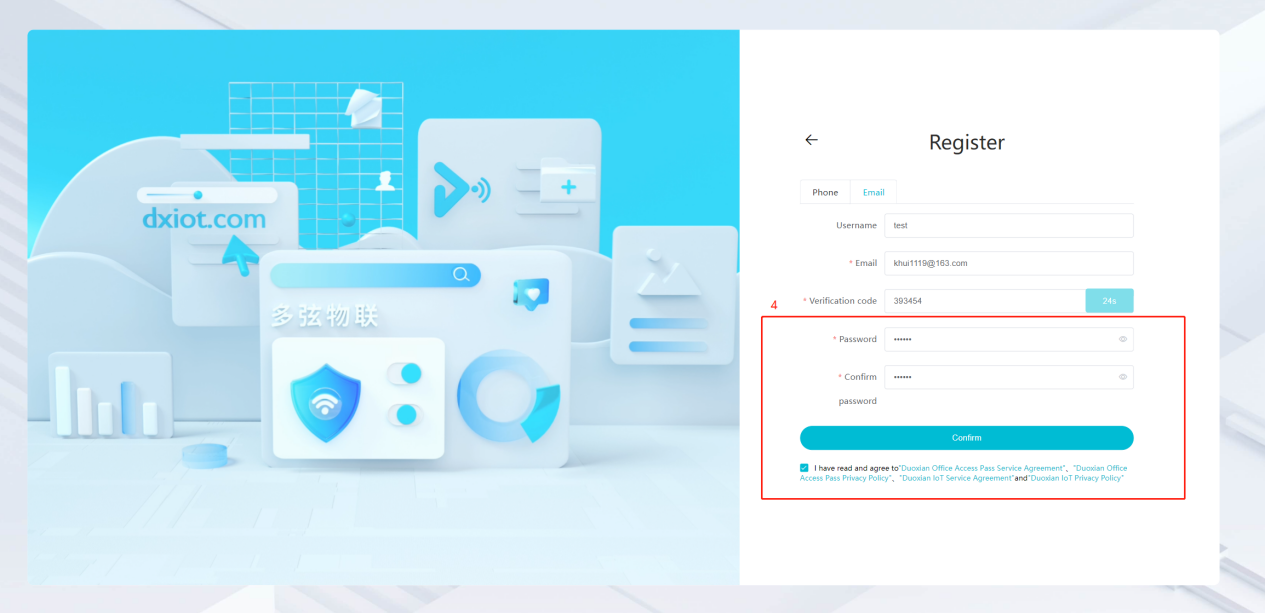 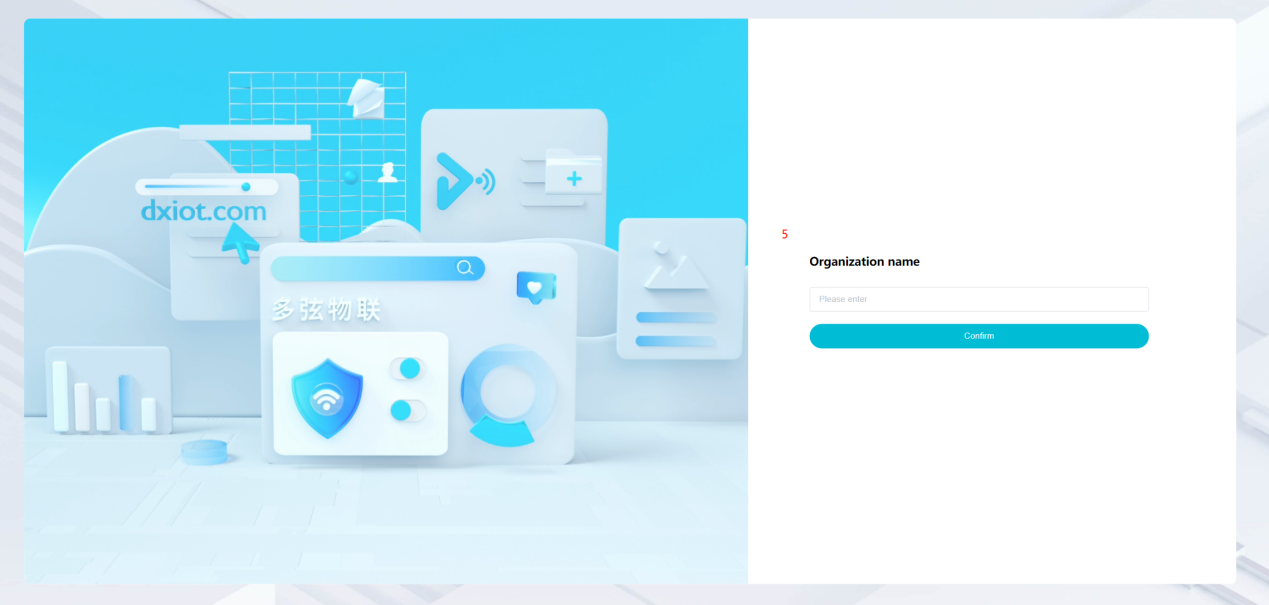 ### 1\.2 Administrator set permissions for login Step 1:Administrator logs in to the system and enters the personnel management module. Step 2:Select a person, click \[Edit], and the person editing page will pop up. Step 3:Select the person as the administrator, click \[Confirm], and the person can become an administrator to log in. The default login password is 123456\. 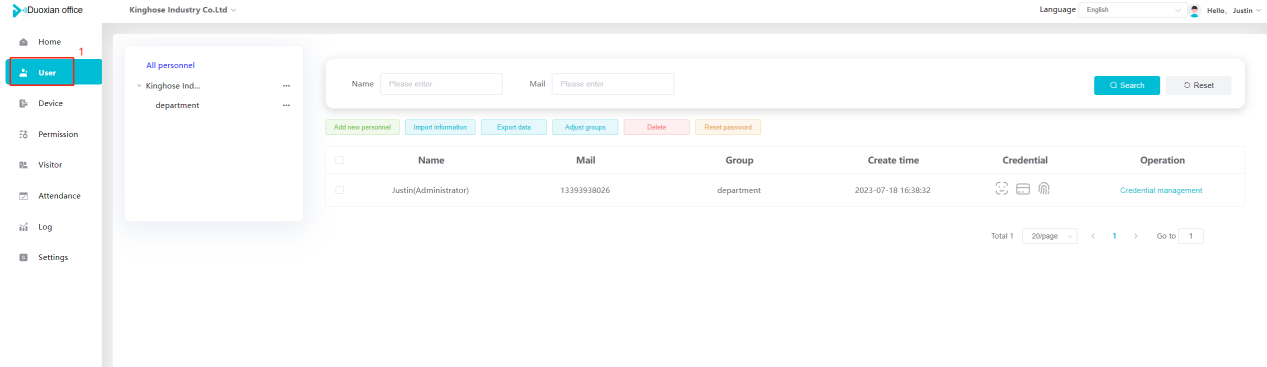 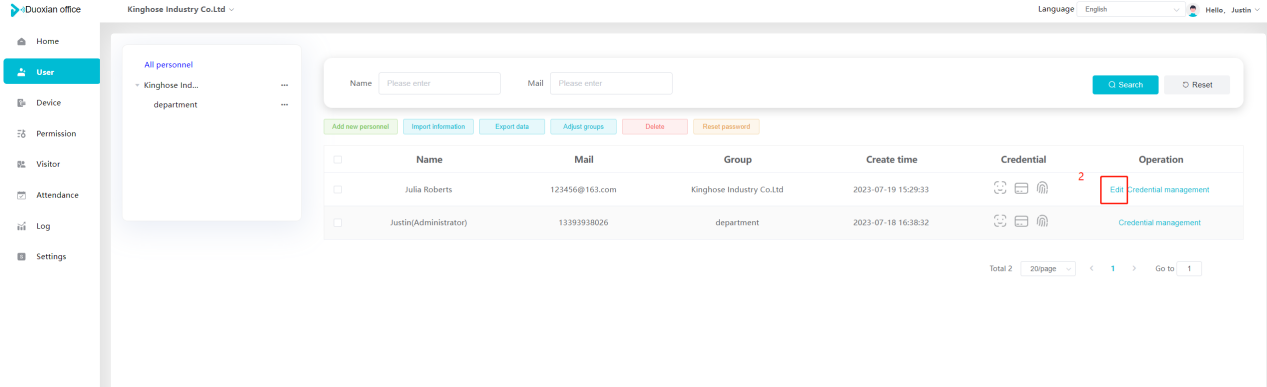 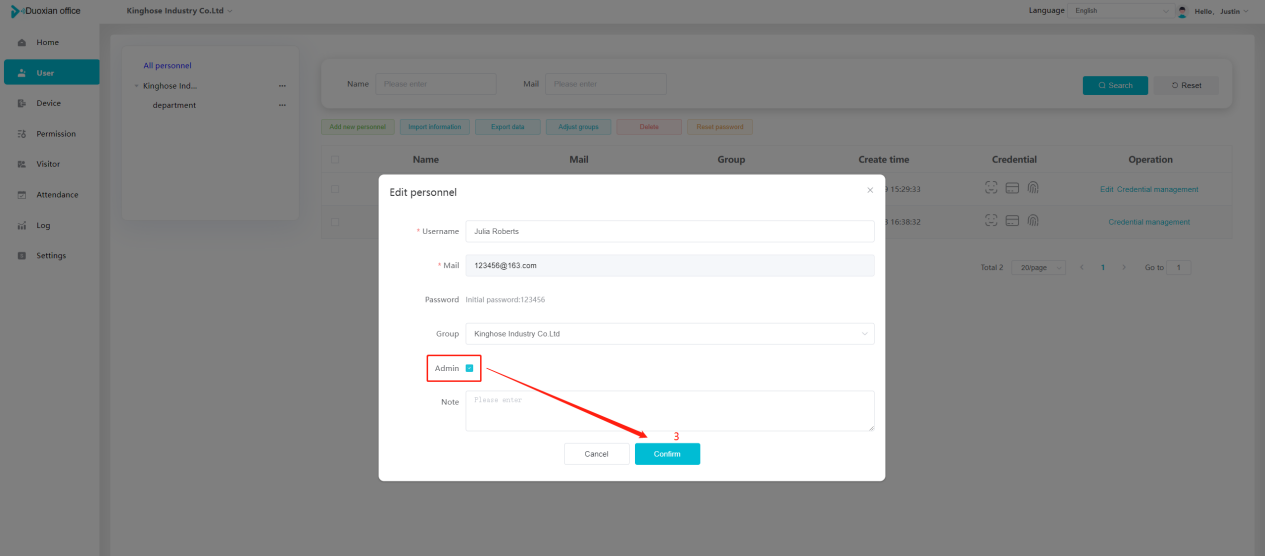 ### 1\.3 Forget password Click \[Forget password], enter the reset password page to modify the login password of users who have already registered. 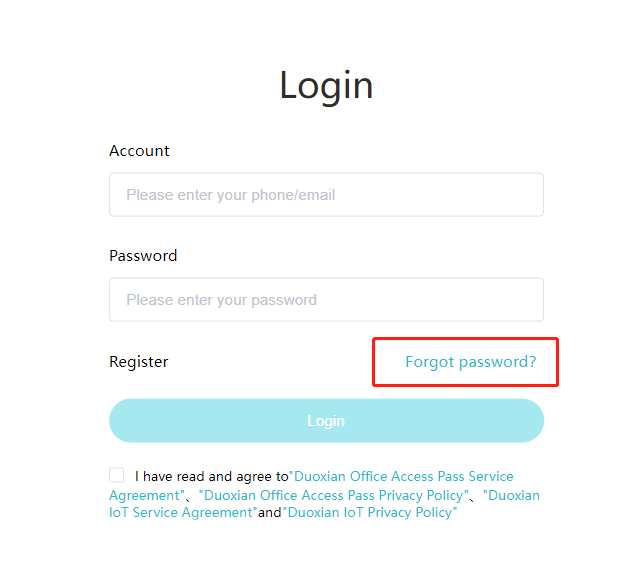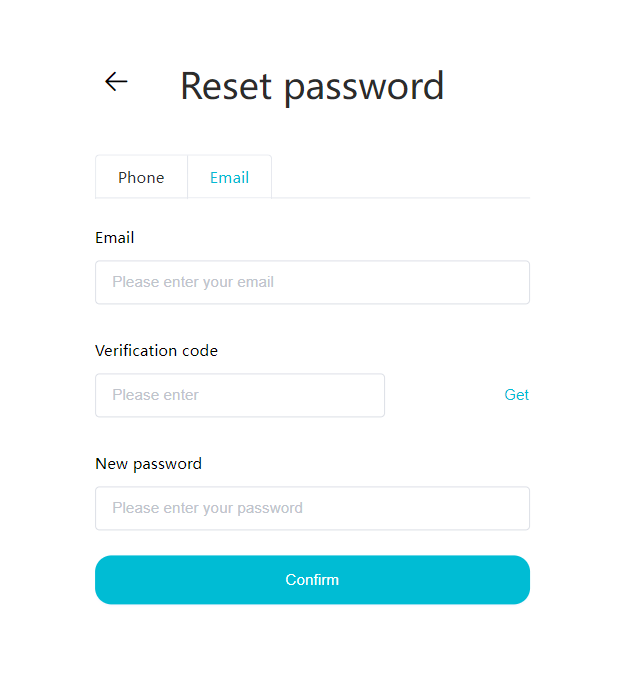 ## Homepage The homepage displays the name of the organization, the total number of devices under the organization, the total number of access and visitors. The total number of access and visitors can be filtered by day, week, and month, and real\-time access monitoring can see the latest 10 access records.  ## 3\.Personnel management Organization administrators can add, delete, and edit personnel within the organization, as well as group and manage personnel. They can also add and delete personnel credentials. The main content of this chapter: 3\.1 Add/Edit personnel. 3\.2 Import information. 3\.3 Adjust group. 3\.4 Delete personnel. 3\.5 Reset password. 3\.6 Credential management. ### 3\.1 Add/Edit personnel Step 1:Click \[Add new personnel]/Edit, pop up window for adding/editing personnel. Step 2:Enter the user name and phone number/email address. The user name is a required field, and either phone number or email address can be selected. All other fields are optional. After selecting the person as an administrator, the person can log in to the backend. 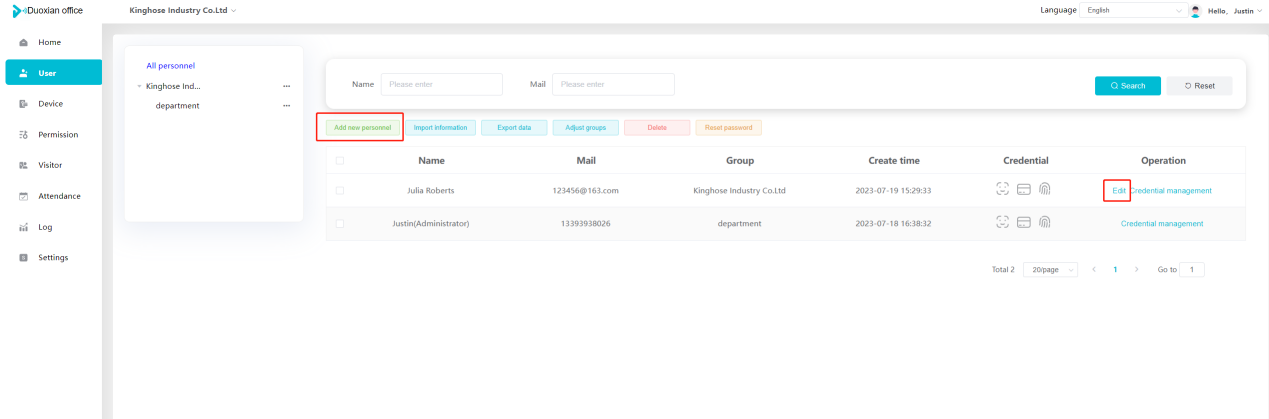 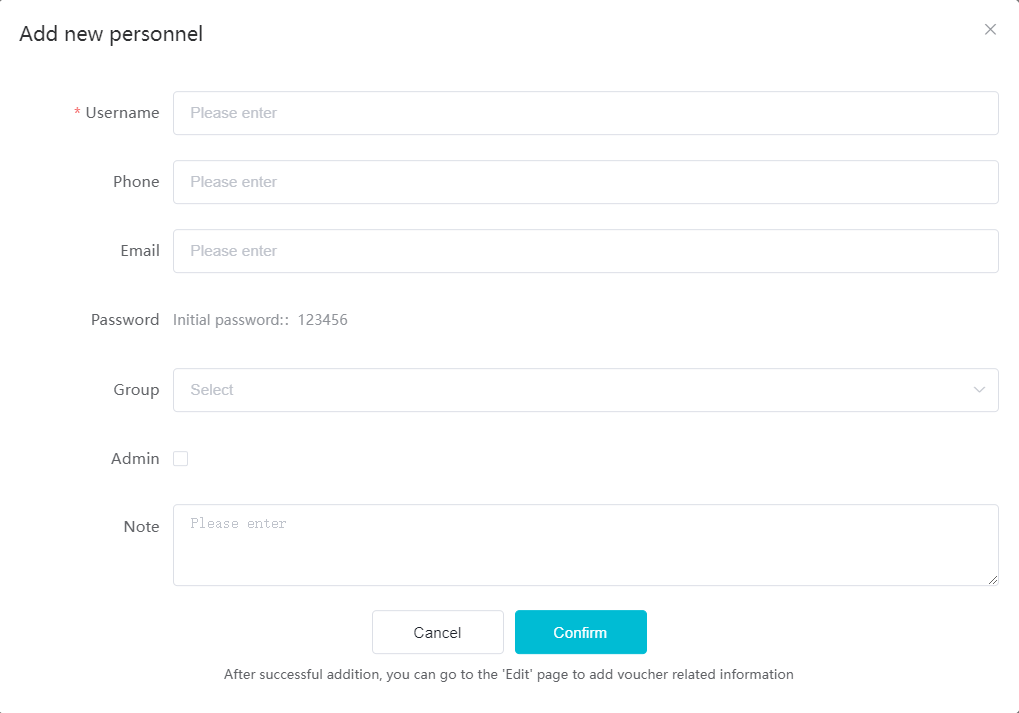 ### 3\.2 Import information Information import can export personnel templates, import templates, import personnel images, and import QR code images. Step 1:Click \[Import information] button. Step 2:Click \[Template Download] to download a personnel information template. Fill in the template information according to the template information. The personnel name is required, one of the phone number or email is optional, and the other is optional. 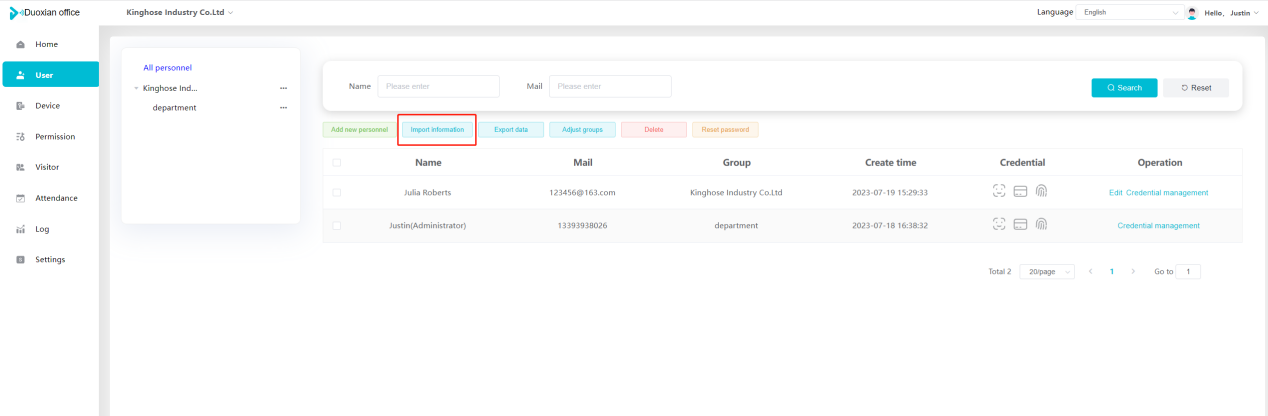 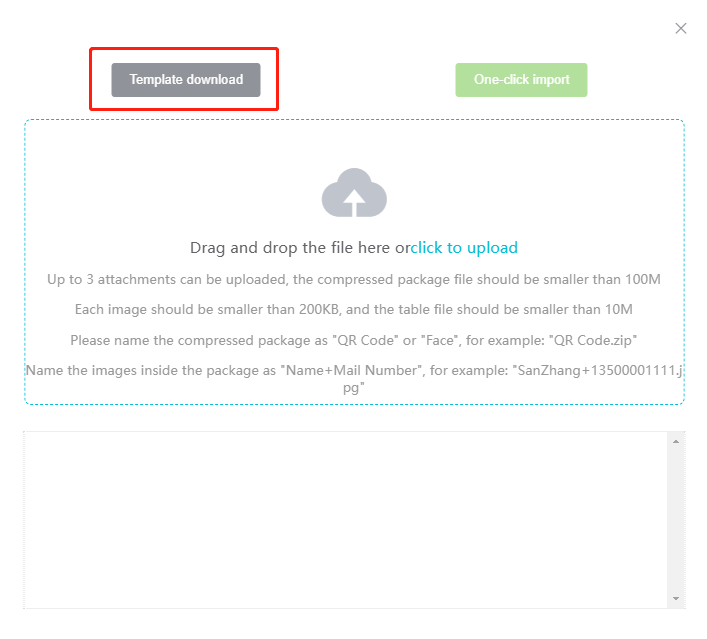  Step 3:Click \[One click import] to select personnel templates, face image zip, or QR code zip for import(Note:The images inside the package must be named with name and email, and the zip compressed package must be named with a face or QR code) 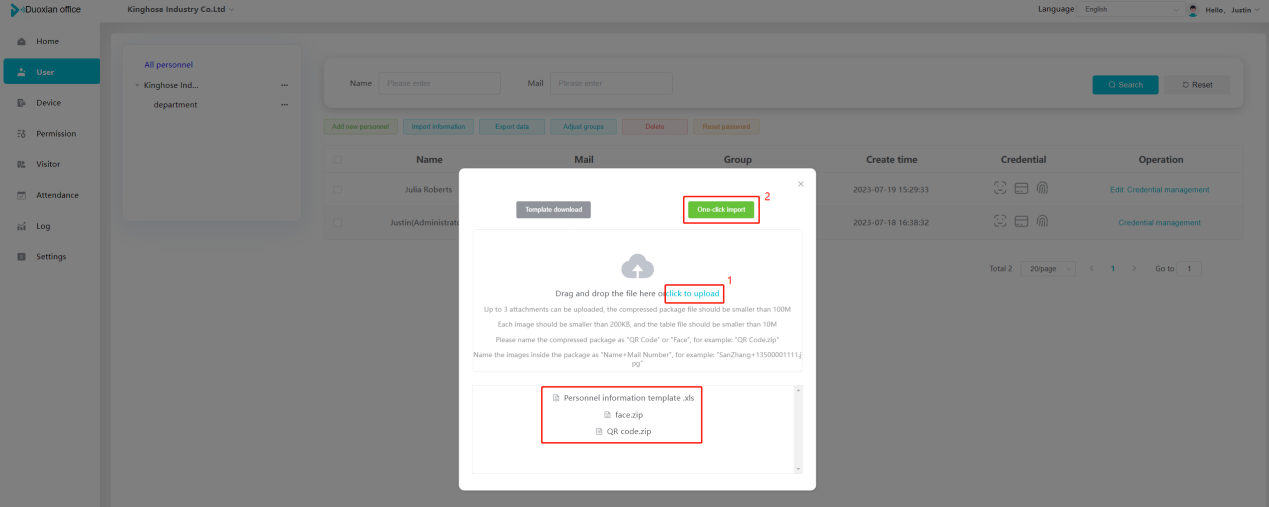 ### 3\.3 Adjust group Select personnel and click \[Adjust Group] to adjust the grouping of personnel in batches. 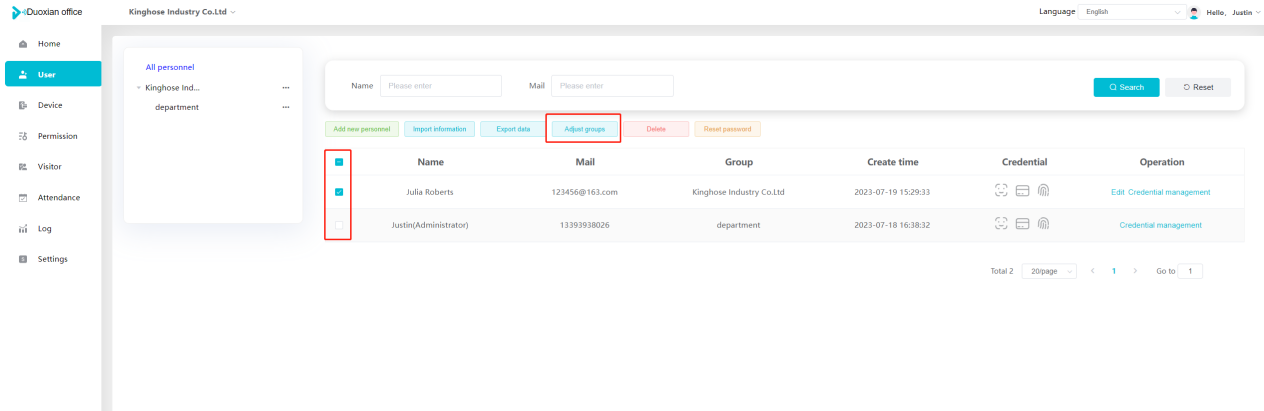 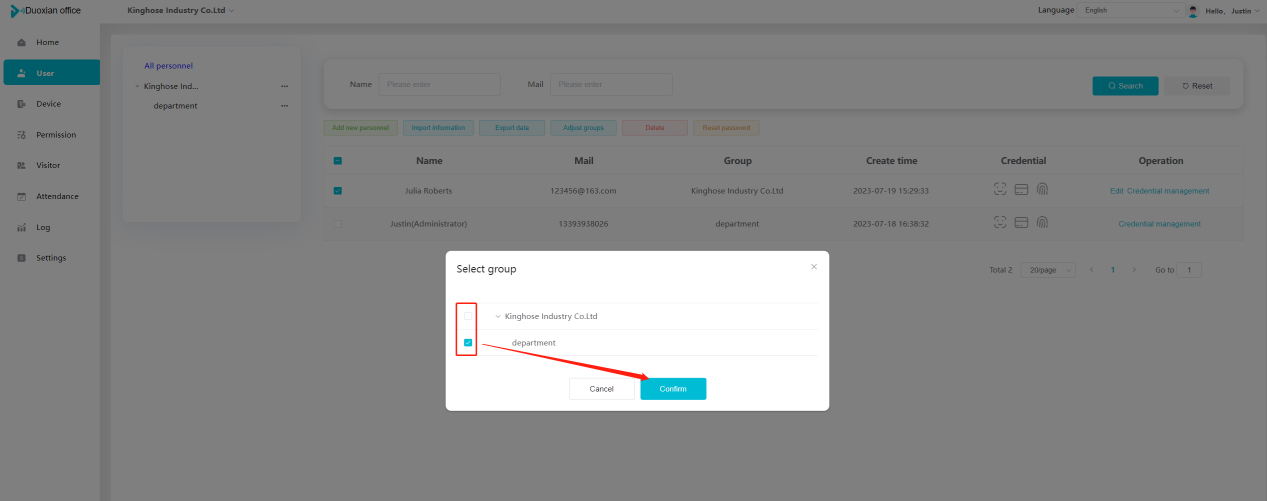 ### 3\.4 Delete personnel Check the personnel and click \[Delete] to batch delete them. When the device is online, deleting the personnel will also delete the corresponding personnel permissions in the device. 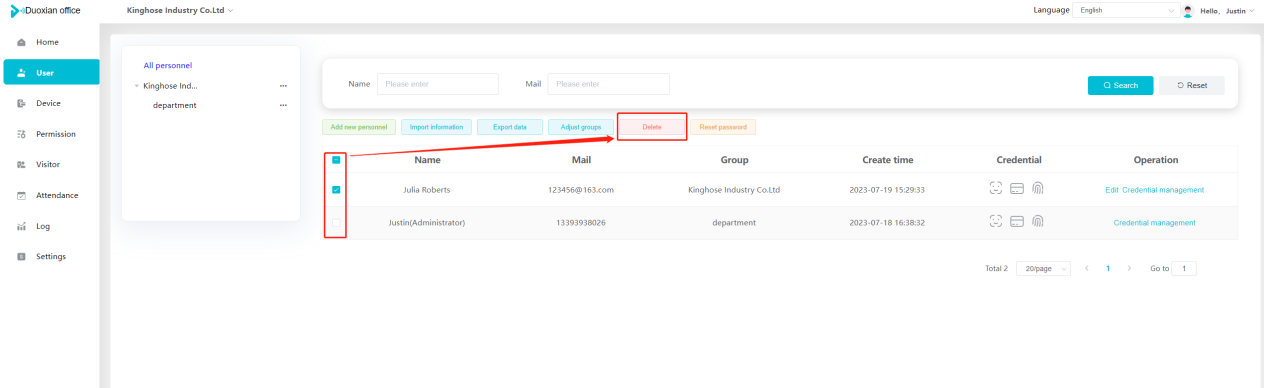 ### 3\.5 Reset password Click \[Reset Password] will reset the personnel's password to the default login password, which is 123456\. 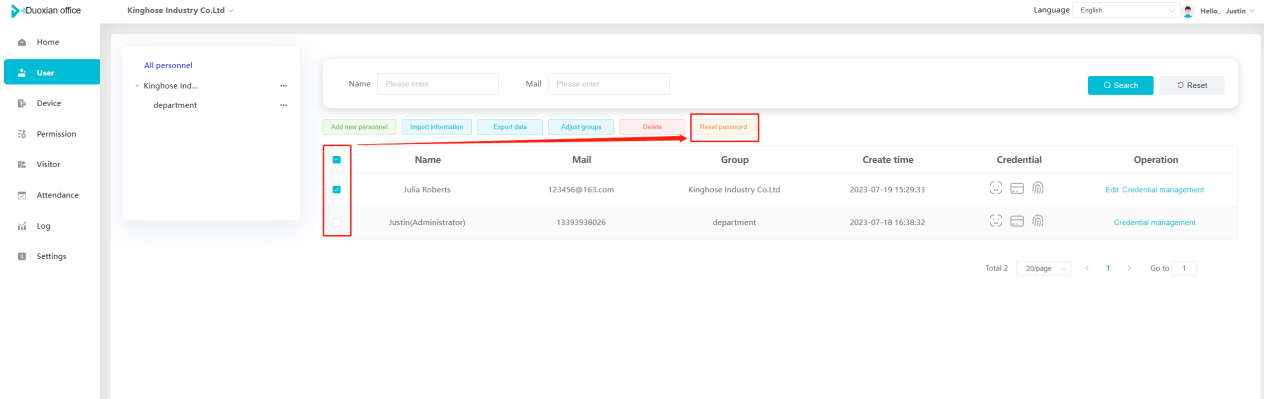 ### 3\.6 Credential management Step 1:Click \[Voucher Management] to pop up the credential management window. Step 2:Can input faces, add cards, passwords, and custom QR codes. 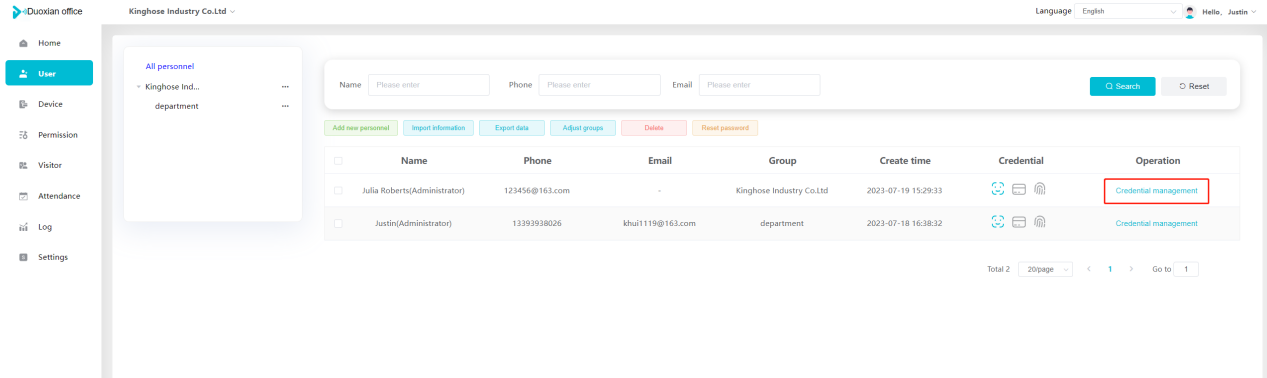 Add face: Click the \[\+] button on the face information side to add a face.  There are two ways to add cards: card binding and input card number Input card number: Click \[Input card number] to directly input the card number. Once confirmed, the card can be bound to the personnel.  Card reading and binding: Step 1:Add a device first. Step 2:After selecting the device, place the card on the device for card reading. The read cards will be displayed in a pop\-up window, with a maximum of 10 cards read at a time. Once confirmed, the read cards can be bound to the personnel.  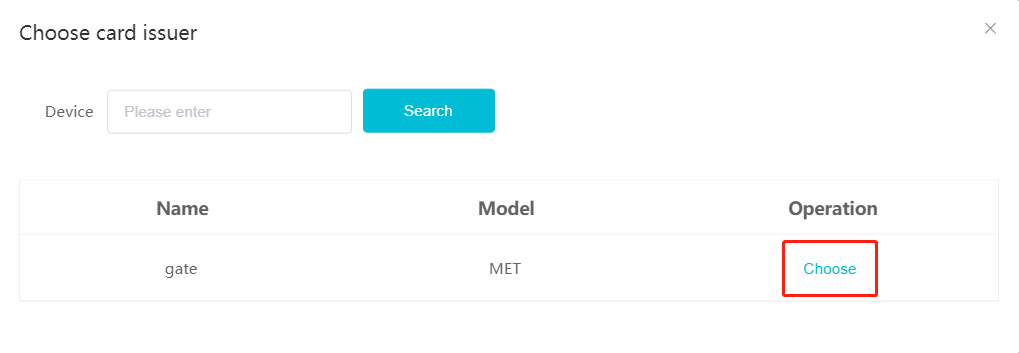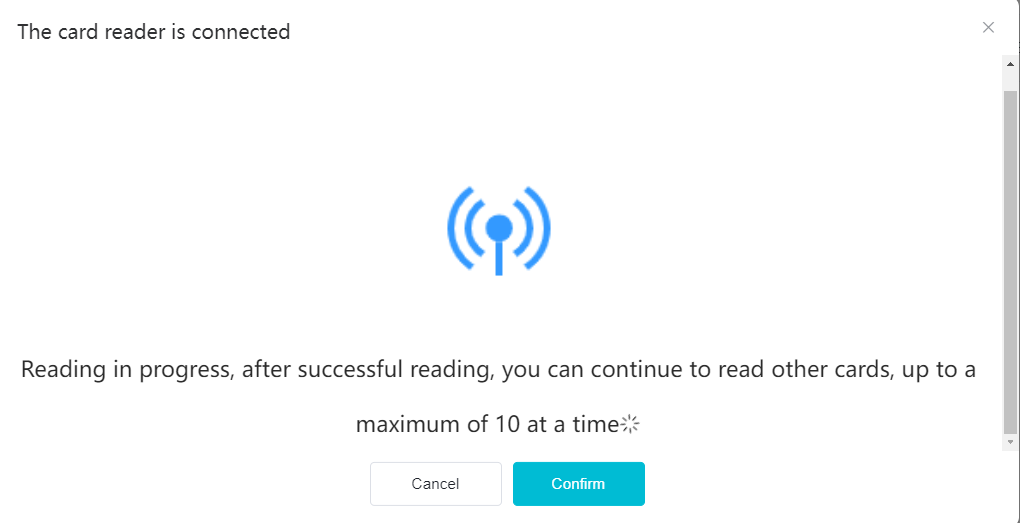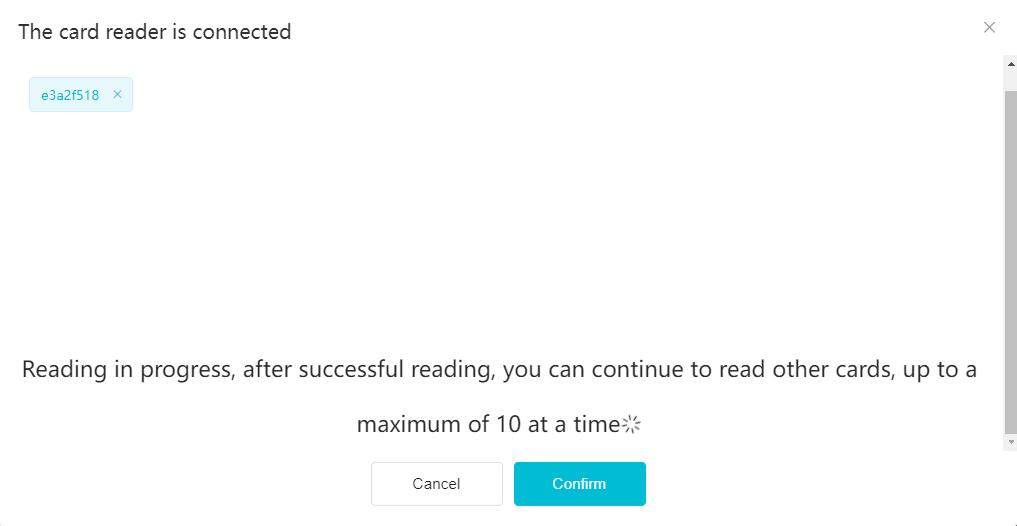 Add password: Click \[Add] on the password side to add a password, with a maximum of five passwords per person. Limit 6\-8 digits per password. 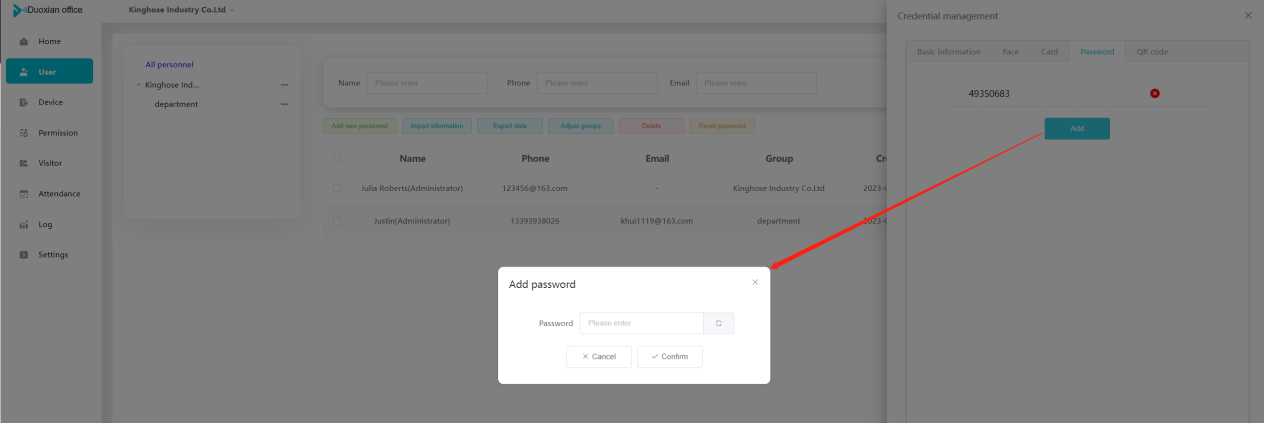 Add custom QR code: Click the \[\+] on the right side of the QR code to add a custom QR code. The QR code can be manually entered and imported into the QR code image. 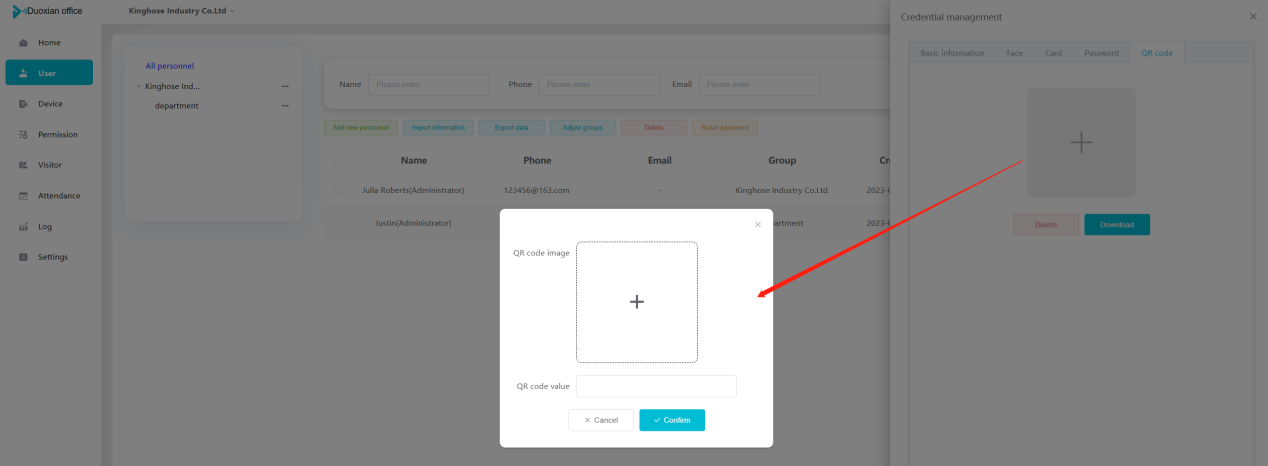 ## 4\. Device management Organization administrators can add, delete, and edit devices in the organization, and can group and manage devices. The main content of this chapter: 4\.1 Add/Edit device. 4\.2 Import device. 4\.3 Adjust group. 4\.4 Delete device. 4\.5 Remote door opening and device disabling and enabling. 4\.6 Configuration. 4\.7 Floor settings. 4\.8 Release fire alarm. ### 4\.1 Add/Edit device Add device can be done through two methods: add new device and import device: Method 1:Add new device. Step 1:Click \[Add/Edit device] to pop up the window. Step 2:Enter the device SN code and device name. The device SN code and device name are mandatory items, while others are optional. After entering the device SN code, the system will verify it. Once the verification is passed, the device model can be obtained. If the SN code is not verified, the device cannot be added. Step 3:After verification, the network and IP address can be set according to the actual situation on site. Click \[Generate Configuration Code] to configure the device to connect to the network and server. If not configured, the device is offline. After successful configuration, the device will restart. After connecting to the network and server, the device is online, and only online devices can successfully open the door remotely. 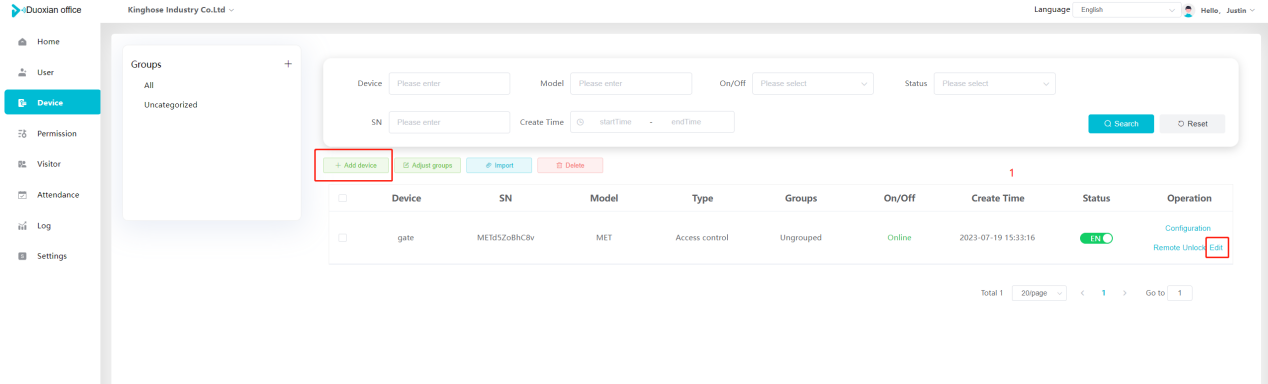 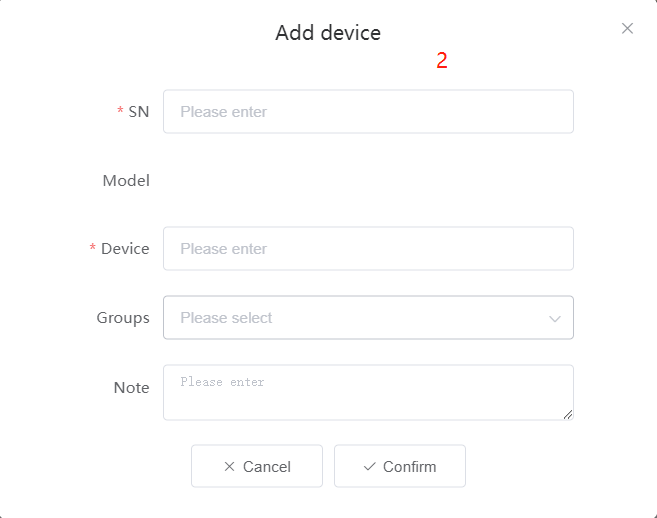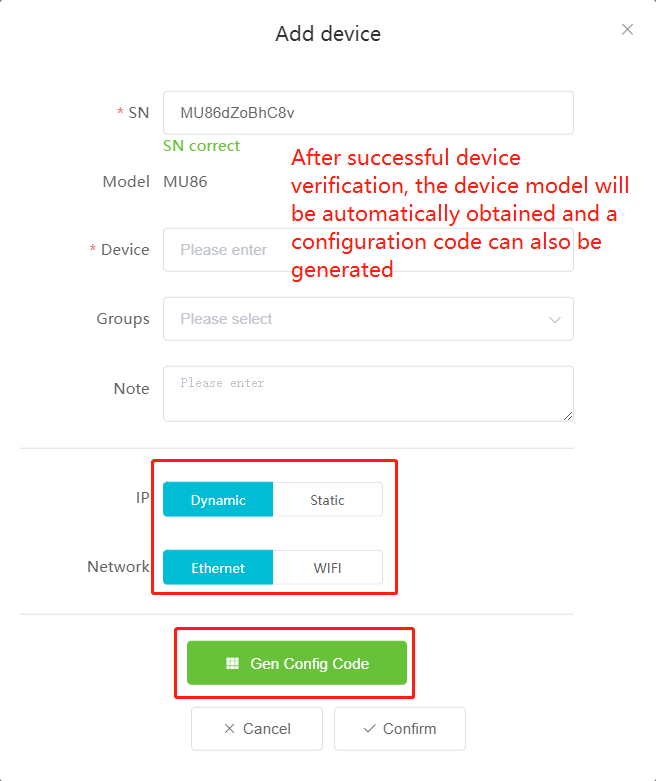 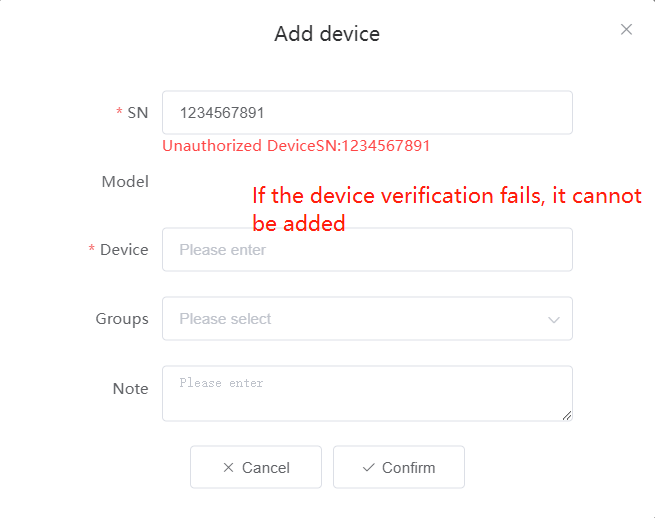 ### 4\.2 Import device Method 2:Import device. Step 1:Click \[Import] to pop up window, where you can select template download and device import. Step 2:Click \[Template download] to download the device template. The device name and SN number are required, while others are optional. Step 3:Click \[Import device ] to batch import the edited devices. 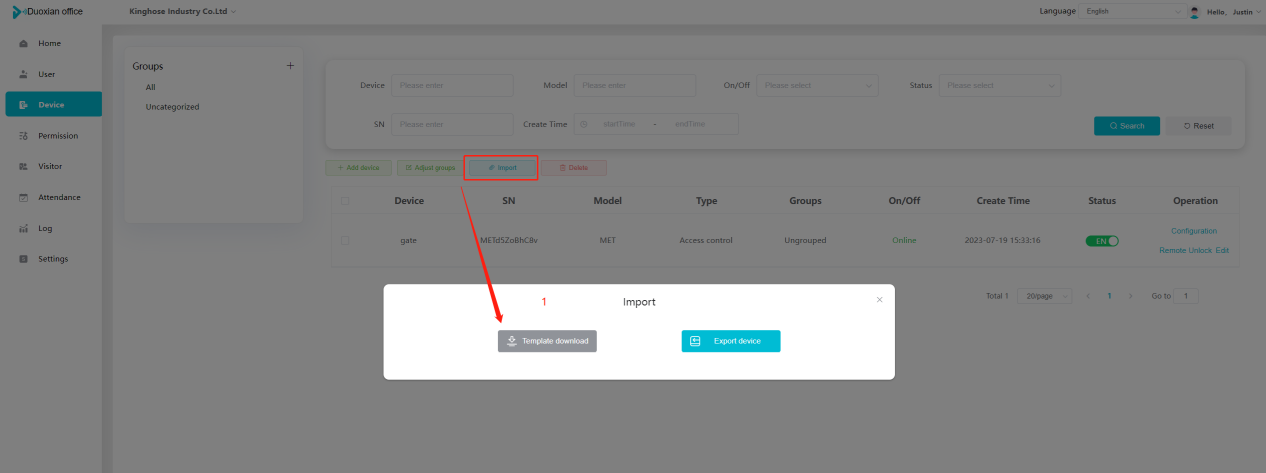   ### 4\.3 Adjust group Check the devices in the list and click \[Adjust Group] to batch adjust the grouping for the devices. 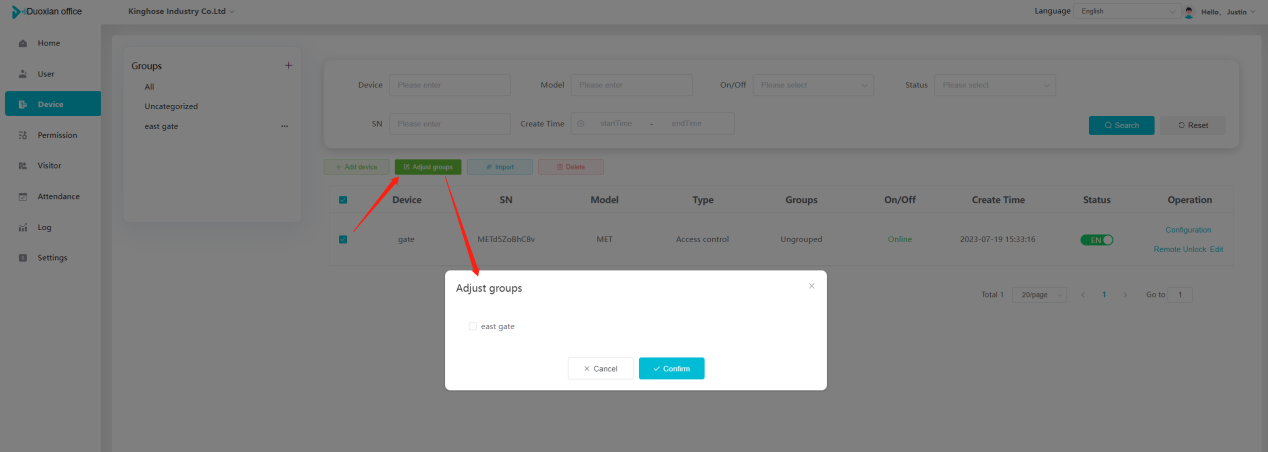 ### 4\.4 Delete device Check the device and click \[Delete]. If the device is online during deletion, all permissions in the device will be cleared. (If the device is offline, the permissions will not be cleared) 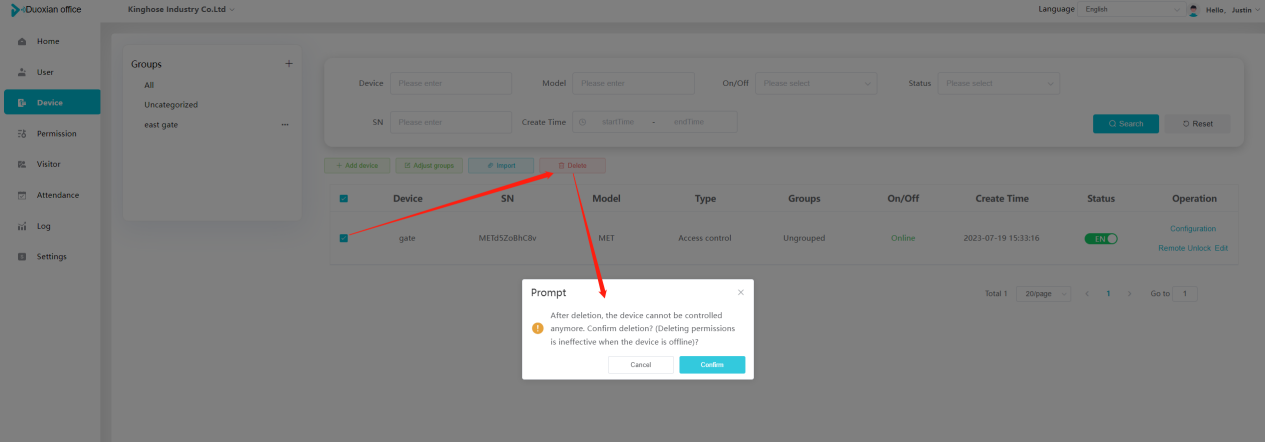 ### 4\.5 Remote door opening and device disabling and enabling Online device can operate remote door opening. Click \[Remote Door Opening] to open the door for online devices. Devices can be disabled and enabled online for operation. 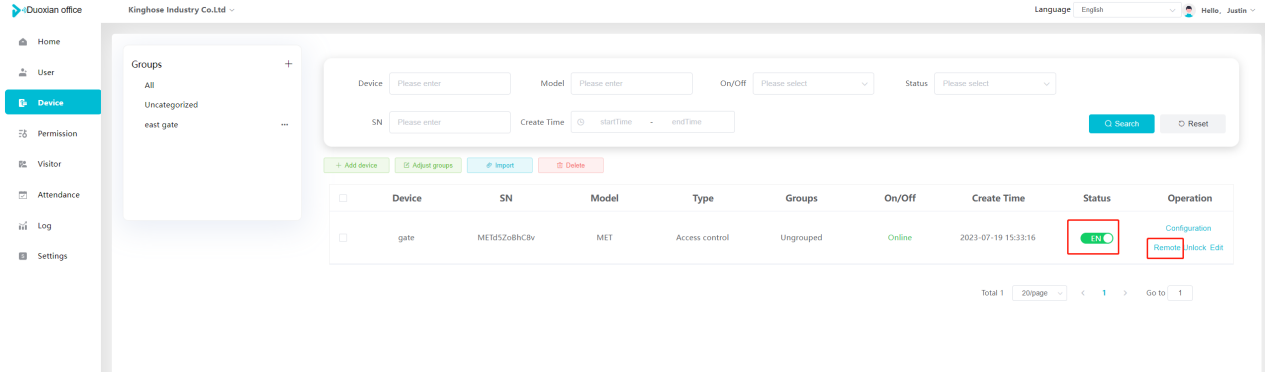 ### 4\.6 Configuration Click \[Configure] will display different configuration pages according to the type of device. 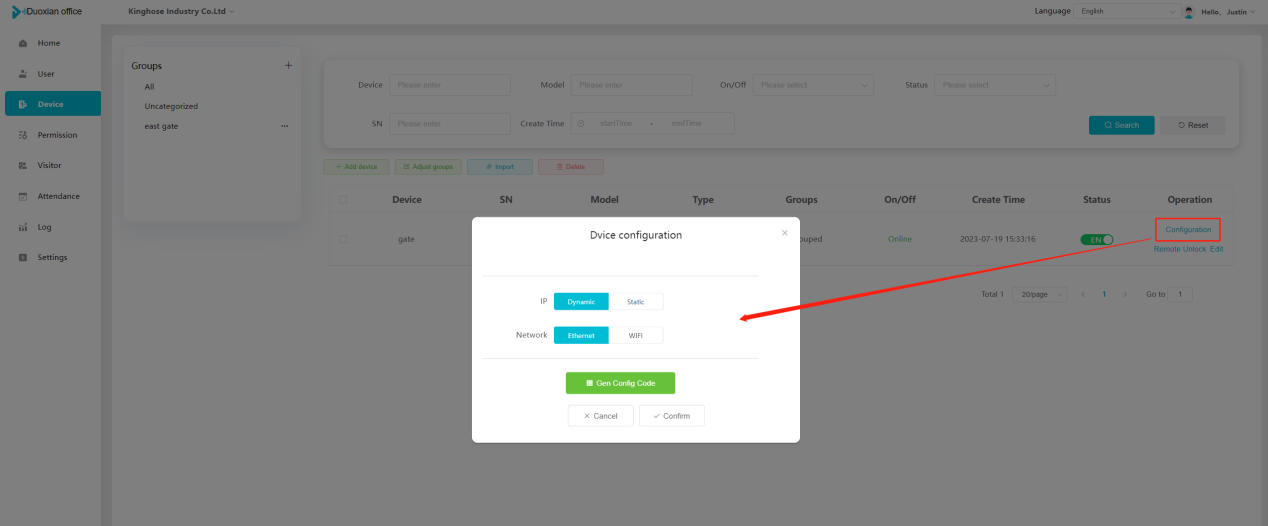 ## 5\. Permission management The system supports group management of permissions, and organization administrators can add, edit and delete permission groups. The main content of this chapter: 5\.1 Add permission group. 5\.2 Adjust personnel and device. 5\.3 Adjust the time. 5\.4 Delete permission group. 5\.5 Add visitor permission group. ### 5\.1 Add permission group Click \[Add permission group] to pop up window. Enter the name of the permission group and click \[Confirm] to add a new permission group. 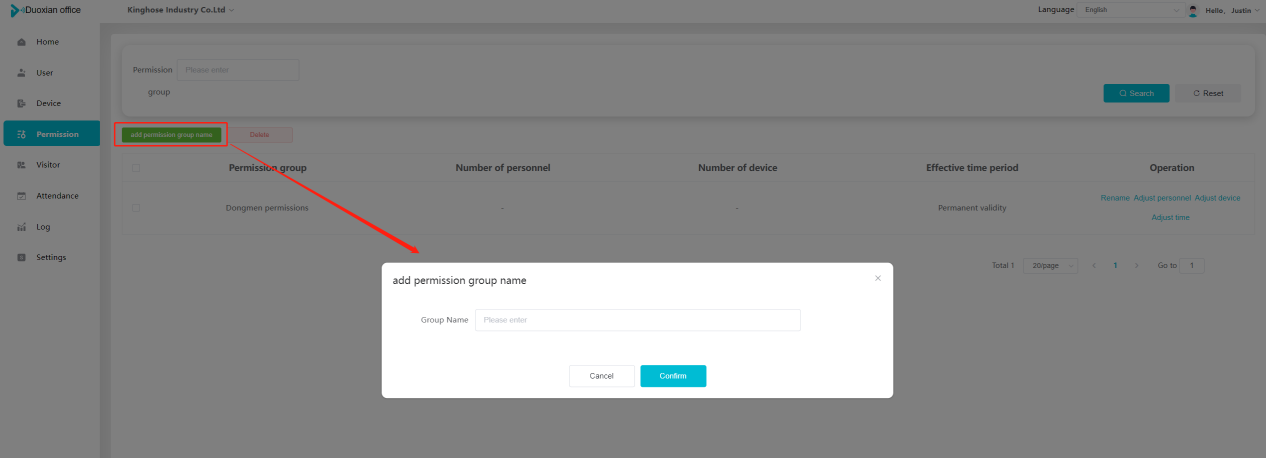 ### 5\.2 Adjust personnel and device Click \[Adjust personnel and device], can add or remove personnel from permission groups. Step 1:Click add personnel to pop up the window. Step 2:Select the person you want to authorize and add, the person will successfully added. Select the person you have already added and click remove to remove the person from the permission group. 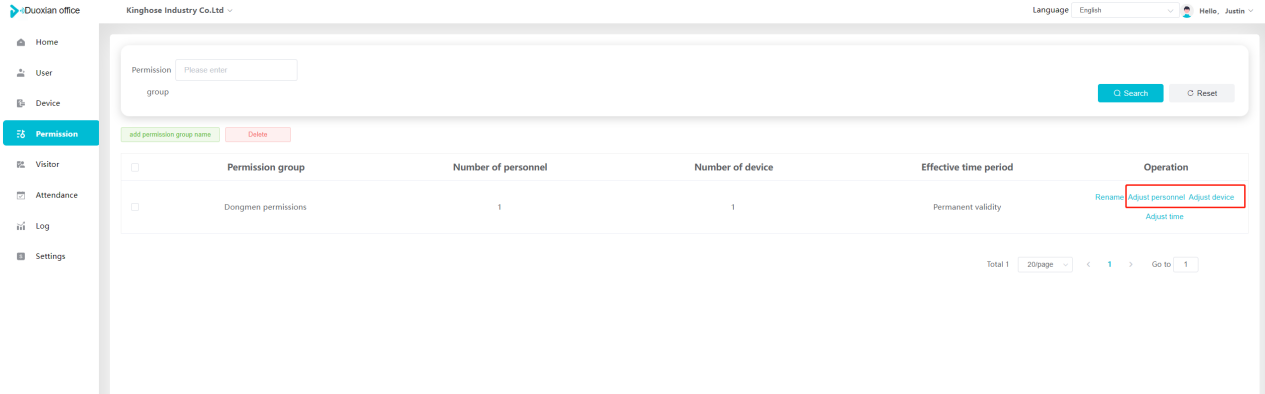 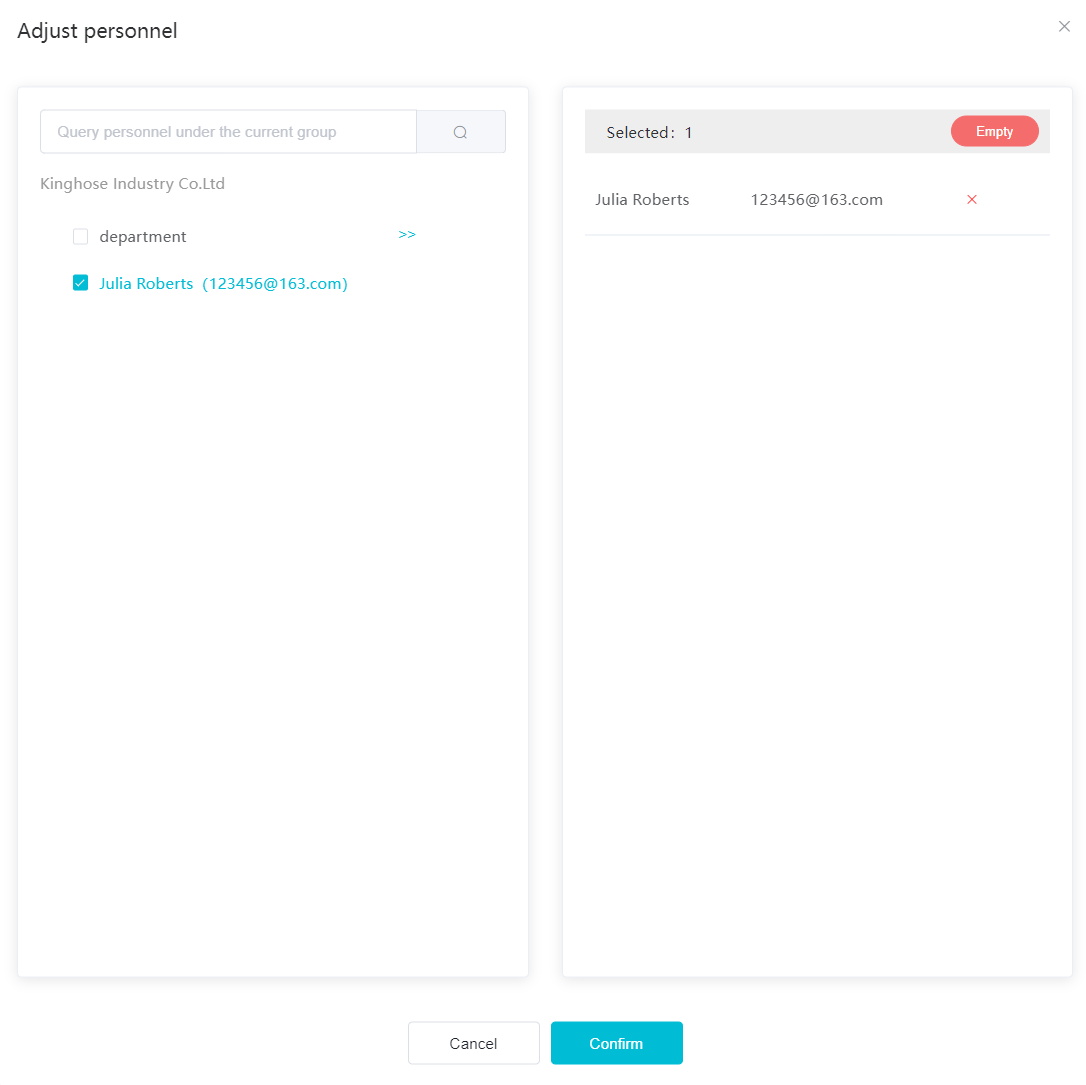 Click \[Adjust device]can add or remove devices from permission groups. Step 1:Click \[Adjust device] to pop up the window. Step 2:Click add device to pop up window. Select the device to be added to the permission group and add it. The device will be successfully added. Select the added device and click remove to remove it from the permission group. 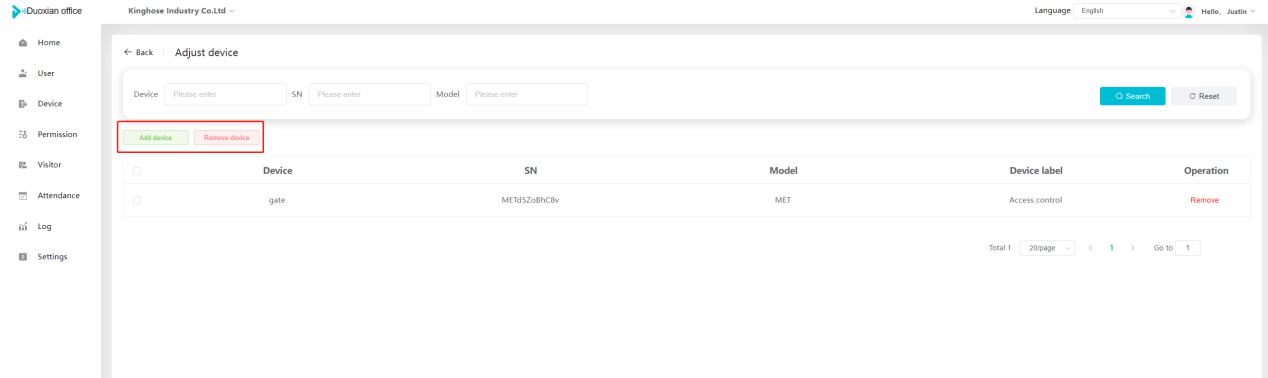 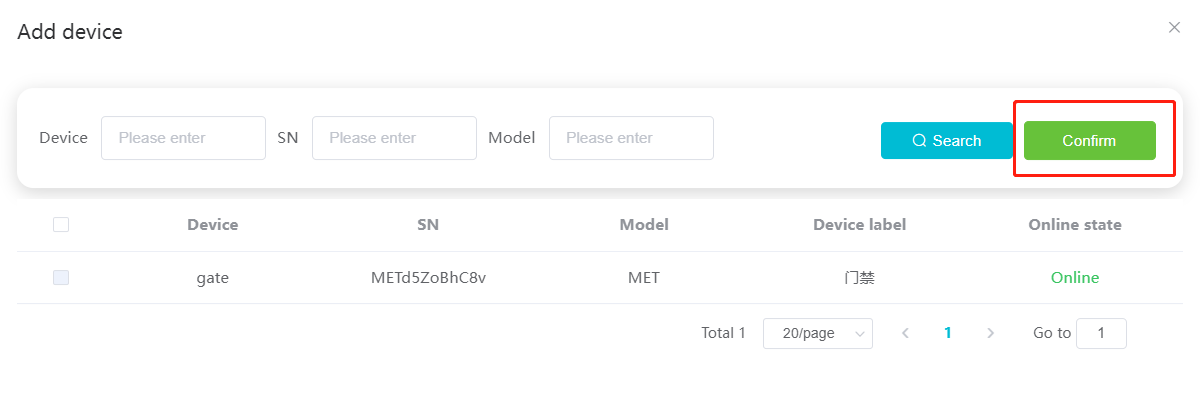 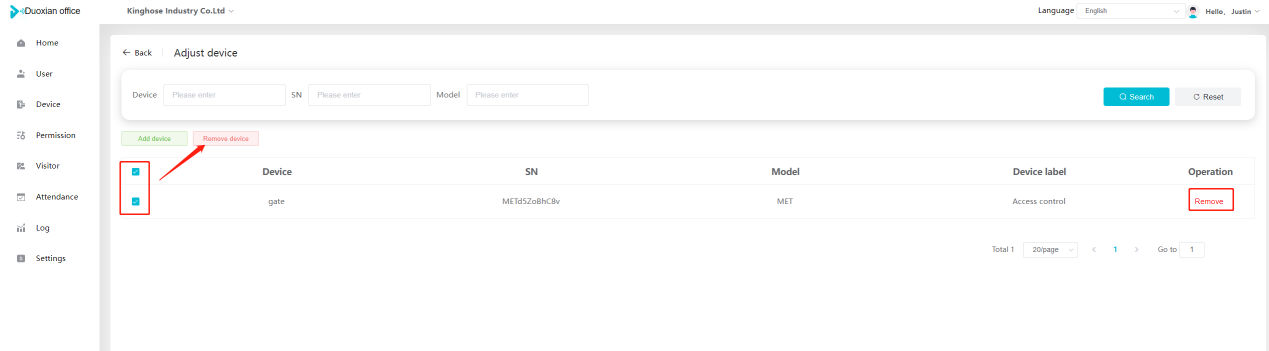 When adjusting personnel and device, the permissions in the device also change accordingly. Select add personnel and add device, the personnel permissions will be automatically distributed to the device in the same permission group. Select remove personnel or remove devices, personnel permissions will also be removed from the devices corresponding to the same permission group.(Note: If the device is offline, the permission issuance or permission deletion will fail. The permission needs to be resent in the authorization record module after the device is online before the permission can be resent or deleted) ### 5\.3 Adjust the time Can adjust the effective time of permissions. The default is permanently effective, can also change to period effective and cycle effective. (Note:The devices that support period and cycle effectiveness include:DW200, M350, MP86, MX86, CC101, CC104, VF101, VF102, VF104, VF105, VF205, M800) 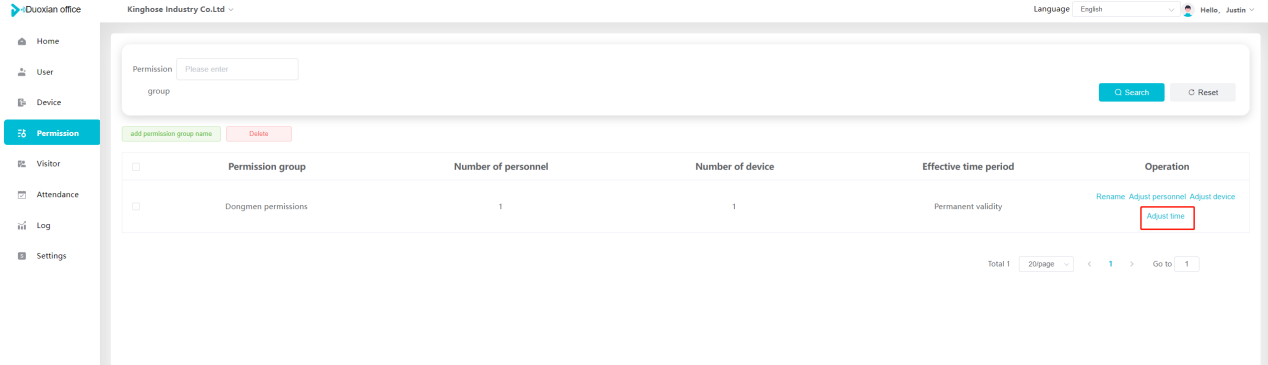 Permanently effective:  Period effective: 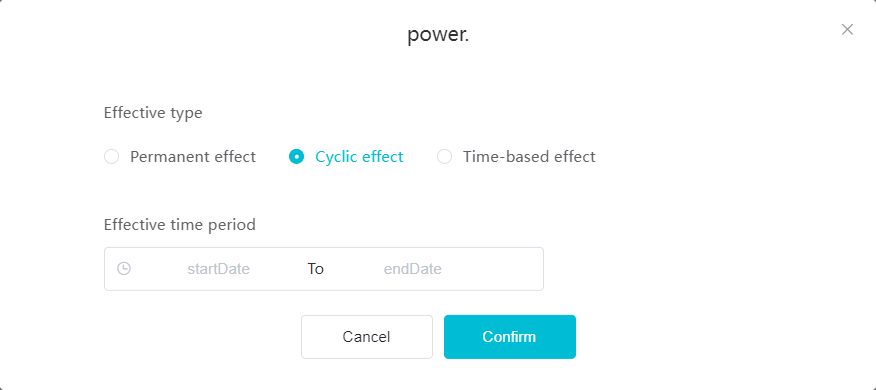 Cycle effective:  ### 5\.4 Delete permission group Check the permission group and click to delete the permission group(Delete permission groups requires that there are no personnel or devices within the permission group). 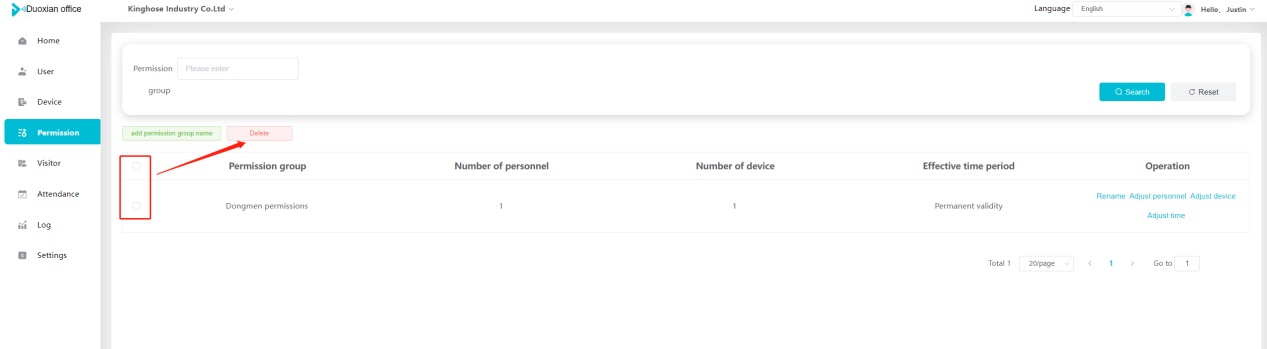 ### 5\.5 Add visitor permission group Enter visitor permissions. Click \[Add Permission Group] to pop up the window. Enter the name of the permission group and click \[Confirm] to add a visitor permission group. When adding new visitors or agreeing to visitor applications, can choose a visitor permission group with devices. The corresponding visitor has the permissions of the devices in the visitor permission group. 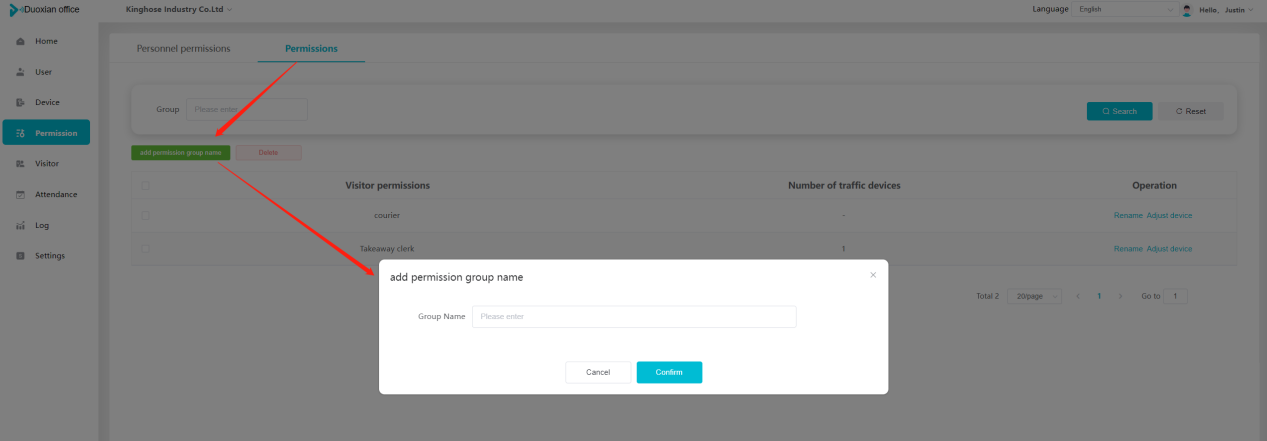 ## Visitor management Organization administrators can authorize visitors, invite visitors, review visitor applications, and other operations. The main content of this chapter: * 1. Visitor authorization 2. Invite visitor 3. Visitor application 4. Delete visitor 5. Review visitor ### 6\.1 Visitor authorization Click and go to \[Permission Management \- Visitor Permissions] to add a visitor permission group here. Details can be found in 5\.5 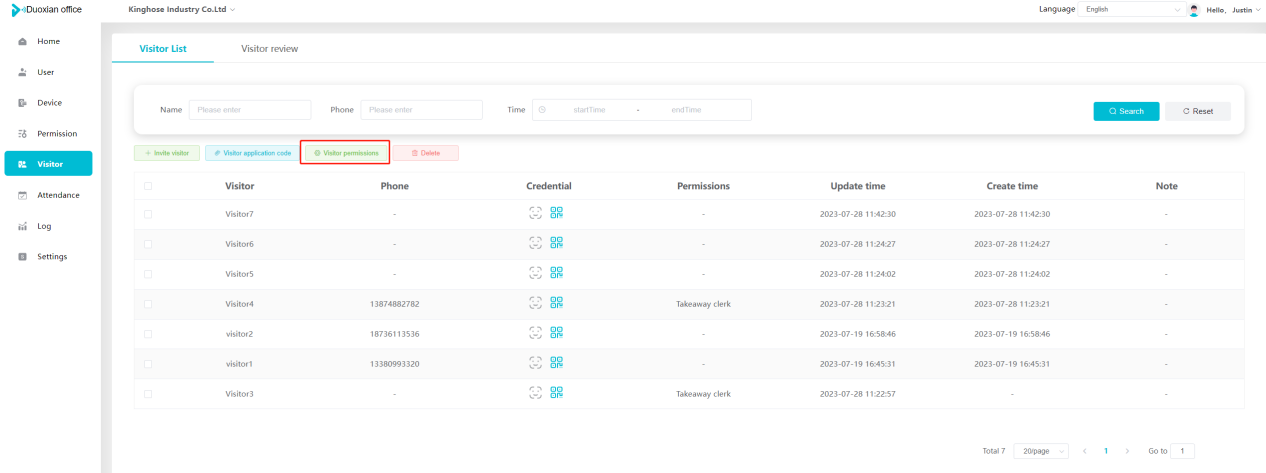 ### 6\.2 Invite visitor Step 1:Click \[Invite Visitor]to pop up the invite window. Step 2:Enter the visitor's name and phone number/email, select the corresponding visitor permission group, select the visit time, and click \[Confirm]. Step 3:After successful addition, click \[Copy Link] and send the link to the visitor. Visitor can use browser to generate a visitor code, which can use to access. 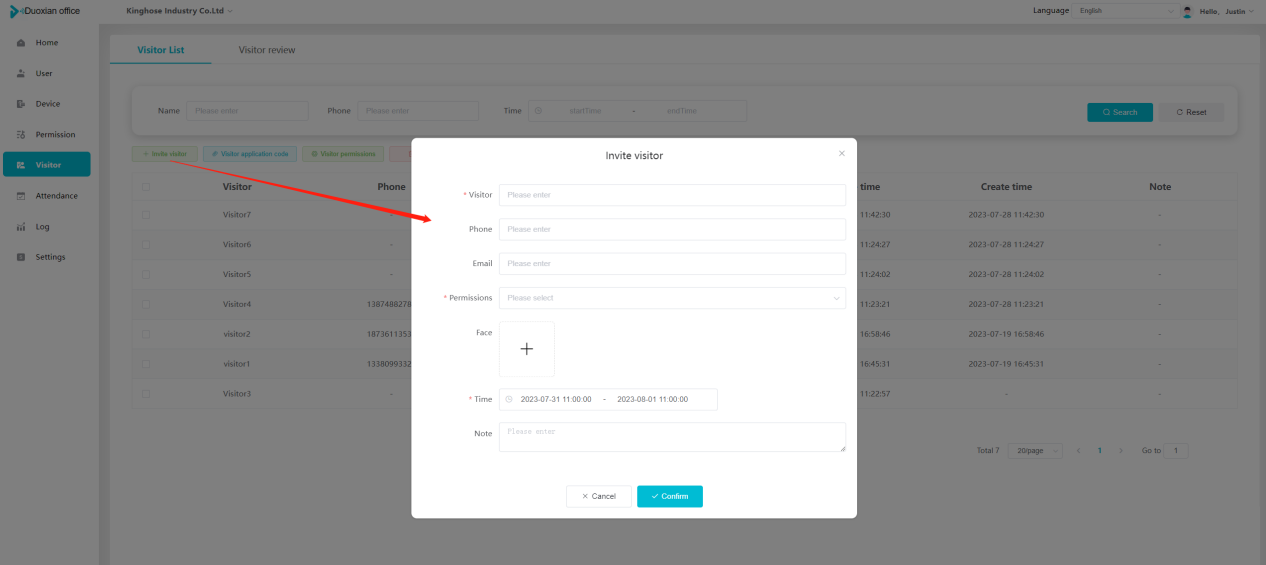 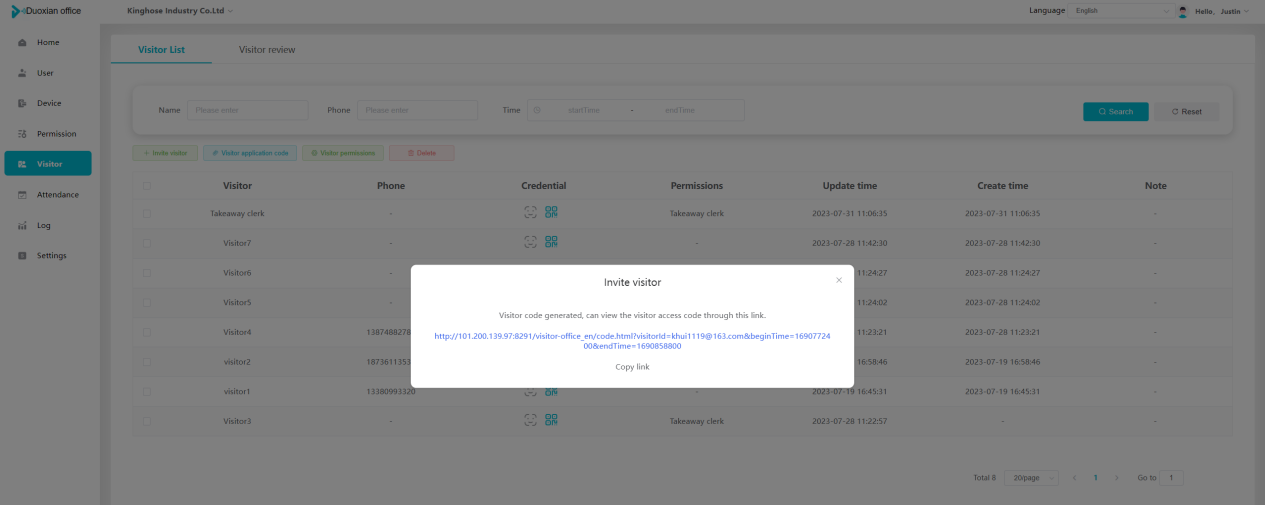 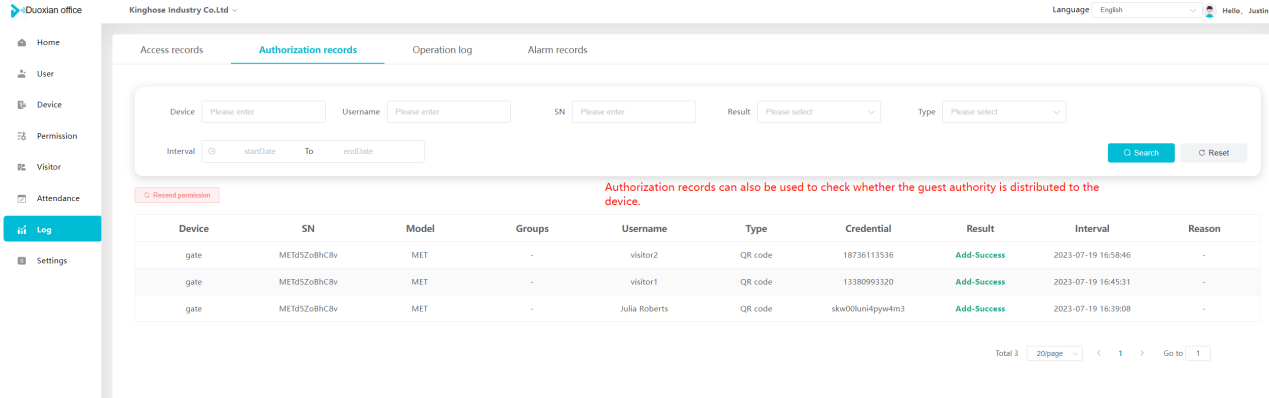 ### 6\.3 Visitor application Visitors can scan the visitor application code and fill in information to apply for access. Step 1:Click \[Visitor Application Code] to pop up the window. Step 2:Visitors use their mobile phones to scan the application code. The mobile browser will open a visitor application page, where they can enter the required name and visit time. Step 3:Click to submit the application. After the application is successful, the administrator can see the visitor in the pending review status on the visitor list page. At this time, the administrator needs to review and approve the visitor. If the visitor filled in is an ordinary person, ordinary people can also log in to the mini program for review. 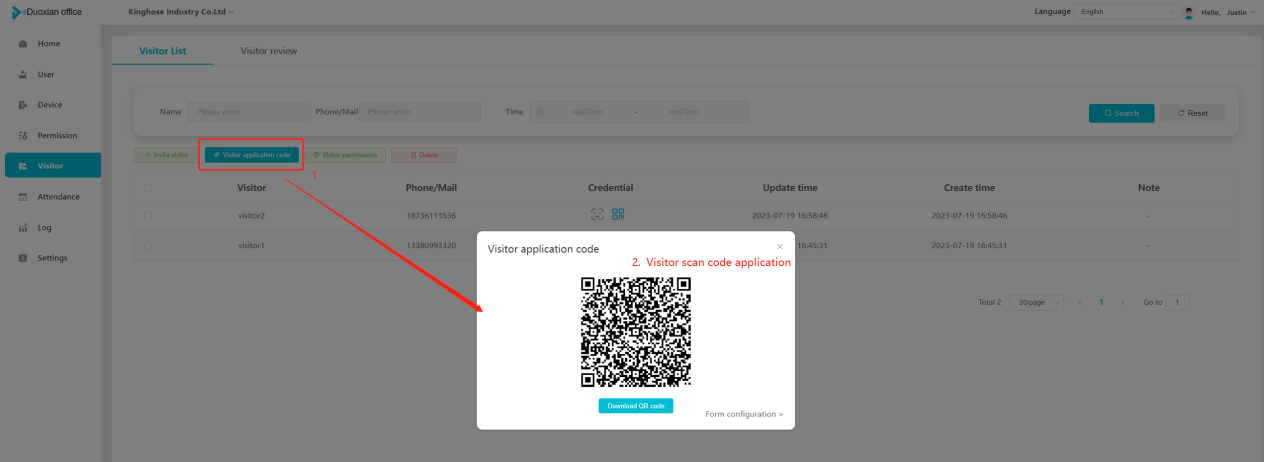 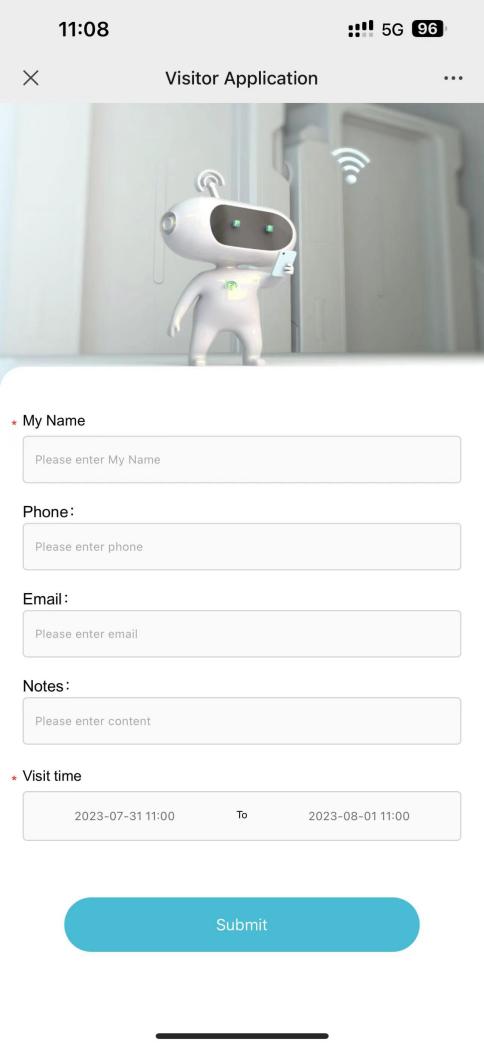 When the administrator agrees, the corresponding visitor permission group needs to be selected. After confirmation, a visitor code will be generated, and the visitor's permissions will also be distributed to the device accordingly. Send the visitor code to the visitor, and they can access. 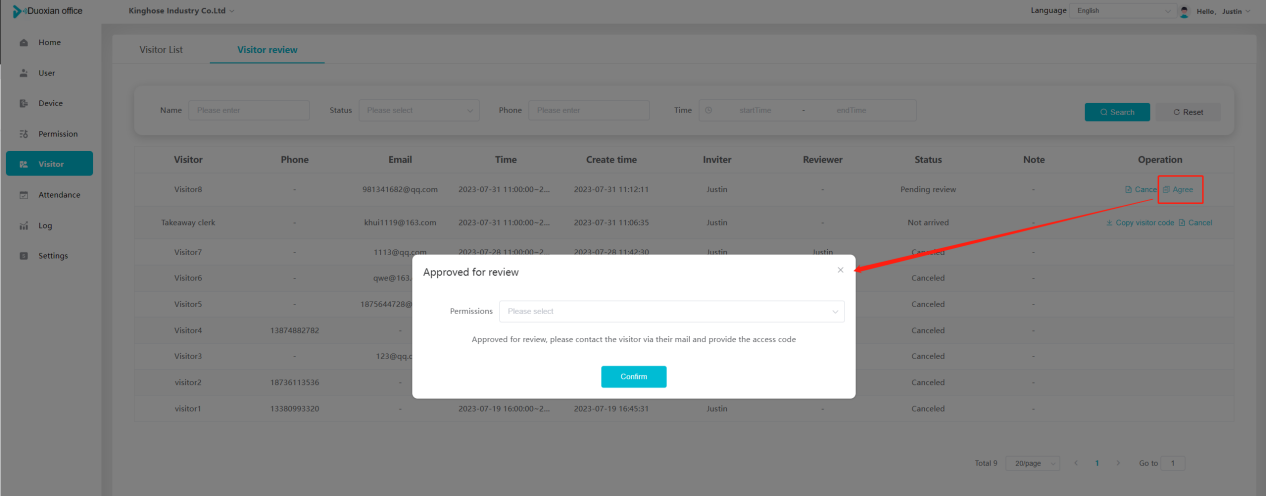 ### 6\.4 Delete Check the visitor and click \[Delete] to delete the visitor. 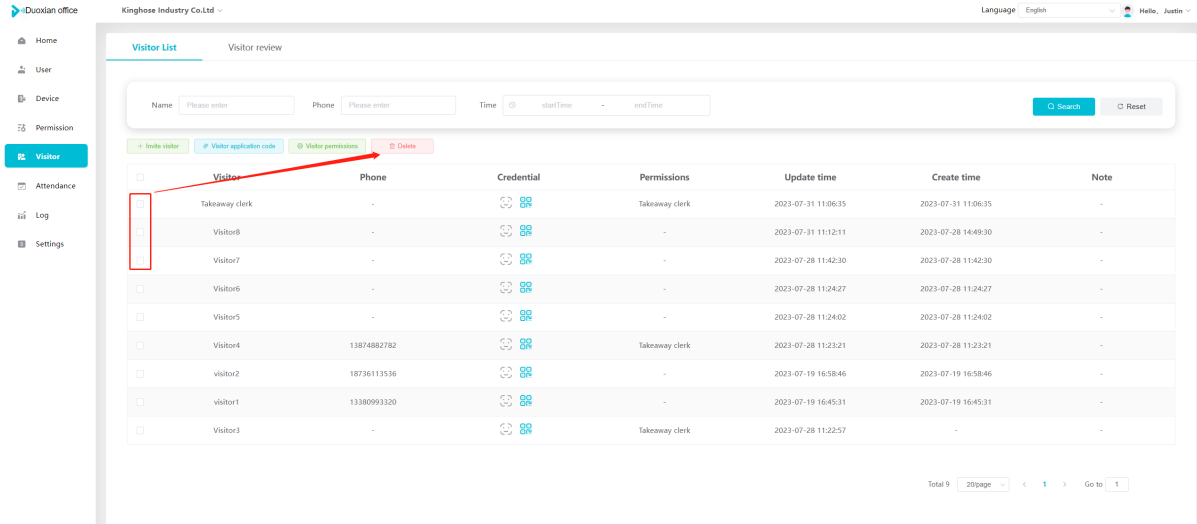 ### 6\.5 Review visitor Visitors who apply through QR codes will have their application records displayed on the visitor review page. Click \[Agree] and select the visitor permission group, visitors can access. Click \[Cancel] to cancel the visitor's application, visitors cannot access. 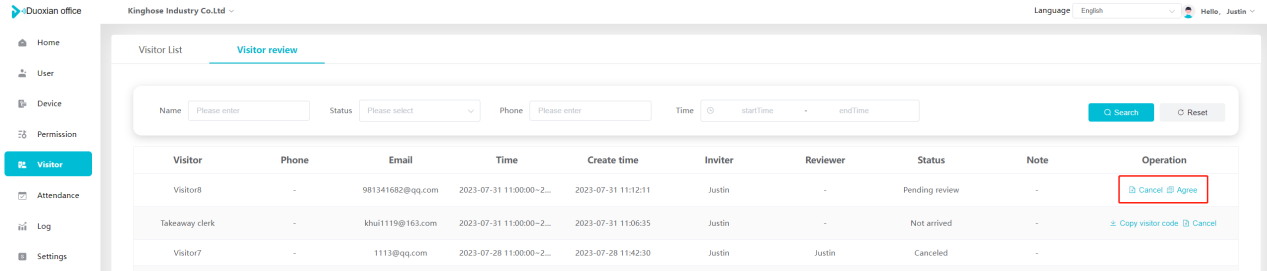 ## Attendance management Organization administrators can view the attendance information of each person within the organization. The main content of this chapter: * 1. Attendance details 2. Attendance statistics ### 7\.1 Attendance details Attendance details display the daily attendance record details of each person, including clock in device, clock out device, clock in time, clock in time, work hours, late hours, early leave hours, and support for exporting data. The working hours, early leave hours, and late hours are calculated based on the set working hours and clock in times. Set a time period to determine whether to be late or leave early based on morning and afternoon. If the check\-in time is later than the start time in the morning, it means being late, and if the check\-in time is earlier than the end time in the afternoon, it means leaving early. 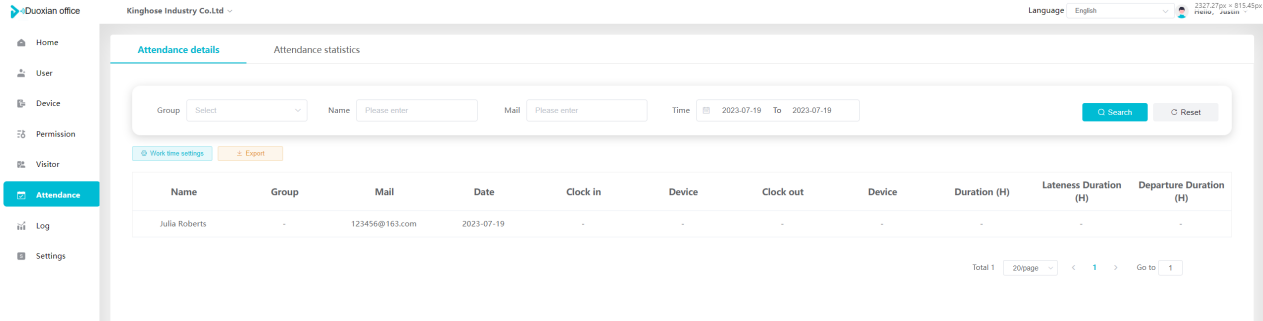 ### 7\.2 Attendance statistics Attendance statistics default to displaying the attendance days, working hours, tardiness times, tardiness hours, early leave times, and early leave hours of each person in the current month. Can search for previous attendance data by modifying the time and support exporting the data. 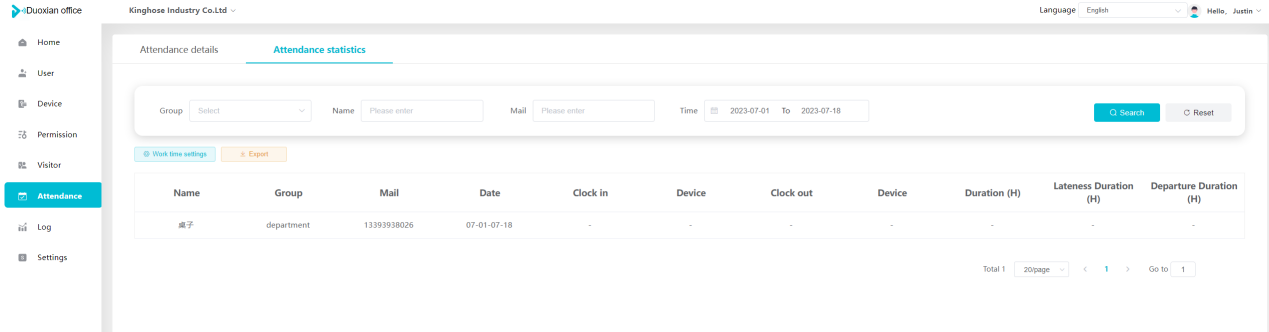 ## Log This chapter mainly records various operation logs conducted within the organization, including access records, authorization records, operation records, and warning records. The main content of this chapter: 8\.1 Access records. 8\.2 Authorization records. 8\.3 Operation log. 8\.4 Warning records. ### 8\.1 Access records Display the access records of personnel and visitors from various organizations, including device for personnel access. The modes of access include remote door opening, face recognition, card swiping, and QR code. Face has a photo, can click to enlarge the photo. Click \[Export] to export the access records based on the filtering criteria. 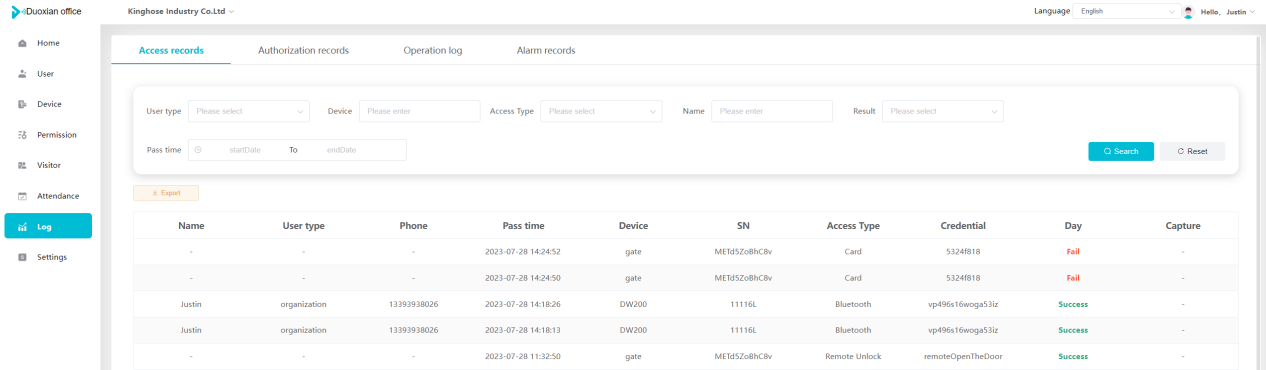 ### 8\.2 Authorization records Display authorization records for each personnel. Can view the authorization records of personnel's credentials on one or more devices. Personnel's credentials include face, cards, license plates, and QR codes. Can also view whether the distribution of personnel permissions was successful or failed, whether to add or delete permissions. Click \[Resend] to resend or delete failed permissions. 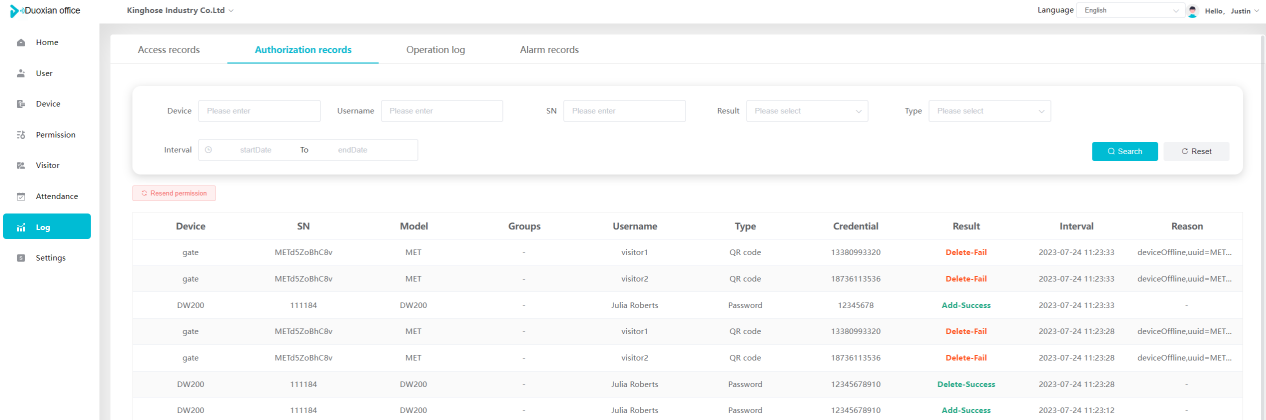 ### 8\.3 Operation log Display the operation logs of each functional module, including account management, personnel management, device management, visitor management, permission management, log recording, and system settings. Click \[Export]to export the operation log based on the filtering criteria. 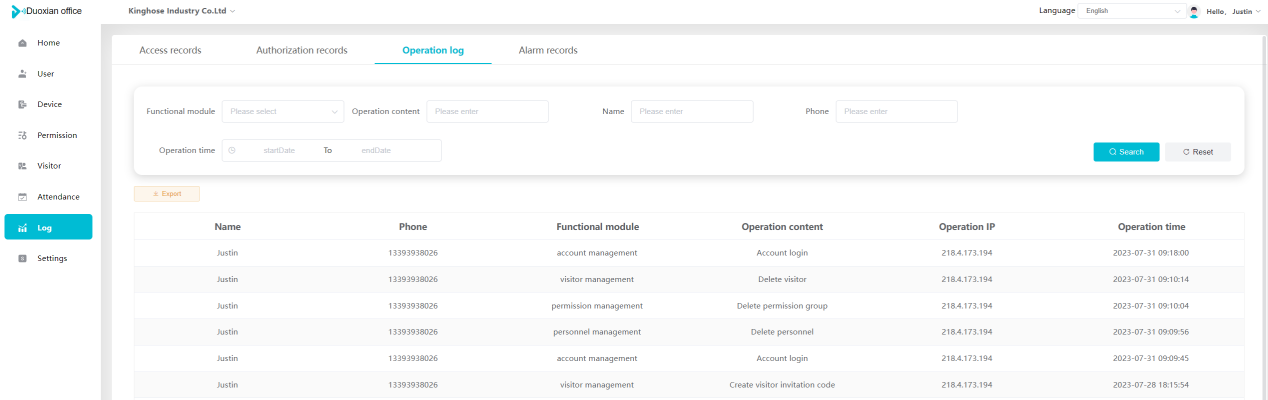 ### 8\.4 Warning records Display the warning records reported by each device, and different devices will report different warning records. The warning level is divided into three types: low, medium, and high. The warning types are divided into multiple failed passes, illegal door opening, fire alarm, magnetic door opening, magnetic door closing, device online, and device offline. Click \[Export] to export warning records based on filtering criteria. 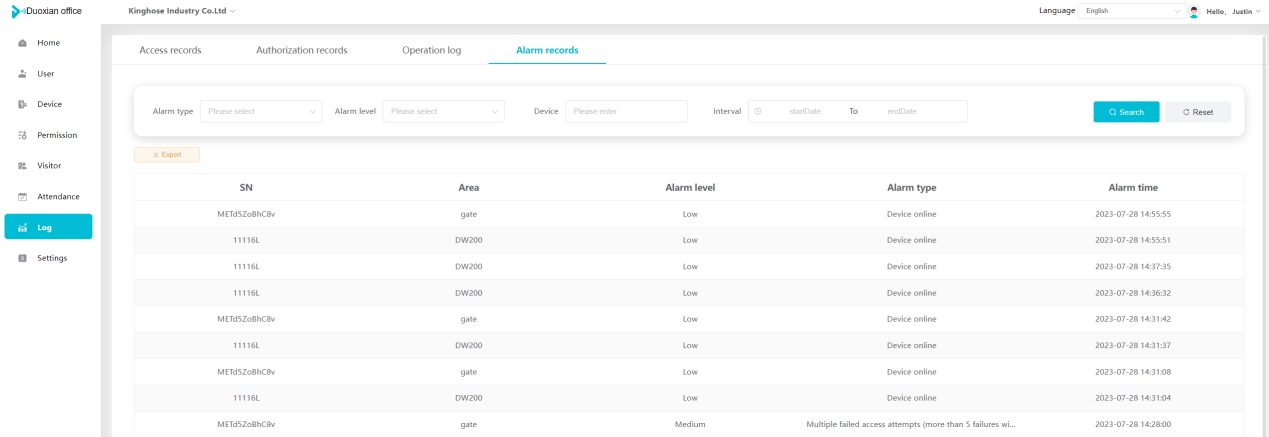 ## System settings Can view personal and organizational information of the organization's super management, and disable the configuration of QR codes and visitor forms. The main content of this chapter: 9\.1 System settings 9\.2 Form configuration ### 9\.1 System settings It is divided into two parts: account information and account settings. The account information displays the personal information and organization name of the organization's super management, including the name of the organization administrator, administrator email, organization name, organization ID, appKey, appSecret, and version number. After super management login, the organization name can be modified. 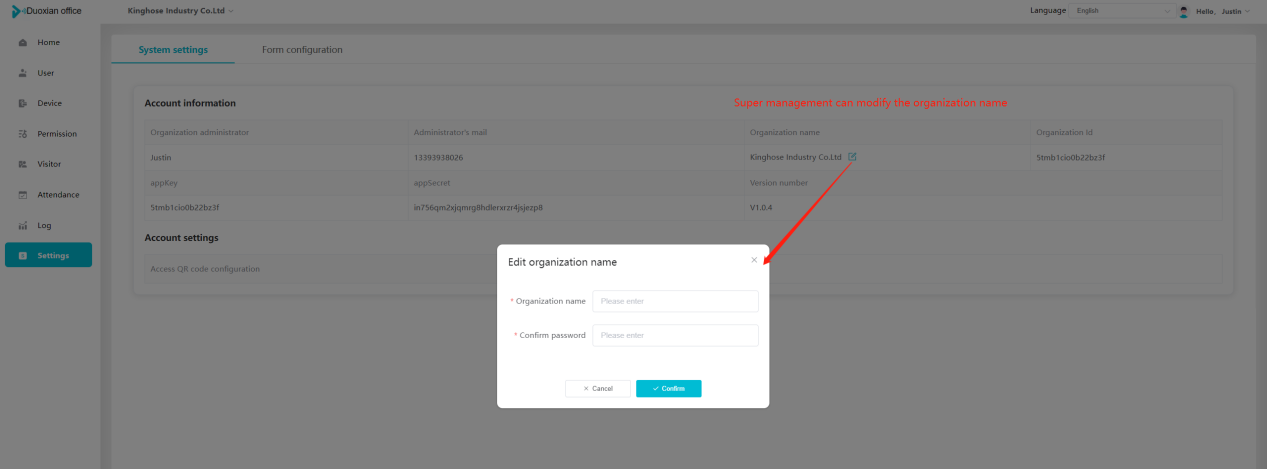 The account settings can adjust the access QR code of the mini program. By default, the Vguang dynamic code is checked, and the adjusted effect is as follows: 1. Only check the Vguang dynamic code, the mini program access code only displays Vguang dynamic code. 2. Only check the static transparent code, the mini program access code only displays Vguang transparent code. 3. Display the Vguang dynamic code and static transparent code, the mini program access code displays the Vguang dynamic code. 4. If neither option is checked, the mini program access code will not be displayed. Note: After removing the check mark, the corresponding QR code permissions previously issued will trigger deletion. 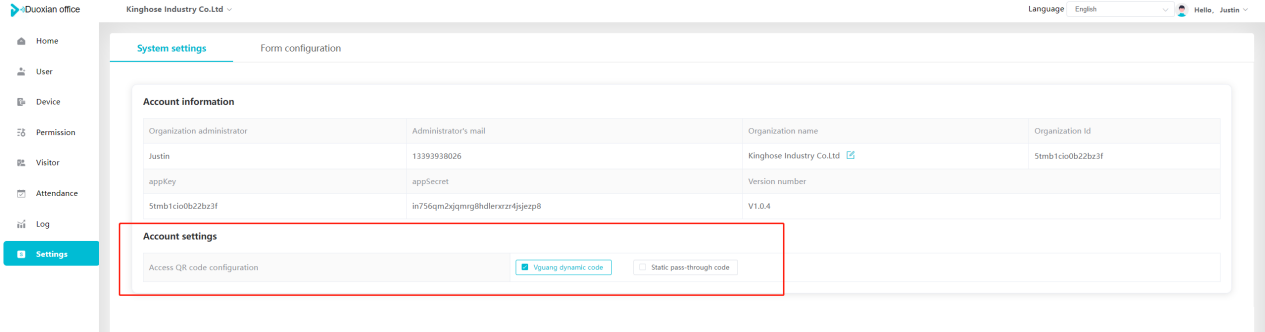 ### 9\.2 Form configuration Visitor invitation forms can be set up. Name, phone number, email, and access time are fixed items that cannot be changed. Options can be set to open or close, including the respondent, respondent's phone number/email, and notes. After closing and saving, the visitor invitation form does not have these filling items. 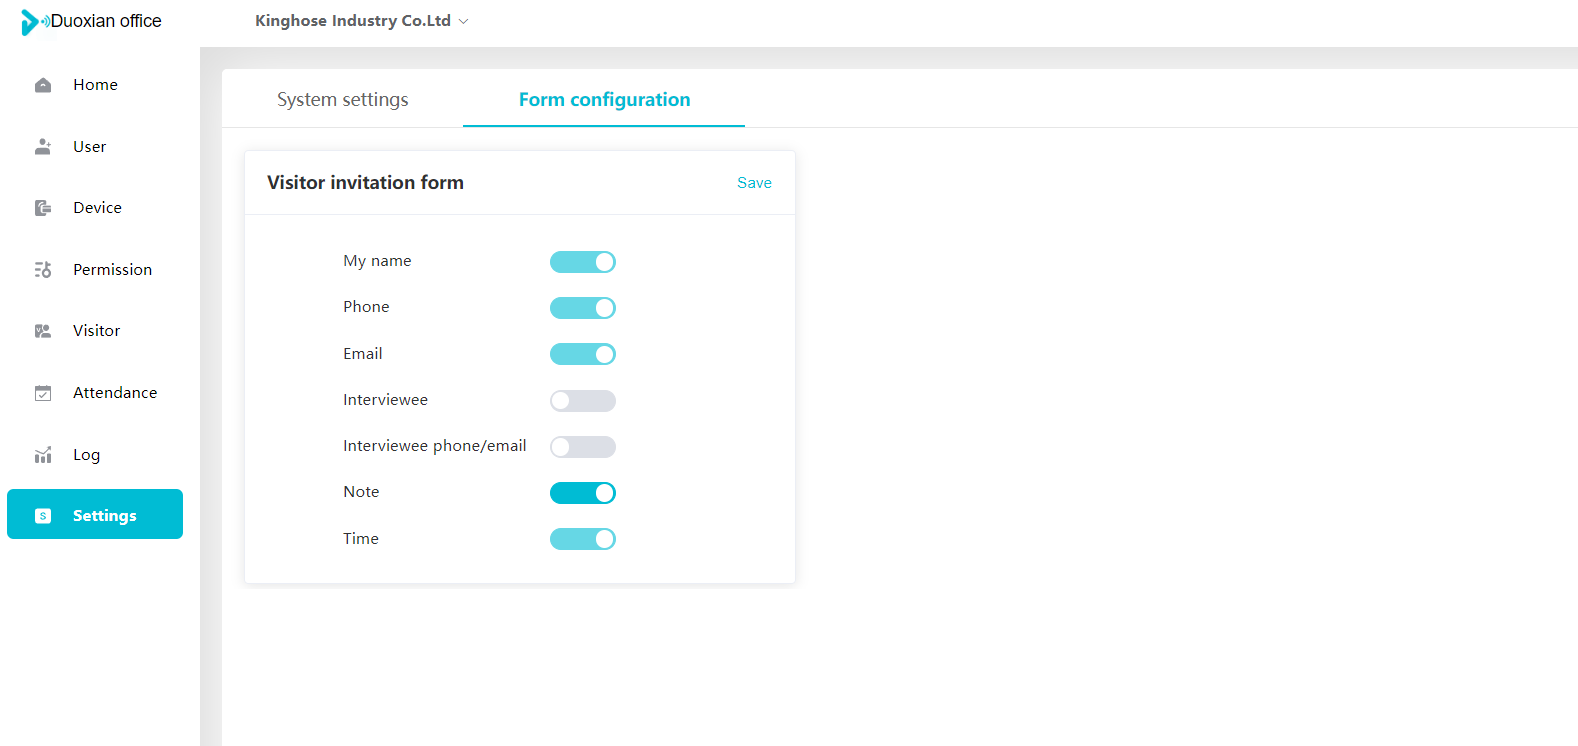
王雅伦
2024年12月6日 16:28
59
转发文档
收藏文档
上一篇
下一篇
手机扫码
复制链接
手机扫一扫转发分享
复制链接
Markdown文件
Word文件
PDF文档
PDF文档(打印)
分享
链接
类型
密码
更新密码
有效期